qidao123.com ToB IT社区-企服评测·应用市场
标题:
ES(Elasticsearch)的根本使用
[打印本页]
作者:
飞不高
时间:
2024-7-18 21:25
标题:
ES(Elasticsearch)的根本使用
一、常见的NoSQL办理方案
1、redis
Redis是一个基于内存的 key-value 结构数据库。Redis是一款采用key-value数据存储格式的内存级NoSQL数据库,重点关注数据存储格式,是key-value格式,也就是键值对的存储情势。与MySQL数据库差别,MySQL数据库有表、有字段、有记载,Redis没有这些东西,就是一个名称对应一个值,并且数据以存储在内存中使用为主。redis的根本使用
2、mongodb
MongoDB可以在内存中存储类似
对象
的数据并实现数据的快速访问。
使用Redis技能可以有效的提高数据访问速度,但是由于Redis的数据格式单一性,无法操作结构化数据,当操作对象型的数据时,Redis就显得左支右绌。在保障访问速度的情况下,如果想操作结构化数据,看来Redis无法满足要求了,此时需要使用全新的
数据存储
竣事来办理此题目,即MongoDB技能。mongodb的根本使用
3、ES(Elasticsearch)
ES(Elasticsearch)是一个分布式全文搜刮引擎,重点是全文搜刮。
二、ES的使用
ES简介
es是由Apache开源的一个兼有
搜刮引擎和NoSQL数据库功能
的系统,其特点紧张如下。
基于Java/Lucene构建,支持全文搜刮、结构化搜刮(应用于加速数据的查询)
低耽误,支持及时搜刮
分布式部署,可横向集群扩展
支持百万级数据
支持多条件复杂查询,如聚合查询
高可用性,数据可以进行切片备份
支持Restful风格的api调用
全文搜刮
全文搜刮的理解:
比如用户要在淘宝上买一本书(Java开发),那么他就可以以Java为关键字进行搜刮,不管是书名中还是书的介绍中,甚至是书的作者名字,只要包含java就作为查询结果返回给用户查看。这就可以理解为全文搜刮。
搜刮的条件不再是仅用于对某一个字段进行比对,而是在一条数据中使用搜刮条件去比对更多的字段,只要能匹配上就列入查询结果,这就是全文搜刮的目标。而ES技能就是一种可以实现上述结果的技能。
全文搜刮的实现:
要实现全文搜刮的结果,不大概使用数据库中like操作去进行比对,这种效率太低了。ES计划了一种全新的头脑,来实现全文搜刮。具体操作过程如下:
将
被查询的字段的数据
全部文本信息进行
拆分
,分成若干个词
例如“中华人民共和国”就会被拆分成三个词,分别是“中华”、“人民”、“共和国”,此过程有专业术语叫做分词。分词的策略差别,分出的结果不一样,差别的分词策略称为分词器。
将分词得到的结果存储起来,对应每条数据的id
例如id为1的数据中名称这一项的值是“中华人民共和国”,那么分词竣过后,就会出现“中华”对应id为1,“人民”对应id为1,“共和国”对应id为1
例如id为2的数据中名称这一项的值是“人民代表大会“,那么分词竣过后,就会出现“人民”对应id为2,“代表”对应id为2,“大会”对应id为2
此时就会出现如下对应结果,按照上述情势可以对所有文档进行分词。需要注意分词的过程
不是仅对一个字段
进行,而是
对每一个参与查询的字段
都执行,最闭幕果汇总到一个表格中
分词结果关键字对应id中华1人民1,2共和国1代表2大会2
当进行查询时,如果输入“人民”作为查询条件,可以通过上述表格数据进行比对,得到id值1,2,然后根据id值就可以得到查询的结果数据了。
上述过程中
分词结果关键字
内容每一个都不雷同,作用有点
类似于数据库中的索引
,是用来
加速数据查询
的。
但是
数据库中的索引
是对某一个字段进行添加索引,而这里的
分词结果关键字
不是一个完备的字段值,只是一个字段中的其中的一部分内容。并且索引使用时是根据索引内容查找整条数据,全文搜刮中的分词结果关键字查询后得到的并不是整条的数据,而是数据的id,要想获得具体数据还要再次查询,因此这里为这种分词结果关键字起了一个全新的名称,叫做
倒排索引
。
ES的应用场景
ES作为全文检索的搜刮引擎,在以下几个方面都存在着相应的应用:
监控。针对日志类数据进行存储、分析、可视化。针对日志数据,ES给出了ELK的办理方案。其中logstash收罗日志,ES进行复杂的数据分析,kibana进行可视化展示。
电商网站。用于商品信息检索。
Json文档数据库。用于存放json格式的文档
维基百科。提供全文搜刮并高亮关键字
Es的windows版安装
windows版安装包下载地址:https://www.elastic.co/cn/downloads/elasticsearch
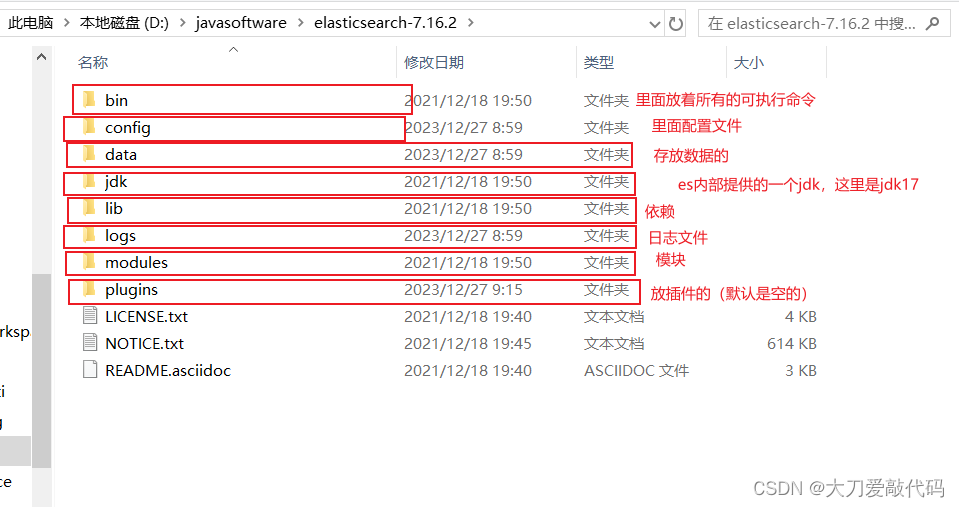
下载zip文件,然后直接解压即可,解压完的目录如下:(data目录,是使用了数据库后自己给你创建的,里面的存放的就是你ES数据库的文件)
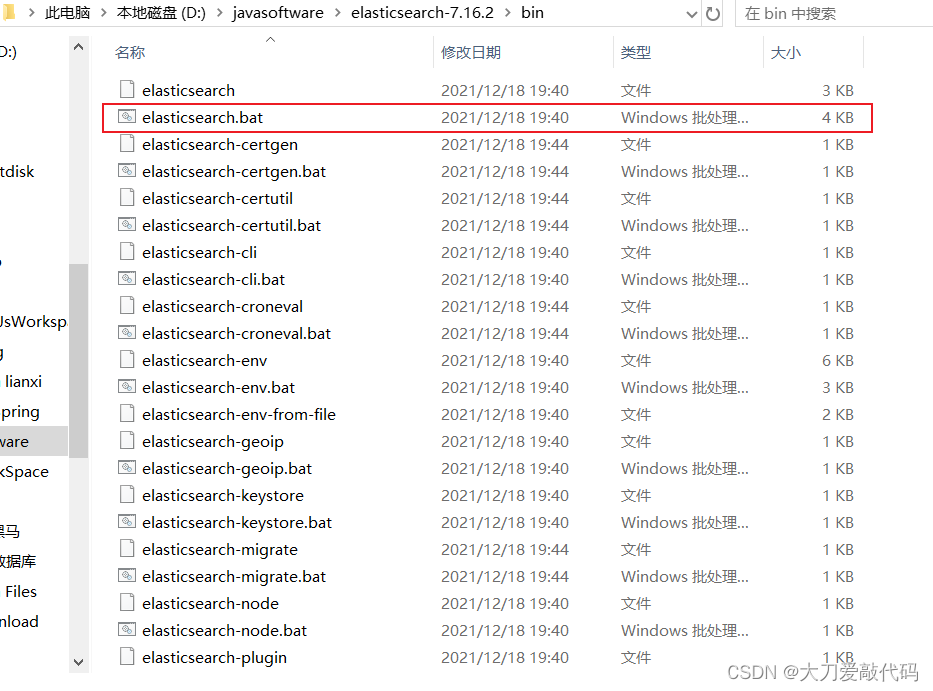
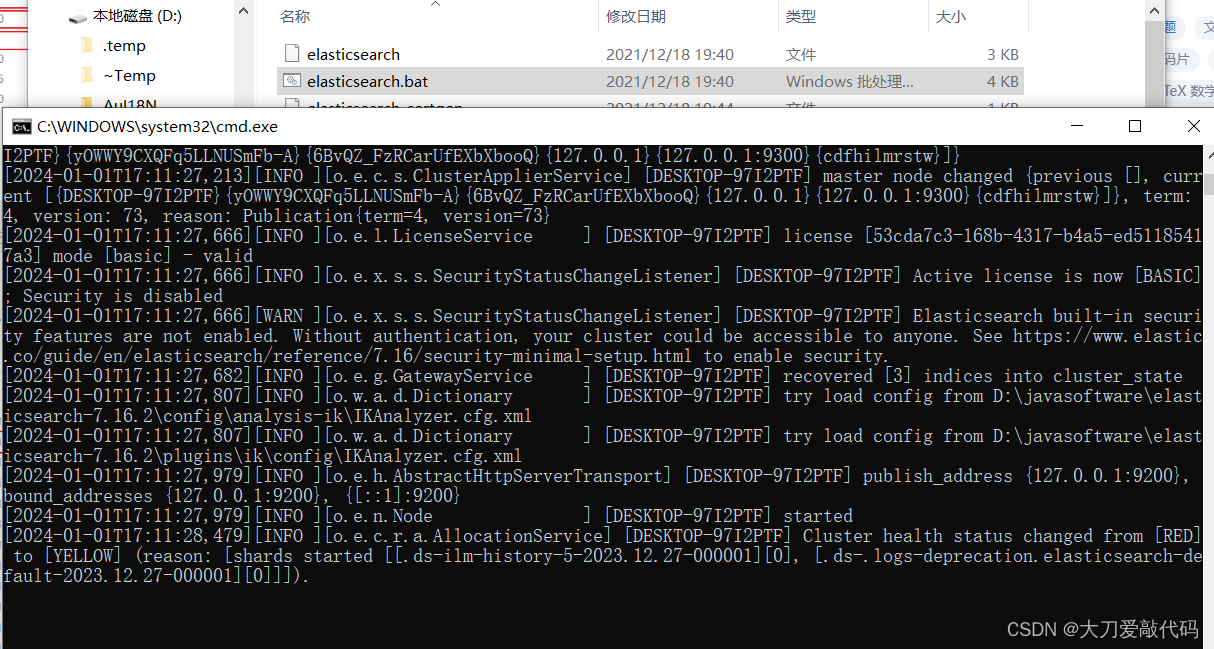
ES的运行:在bin目录下,双击elasticserach.bat文件。(默认端口号:9200)
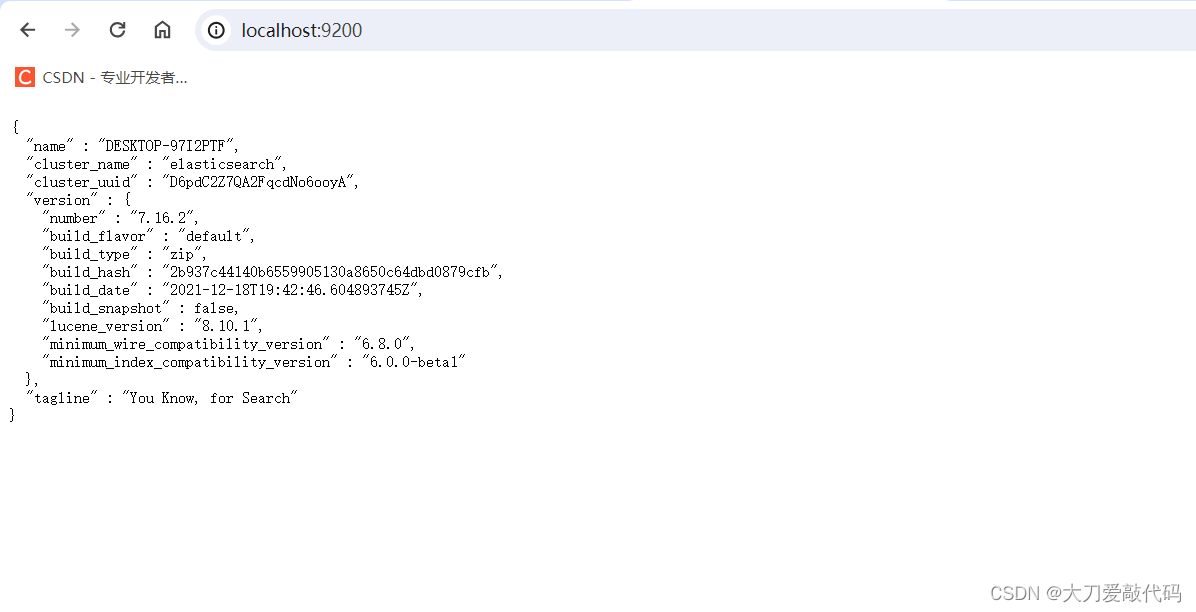
然后访问:http://localhost:9200/,看到下面的json数据后,表示es已经启动成功。
ES的基础操作
ES的基础操作-----索引操作
对于mysql数据库,我们一般需要创建数据库之后才能继承操作,而ES则需要创建
索引
之后才能继承操作。
对于es的操作,我们只需要发web哀求就可以了。要操作ES可以通过Rest风格的哀求来进行(由于它支持rest风格,可以使用postman进行操作),也就是说发送一个哀求就可以执行一个操作。比如新建索引,删除索引这些操作都可以使用发送哀求的情势来进行。
ES中保存的数据,只是格式和数据库存储的数据格式 与我们的mysql等数据库差别而已。
在ES中我们要先创建倒排索引,这个索引的
功能
又有点类似于数据库的表。
然后将数据添加到倒排索引中,添加的数据称为文档。
所以要进行ES的操作要先创建索引,再添加文档,这样才能进行后续的查询操作。
不具备分词结果的索引的创建(没有指定分词器)
创建索引:注意这里使用的哀求方式是put而不是post
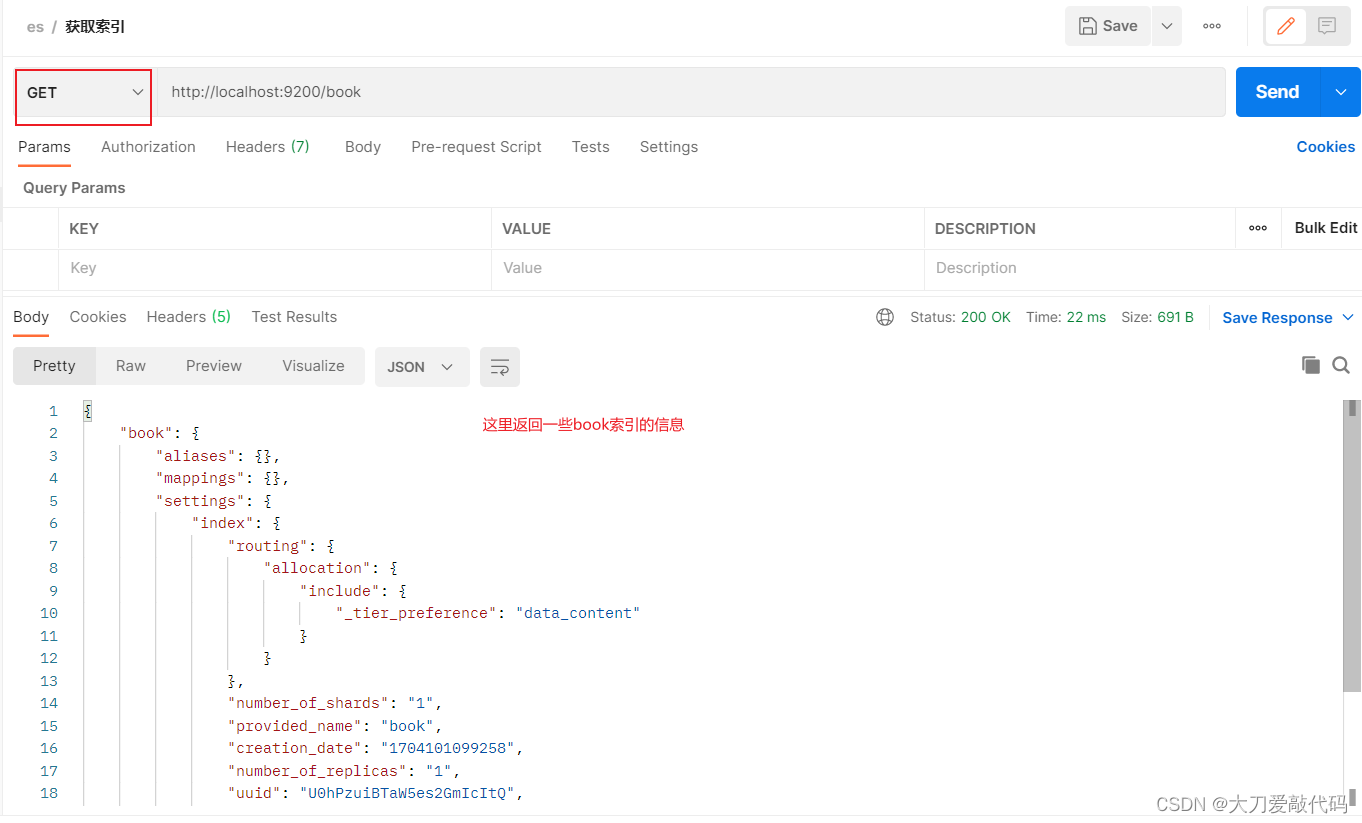
获取索引
获取无分词器的索引返回的信息:
{
"book": {
"aliases": {},
"mappings": {},
"settings": {
"index": {
"routing": {
"allocation": {
"include": {
"_tier_preference": "data_content"
}
}
},
"number_of_shards": "1",
"provided_name": "book",
"creation_date": "1704103713618",
"number_of_replicas": "1",
"uuid": "1mabgD9eR7WvHVZeCBfVqw",
"version": {
"created": "7160299"
}
}
}
}
}
复制代码
删除索引
利用分词器进行创建索引(创建索引并指定分词器)
我们在创建索引时,可以添加哀求参数,设置分词器。
ik分词器的下载:https://github.com/medcl/elasticsearch-analysis-ik/releases
分词器下载后解压到
ES安装目录的plugins目录
中即可,安装分词器后需要重新启动ES服务器。使用IK分词器创建索引格式:
创建带分词器的索引:创建索引并指定规则
参数数据如下:
{
"mappings":{ //mapping表示:定义mappings属性,替换创建索引时对应的mappings属性
"properties":{ // properties表示:定义索引中包含的属性设置(属性是自定义的)
"id":{ // 设置索引中包含id属性(相当于数据库表中创建一个id字段)
"type":"keyword" //设置当前属性为关键字,可以被直接搜索
},
"name":{ // 设置索引中包含name属性
"type":"text", //设置当前属性是文本信息,参与分词
"analyzer":"ik_max_word", //选择当前属性的分词策略,这里表示使用IK分词器进行分词
"copy_to":"all" // 表示把分词结果拷贝到all属性中,即all属性中也有name属性同样的作用
},
"type":{
"type":"keyword"
},
"description":{
"type":"text",
"analyzer":"ik_max_word",
"copy_to":"all"
},
"all":{ //all是一个定义属性(虚拟的属性,数据库中不存在的属性),用来描述多个字段的分词结果集合,当前属性可以参与查询
"type":"text",
"analyzer":"ik_max_word"
}
}
}
}
复制代码
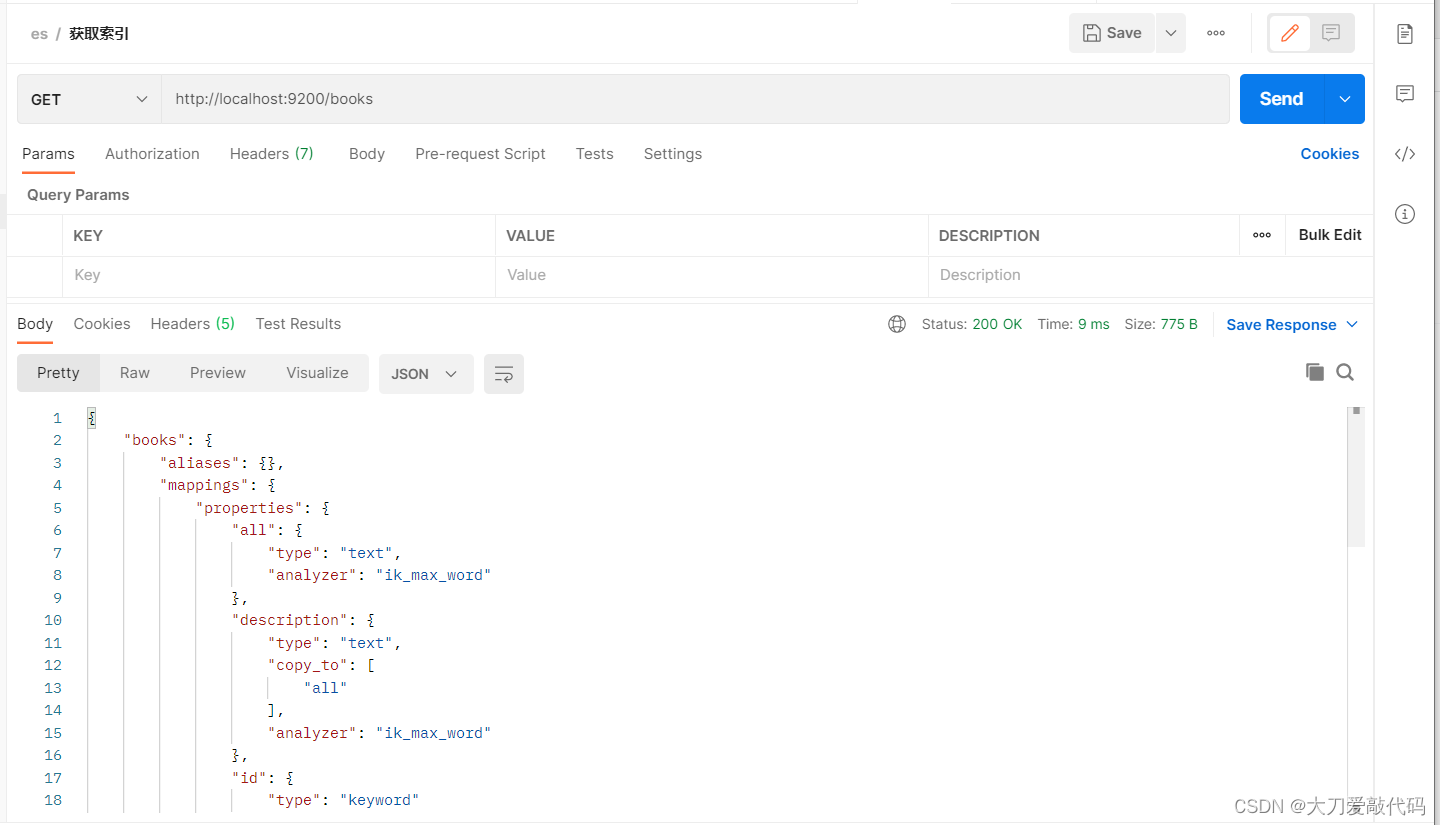
查询带分词器的索引
返回值:(与前面的查询不带分词器的相比,会发现mappings里面多了许多数据信息)
{
"books": {
"aliases": {},
"mappings": { //mappings属性已经被替换
"properties": {
"all": {
"type": "text",
"analyzer": "ik_max_word"
},
"description": {
"type": "text",
"copy_to": [
"all"
],
"analyzer": "ik_max_word"
},
"id": {
"type": "keyword"
},
"name": {
"type": "text",
"copy_to": [
"all"
],
"analyzer": "ik_max_word"
},
"type": {
"type": "keyword"
}
}
},
"settings": {
"index": {
"routing": {
"allocation": {
"include": {
"_tier_preference": "data_content"
}
}
},
"number_of_shards": "1",
"provided_name": "books",
"creation_date": "1704103876876",
"number_of_replicas": "1",
"uuid": "nQ2Jmml6QSOGwOI2cswwJw",
"version": {
"created": "7160299"
}
}
}
}
}
复制代码
ES的基础操作-----文档操作
前面我们已经创建了索引了,但是索引中还没有数据,所以要先添加数据,ES中称数据为文档,下面进行文档操作。
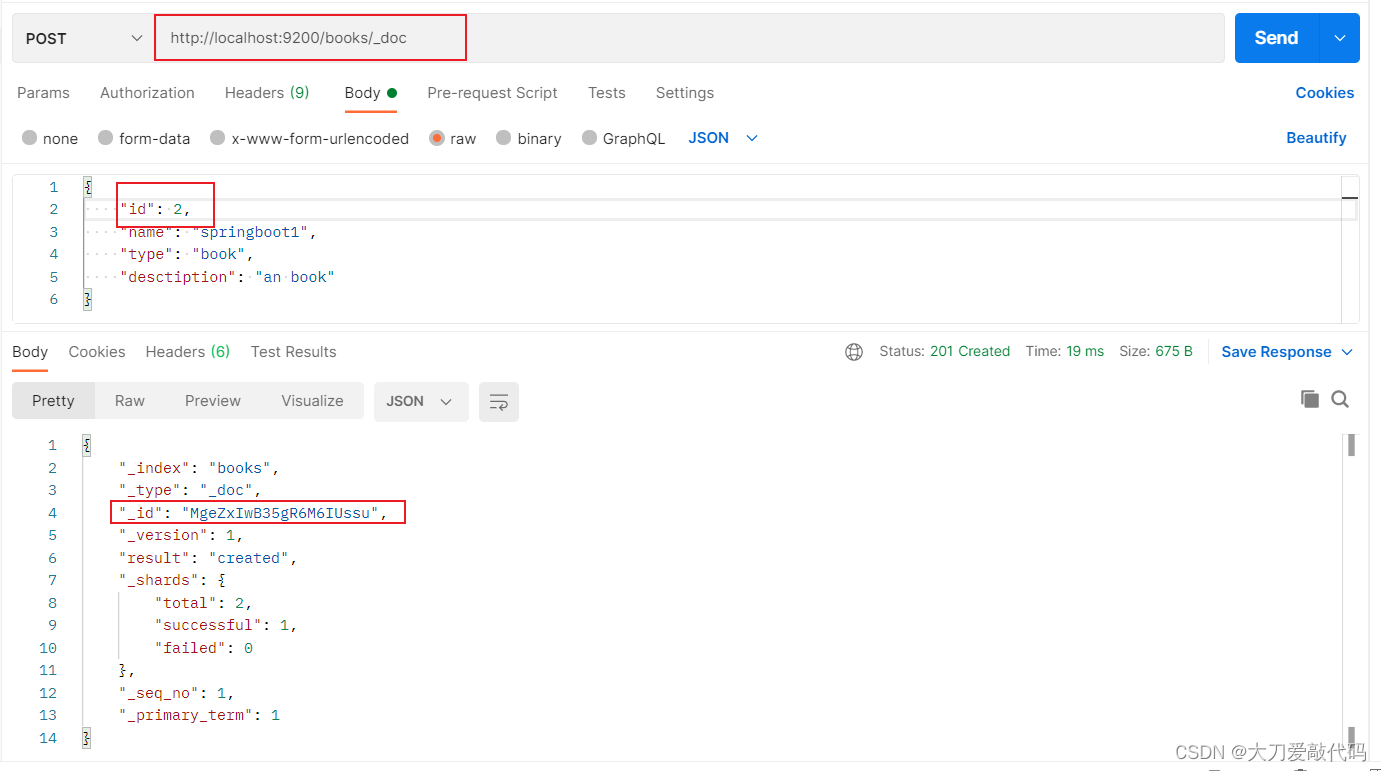
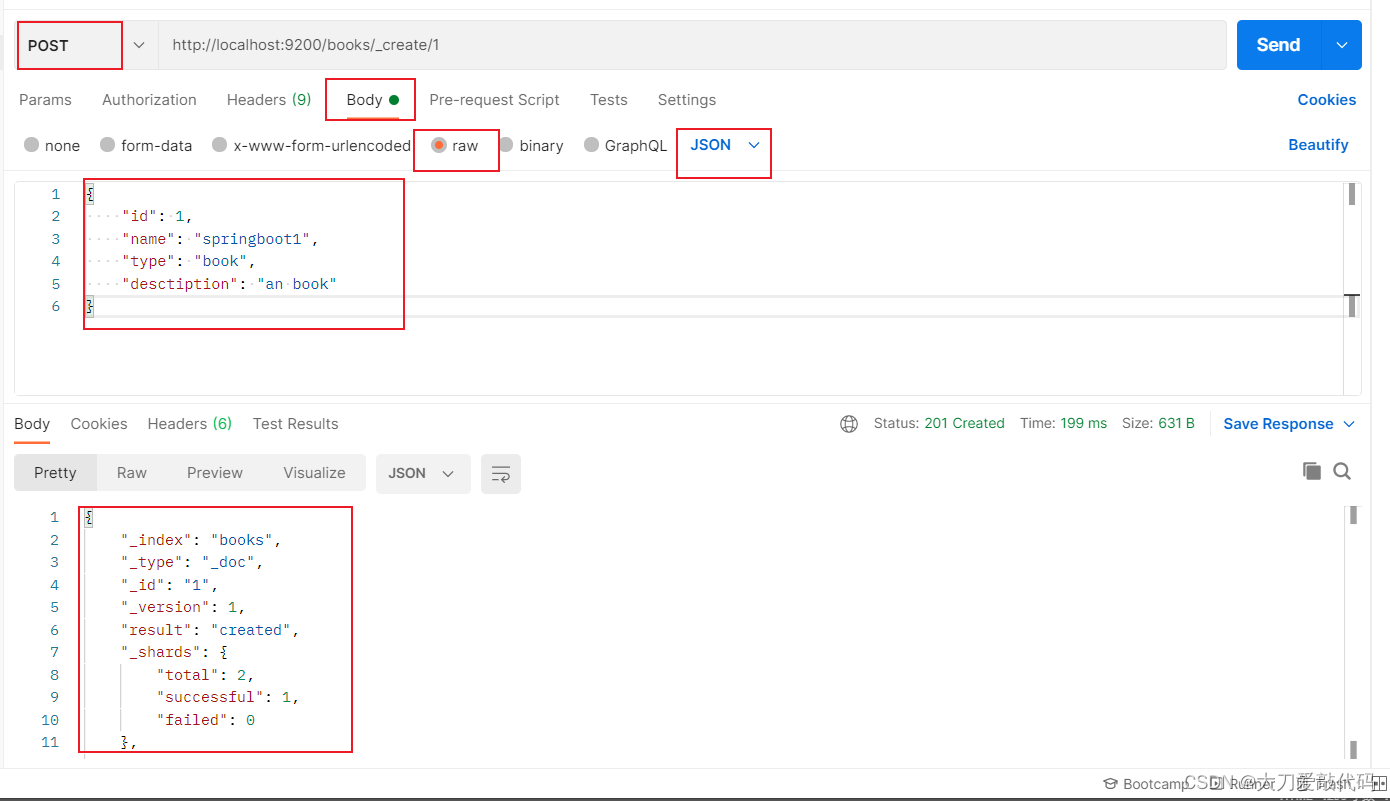
添加文档:
添加文档有三种方式:创建books索引下的文档
POST请求 http://localhost:9200/books/_doc #使用系统生成id(自动帮你创建)
POST请求 http://localhost:9200/books/_doc/1 #使用指定id,不存在创建,存在更新(版本递增)
POST请求 http://localhost:9200/books/_create/1 #使用指定id(必须指定id)
复制代码
传参数据一般不使用id属性:由于指定了也不访问效,要么默认帮你创建,要么在哀求路径上进行指定
参数的使用:
{
"id": 1, //一般不使用这一行
"name": "springboot1",
"type": "book",
"desctiption": "an book"
}
复制代码
第一种哀求方式:
返回结果:
{
"_index": "books",
"_type": "_doc",
"_id": "MgeZxIwB35gR6M6IUssu",
"_version": 1,
"result": "created",
"_shards": {
"total": 2,
"successful": 1,
"failed": 0
},
"_seq_no": 1,
"_primary_term": 1
}
复制代码
第二种哀求方式:
返回结果:
{
"_index": "books",
"_type": "_doc",
"_id": "55",
"_version": 1,
"result": "created",
"_shards": {
"total": 2,
"successful": 1,
"failed": 0
},
"_seq_no": 2,
"_primary_term": 1
}
复制代码
第三种哀求方式:
返回结果:
{
"_index": "books",
"_type": "_doc",
"_id": "1",
"_version": 1,
"result": "created",
"_shards": {
"total": 2,
"successful": 1,
"failed": 0
},
"_seq_no": 0,
"_primary_term": 1
}
复制代码
获取文档
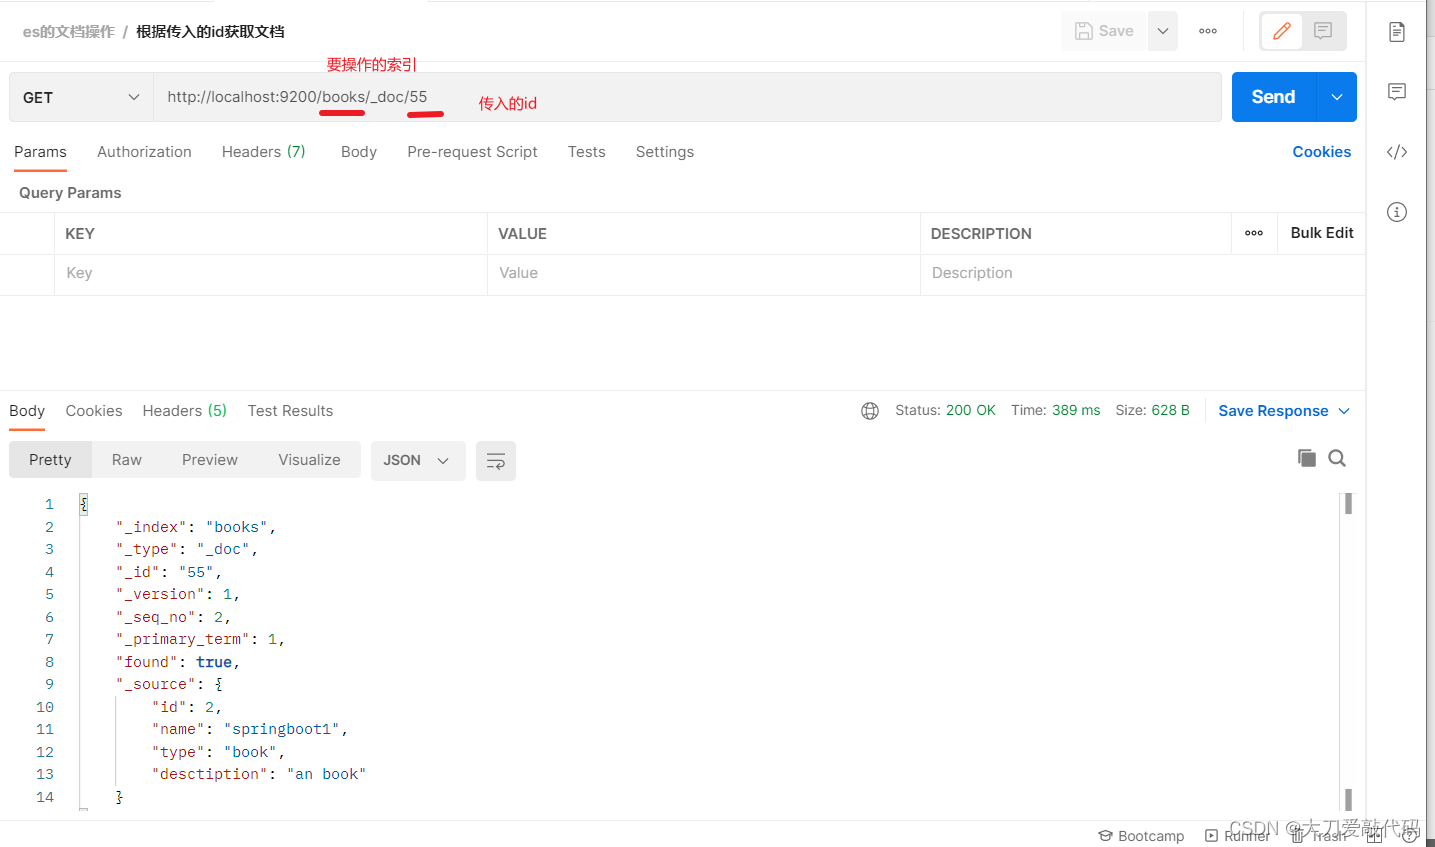
根据id获取某个索引的文档:http://localhost:9200/books/_doc/1
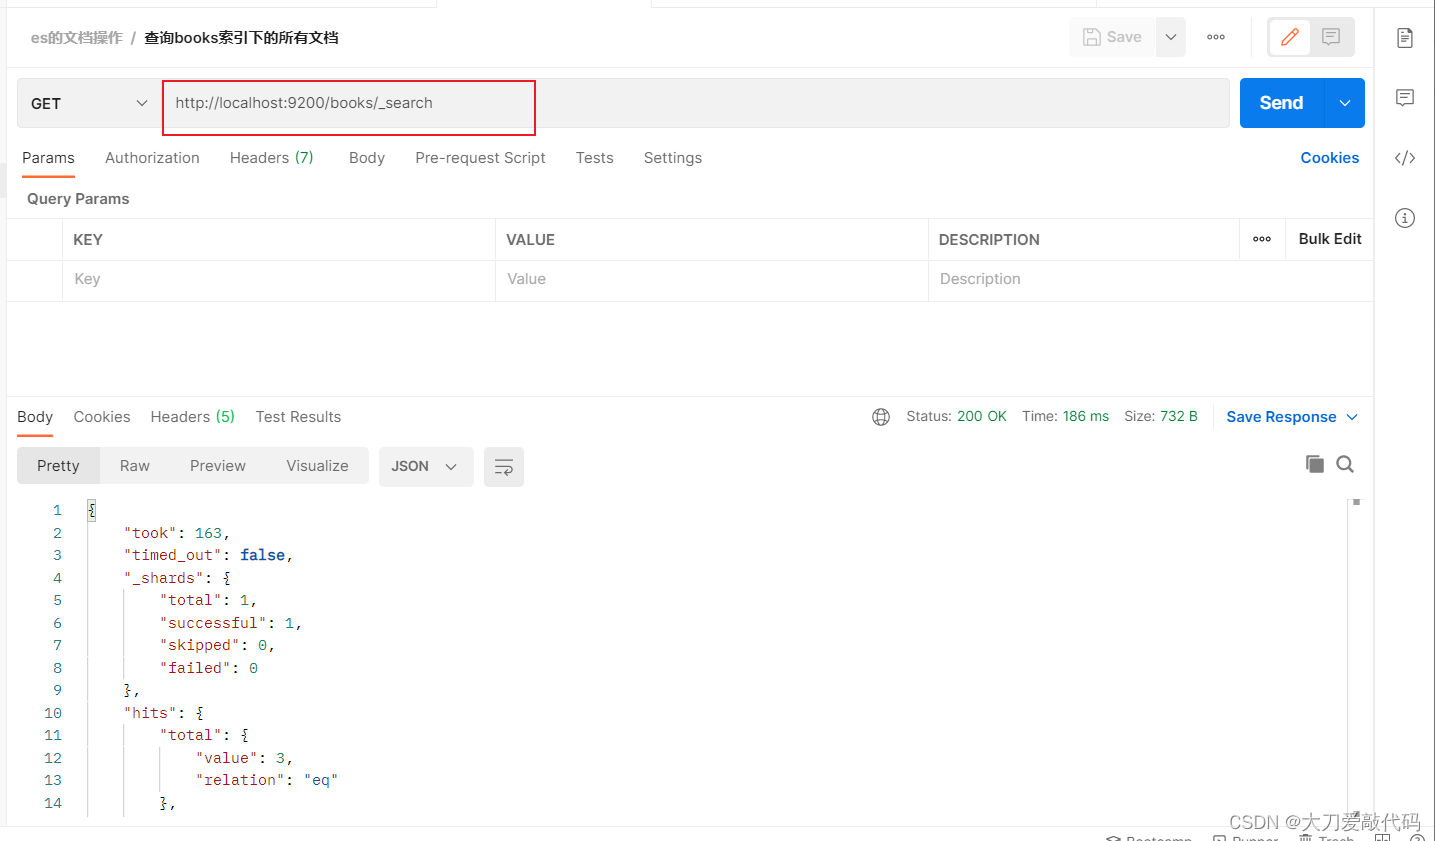
获取某个索引的所有的文档:GET哀求 http://localhost:9200/books/_search
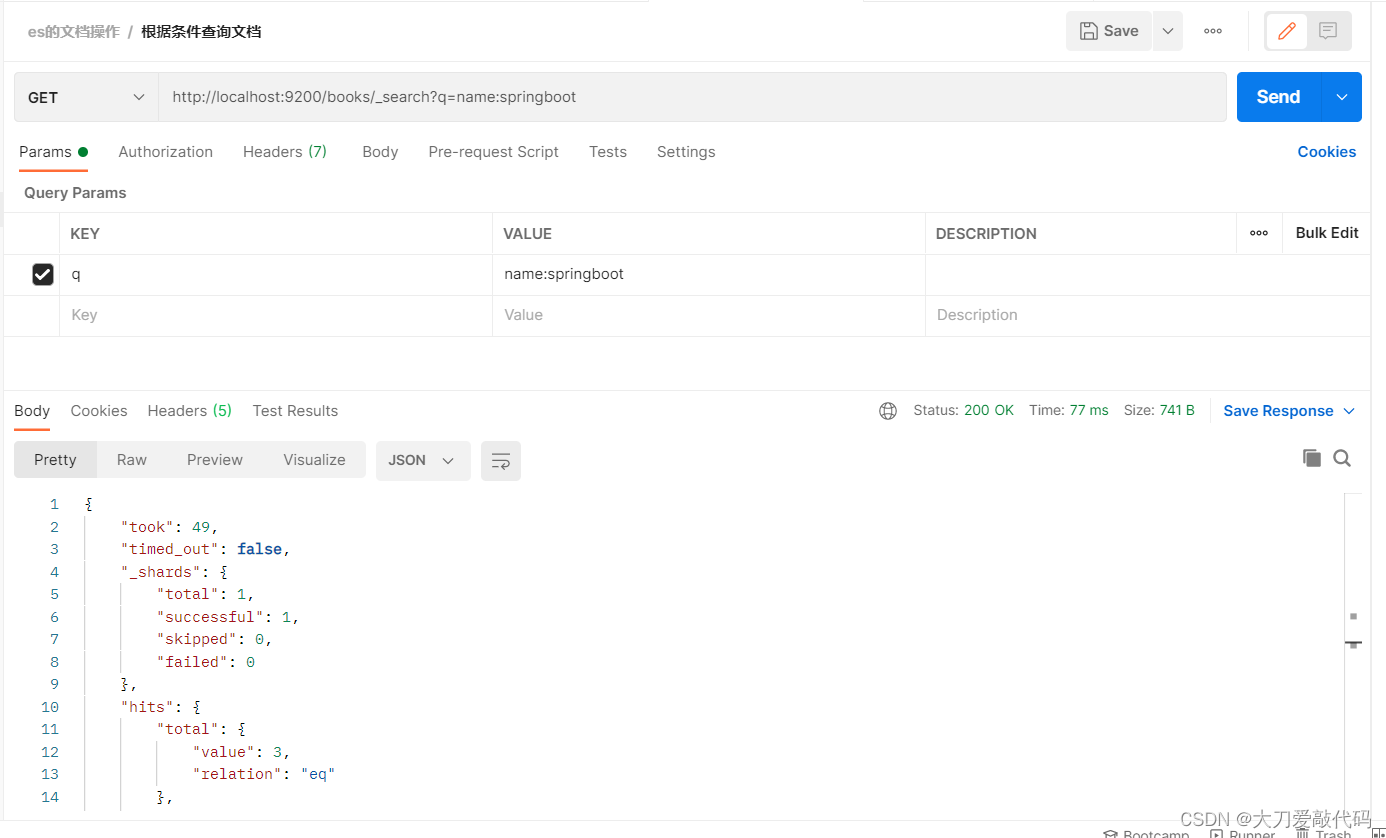
3. 根据指定条件获取某个索引的所有的文档:
GET请求 http://localhost:9200/books/_search?q=name:springboot
# q=查询属性名:查询属性值
复制代码
删除文档
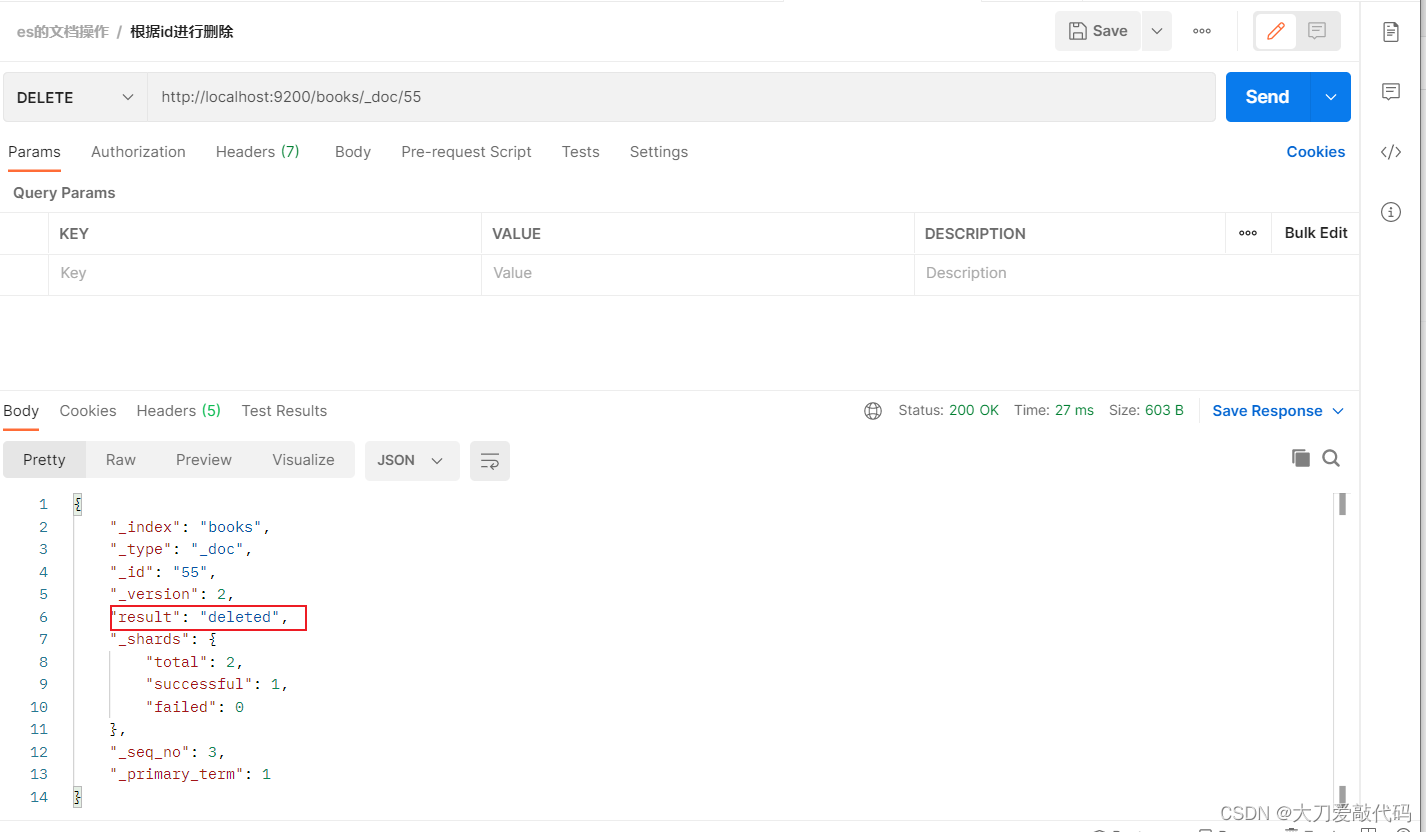
根据id进行删除:DELETE哀求 http://localhost:9200/books/_doc/1
修改文档(分为全量更新和部分更新)
全量更新(注意这里是put哀求,以及_doc)
PUT哀求
http://localhost:9200/books/_
doc
/1:根据指定id进行修改,传入的数据就是修改后的数据。
//文档通过请求参数传递,数据格式json
{
"name":"springboot",
"type":"springboot",
"description":"springboot"
}
复制代码
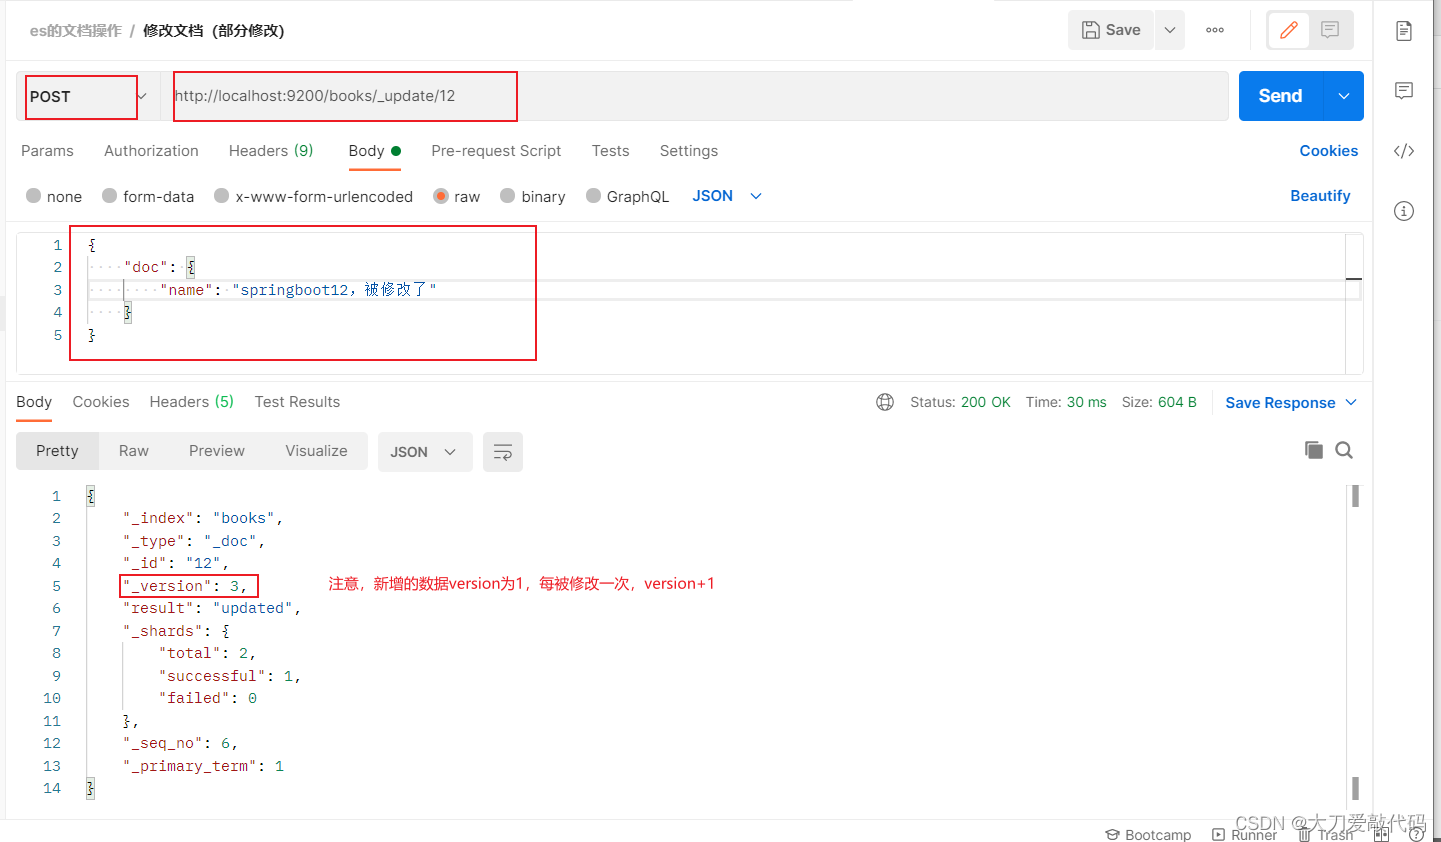
修改文档(部分更新)注意:这里是post哀求,以及_update
POST哀求 http://localhost:9200/books/_update/1
//文档通过请求参数传递,数据格式json
{
"doc":{ //部分更新并不是对原始文档进行更新,而是对原始文档对象中的doc属性中的指定属性更新
"name":"springboot" //仅更新提供的属性值,未提供的属性值不参与更新操作
}
}
复制代码
三、Springboot整合ES
整合步骤(依旧是拿三板斧):
导入依靠
做配置(springboot底层有默认的配置)
调用它的api接口
ES有两种级别的客户端,一种是Low Level Client,一种是High Level Client。
Low Level Client:这种客户端操作方式性能方面略显不敷,不保举使用,但是springboot最初整合ES的时间使用的是低级别客户端,所以
企业开发需要更换成高级别的客户端模式
。
High Level Clien:高级别客户端与ES版本同步更新
Springboot整合Low Level Client的ES(不保举使用了,这里了解一下)
ES早期的操作方式如下:
步骤①
:导入springboot整合ES的starter坐标(spiringboot里面有指定版本(就是低级别的版本号)
<dependency>
<groupId>org.springframework.boot</groupId>
<artifactId>spring-boot-starter-data-elasticsearch</artifactId>
</dependency>
复制代码
步骤②
:进行基础配置
spring:
elasticsearch:
rest:
uris: http://localhost:9200
复制代码
配置ES服务器地址,端口9200(默认就是9200)
步骤③
:使用springboot整合ES的专用客户端接口ElasticsearchRestTemplate来进行操作
@SpringBootTest
class Springboot18EsApplicationTests {
@Autowired
private ElasticsearchRestTemplate template;
}
复制代码
springboot测试类中的测试类的初始化方法和销毁方法的使用
@BeforeEach:在测试类中每个操作运行
前
运行的方法
@AfterEach :在测试类中每个操作运行
后
运行的方法
@SpringBootTest
class Springbootests {
@BeforeEach //在测试类中每个操作运行前运行的方法
void setUp() {
//各种操作
}
@AfterEach //在测试类中每个操作运行后运行的方法
void tearDown() {
//各种操作
}
}
复制代码
Springboot整合High Level Client的ES
高级别客户端方式进行springboot整合ES,操作步骤如下:
步骤①
:导入springboot整合ES高级别客户端的坐标,此种情势目前没有对应的starter
<dependency>
<groupId>org.elasticsearch.client</groupId>
<artifactId>elasticsearch-rest-high-level-client</artifactId>
</dependency>
复制代码
这里的springboot版本为:2.5.4,es的版本为7.16.2,那时间的springboot没有整合高级别的ES,所以配置文件里不需要配置,只能写硬编码配置
步骤②
:使用编程的情势设置连接的ES服务器,并
获取客户端对象
步骤③
:使用客户端对象操作ES,例如
创建索引
,
为索引添加文档
等等操作。
ES-----创建客户端
@SpringBootTest
class Springboot18EsApplicationTests {
@Autowired
private BookMapper bookMapper;
private RestHighLevelClient client;
@Test
void testCreateClient() throws IOException {
//先创建ES客户端
HttpHost host = HttpHost.create("http://localhost:9200");
RestClientBuilder builder = RestClient.builder(host);
client = new RestHighLevelClient(builder);
client.close();
}
}
复制代码
配置ES服务器地址与端口9200,记得客户端使用完毕需要手工关闭。由于当前客户端是手工维护的,因此不能通过自动装配的情势加载对象。
ES-----根据客户端创建索引
@SpringBootTest
class Springboot18EsApplicationTests {
@Autowired
private BookMapper bookMapper;
private RestHighLevelClient client;
@Test
void testCreateIndex() throws IOException {
//先创建ES客户端
HttpHost host = HttpHost.create("http://localhost:9200");
RestClientBuilder builder = RestClient.builder(host);
client = new RestHighLevelClient(builder);
//在通过ES客户端创建索引
CreateIndexRequest request = new CreateIndexRequest("books");
client.indices().create(request, RequestOptions.DEFAULT);
client.close();
}
}
复制代码
高级别客户端操作是通过发送哀求的方式完成所有操作的,ES针对各种差别的操作,设定了各式各样的哀求对象,上例中创建索引的对象是CreateIndexRequest,其他操作也会有自己专用的Request对象。
ES-----根据客户端创建索引(使用Ik分词器)
使用分词器IK:
//json的参数:
{
"mappings":{
"properties":{
"id":{
"type":"keyword"
},
"name":{
"type":"text",
"analyzer":"ik_max_word",
"copy_to":"all"
},
"type":{
"type":"keyword"
},
"description":{
"type":"text",
"analyzer":"ik_max_word",
"copy_to":"all"
},
"all":{
"type":"text",
"analyzer":"ik_max_word"
}
}
}
}
复制代码
@Test
void testCreateClientIndexByIk() throws IOException {
// 创建客户端
HttpHost host = HttpHost.create("http://localhost:9200");
RestClientBuilder builder = RestClient.builder(host);
client = new RestHighLevelClient(builder);
CreateIndexRequest request = new CreateIndexRequest("books");
String json = "{\n" +
" "mappings":{\n" +
" "properties":{\n" +
" "id":{\n" +
" "type":"keyword"\n" +
" },\n" +
" "name":{\n" +
" "type":"text",\n" +
" "analyzer":"ik_max_word",\n" +
" "copy_to":"all"\n" +
" },\n" +
" "type":{\n" +
" "type":"keyword"\n" +
" },\n" +
" "description":{\n" +
" "type":"text",\n" +
" "analyzer":"ik_max_word",\n" +
" "copy_to":"all"\n" +
" },\n" +
" "all":{\n" +
" "type":"text",\n" +
" "analyzer":"ik_max_word"\n" +
" }\n" +
" }\n" +
" }\n" +
"}";
//设置请求中的参数(添加分词器)
request.source(json, XContentType.JSON);
client.indices().create(request, RequestOptions.DEFAULT);
client.close();
}
复制代码
IK分词器是通过哀求参数的情势进行设置的,设置哀求参数使用request对象中的source方法进行设置,至于参数是什么,取决于你的操作种类。当哀求中需要参数时,均可使用当前情势进行参数设置。
ES-----为索引添加文档
// 添加文档:
@Test
void testCreateClientIndexByIkAddData() throws IOException {
// 创建客户端
HttpHost host = HttpHost.create("http://localhost:9200");
RestClientBuilder builder = RestClient.builder(host);
client = new RestHighLevelClient(builder);
// 进行添加操作,因为前面已经创建好了books索引
Book book = bookMapper.selectById(1);
// 把book对象数据转换为json数据,
String json = JSON.toJSONString(book);
// 指定添加的文档的id为book.getId(),需要添加文档的索引为books
IndexRequest request = new IndexRequest("books").id(book.getId().toString());
// 传入数据
request.source(json,XContentType.JSON);
client.index(request,RequestOptions.DEFAULT);
client.close();
}
复制代码
添加文档使用的哀求对象是IndexRequest,与创建索引使用的哀求对象差别。
ES-----为索引批量添加文档
// 批量添加
@Test
void testCreateClientIndexByIkAddBatchData() throws IOException {
// 创建客户端
HttpHost host = HttpHost.create("http://localhost:9200");
RestClientBuilder builder = RestClient.builder(host);
client = new RestHighLevelClient(builder);
// 进行添加操作,因为前面已经创建好了books索引
List<Book> bookList= bookMapper.selectList(null);
// BulkRequest的对象,可以将该对象理解为是一个保存request对象的容器,
// 将所有的请求都初始化好后,添加到BulkRequest对象中,再使用BulkRequest对象的bulk方法,一次性执行完毕
BulkRequest bulk = new BulkRequest();
for (Book book : bookList) {
// 把book对象数据转换为json数据,
String json = JSON.toJSONString(book);
// 指定添加的文档的id为book.getId(),需要添加文档的索引为books
IndexRequest request = new IndexRequest("books").id(book.getId().toString());
// 传入数据
request.source(json,XContentType.JSON);
// 把数据放进BulkRequest对象里面
bulk.add(request);
}
// 批量执行
client.bulk(bulk,RequestOptions.DEFAULT);
// 关闭客户端
client.close();
}
复制代码
批量做时,先创建一个BulkRequest的对象,可以将该对象理解为是一个保存request对象的容器,将所有的哀求都初始化好后,添加到BulkRequest对象中,再使用BulkRequest对象的bulk方法,一次性执行完毕。
ES-----查询文档
根据id查询
@Test
//按id查询
void testGetById() throws IOException {
// 创建客户端
HttpHost host = HttpHost.create("http://localhost:9200");
RestClientBuilder builder = RestClient.builder(host);
client = new RestHighLevelClient(builder);
// 根据id查询
GetRequest request = new GetRequest("books","1");
GetResponse response = client.get(request, RequestOptions.DEFAULT);
// 获取查询到的数据中的source属性的数据
String json = response.getSourceAsString();
System.out.println(json);
client.close();
}
复制代码
条件查询
@Test
//按条件查询
void testSearch() throws IOException {
// 创建客户端
HttpHost host = HttpHost.create("http://localhost:9200");
RestClientBuilder builder = RestClient.builder(host);
client = new RestHighLevelClient(builder);
//
SearchRequest request = new SearchRequest("books");
//创建条件查询对象
SearchSourceBuilder searchSourceBuilder = new SearchSourceBuilder();
// 设置查询条件
searchSourceBuilder.query(QueryBuilders.termQuery("all", "spring"));
// 把查询条件放进请求中
request.source(searchSourceBuilder);
// 根据请求获取返回数据
SearchResponse response = client.search(request, RequestOptions.DEFAULT);
// 获取返回数据里面的hits属性(获取的具体属性,可以看上面的postman操作)
SearchHits hits = response.getHits();
for (SearchHit hit : hits) {
String source = hit.getSourceAsString();
//把json数据转换为对象
Book book = JSON.parseObject(source, Book.class);
System.out.println(book);
}
}
复制代码
Mysql与Es数据同步的实现(这里只是根本了解一下)
在现实项目开发中,我们常常将mysql作为业务数据库,ES作为擦汗寻数据库,用来实现读写分离,缓解mysql数据库的查询压力,应对海量数据的复杂查询。
1、同步双写
这是一种最为简朴的方式,在将数据写入mysql的同时,也把数据写到ES里面
优缺点:
长处
业务逻辑简朴
2、 及时性高
缺点:
硬编码,有需要写入MySQL的地方,都需要添加写入es的代码
业务强耦合
存在双写失败丢失数据的风险
性能较差,本来的mysql的性能不是很高,再加一个es系统的性能必然会降落
2. 异步双写
针对多数据源写入的场景,可以借助MQ实现异步的多源写入
优缺点
长处:
性能高
不易出现数据丢失题目:紧张基于MQ消息的消费保障机制,比如ES宕机大概写入失败,还能重新消费MQ消息;
多源写入之间相互隔离,便于扩展更多的数据源写入
缺点:
硬编码题目:接入新的数据源需要实现新的消费者代码
2、系统复杂度增加,映入了消息中间件
3、数据及时题目,mq是异步消费,用户输入,不一定会立刻同步让他看到
3、基于sql抽取(定时使命)
上面两种方案都存在硬编码题目,代码的侵入性太强,如果对及时性要求不高的情况下,可以思量用定时器来处理:
数据库的相关表中增加一个字段为updatetime(自己界说的名称)字段,任何CURD操作都会导致该字段的现实发生厘革
原来程序中的crud操作不做任何厘革
增加一个定时器程序,让该程序按一定的时间周期扫描指定的表,把该时间段内发生的厘革的数据提取出来
比较此字段来确认变动数据,然后把变动的数据逐条写入ES中。
优缺点:
长处:
1、不改原代码,没有侵入性,没有硬编码;
2、没有业务强耦合,不改变原来程序的性能;
3、worker代码编写简朴,不需要思量增删改查;
缺点:
1、时效性太差,由于采取定时器根据固定频率查询表来同步数据,只管将同步周期设置到秒级,也还是会存在一定时间的耽误。
2、对数据库有一定的轮询压力。
优化的方案:
1、将轮寻放到压力不大的从库上
2、借助logstash实现数据同步,其底层实现原理就是根据配置定期使用sql查询新增的数据写入es中,实现数据的增量同步(经典方案)
4、基于Binlog实现同步
前三种代码要么有代码侵入,要么有耽误。
而基于Binlog与mysql实现同步:既能保证数据同步的及时性又没有代入、侵入性。
实施步骤
1、读取mysql 的binlog日志,获取指定表的日志信息;
2、将读取的信息转为mq;
3、编写一个mq消费程序;
4、不断消费mq,每费完一条消息,将消息写入到es中;
优缺点:
长处:
1、没有代码侵入,没有硬编码;
原有系统不需要任何厘革,没有感知;
3、性能高
4、业务解耦,不需要关注原来系统的业务逻辑
缺点:
1、构建Binlog系统复杂
2、如皋采用MQ消费解析的Binlog信息,也会存在MQ延时的风险
数据迁移工具选型
对于上面的四种数据同步方案,“基于Binlog及时同步”方案是目前最为常用的,也诞生了许多优秀的数据迁移工具,紧张有以下几种:
1、canal (原理是伪装成mysql的从数据库)
2、阿里云DTS (需付费)
3、databus
4、Flink
5、CloudCanal
6、Maxwell
免责声明:如果侵犯了您的权益,请联系站长,我们会及时删除侵权内容,谢谢合作!更多信息从访问主页:qidao123.com:ToB企服之家,中国第一个企服评测及商务社交产业平台。
欢迎光临 qidao123.com ToB IT社区-企服评测·应用市场 (https://dis.qidao123.com/)
Powered by Discuz! X3.5