每个Spring Boot版本和内置容器不同,结果也不同,这里以Spring Boot 2.7.10版本 + 内置Tomcat容器举例。
概序
在SpringBoot2.7.10版本中内置Tomcat版本是9.0.73,SpringBoot内置Tomcat的默认设置如下:
- Tomcat的连接等待队列长度,默认是100
- Tomcat的最大连接数,默认是8192
- Tomcat的最小工作线程数,默认是10
- Tomcat的最大线程数,默认是200
- Tomcat的连接超时时间,默认是20s

相关配置及默认值如下- server:
- tomcat:
- # 当所有可能的请求处理线程都在使用中时,传入连接请求的最大队列长度
- accept-count: 100
- # 服务器在任何给定时间接受和处理的最大连接数。一旦达到限制,操作系统仍然可以接受基于“acceptCount”属性的连接。
- max-connections: 8192
- threads:
- # 工作线程的最小数量,初始化时创建的线程数
- min-spare: 10
- # 工作线程的最大数量 io密集型建议10倍的cpu数,cpu密集型建议cpu数+1,绝大部分应用都是io密集型
- max: 200
- # 连接器在接受连接后等待显示请求 URI 行的时间。
- connection-timeout: 20000
- # 在关闭连接之前等待另一个 HTTP 请求的时间。如果未设置,则使用 connectionTimeout。设置为 -1 时不会超时。
- keep-alive-timeout: 20000
- # 在连接关闭之前可以进行流水线处理的最大HTTP请求数量。当设置为0或1时,禁用keep-alive和流水线处理。当设置为-1时,允许无限数量的流水线处理或keep-alive请求。
- max-keep-alive-requests: 100
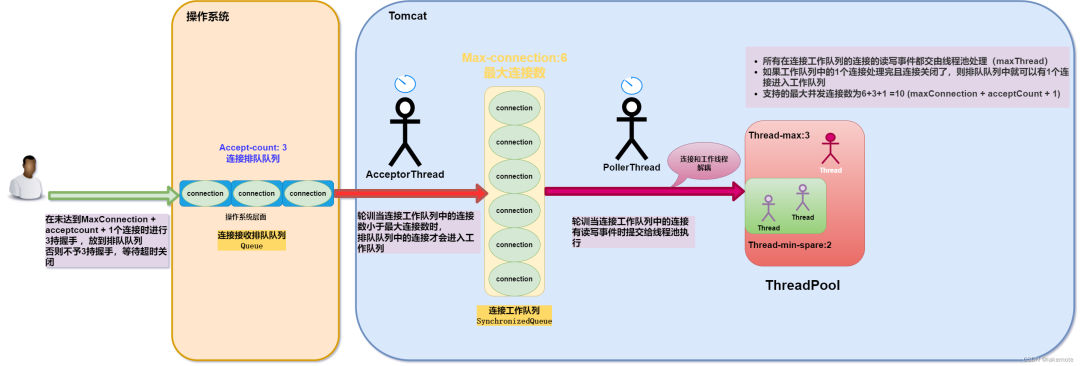
当连接数大于maxConnections+acceptCount + 1时,新来的请求不会收到服务器拒绝连接响应,而是不会和新的请求进行3次握手建立连接,一段时间后(客户端的超时时间或者Tomcat的20s后)会出现请求连接超时。
推荐一个开源免费的 Spring Boot 实战项目:
https://github.com/javastacks/spring-boot-best-practice
TCP的3次握手4次挥手
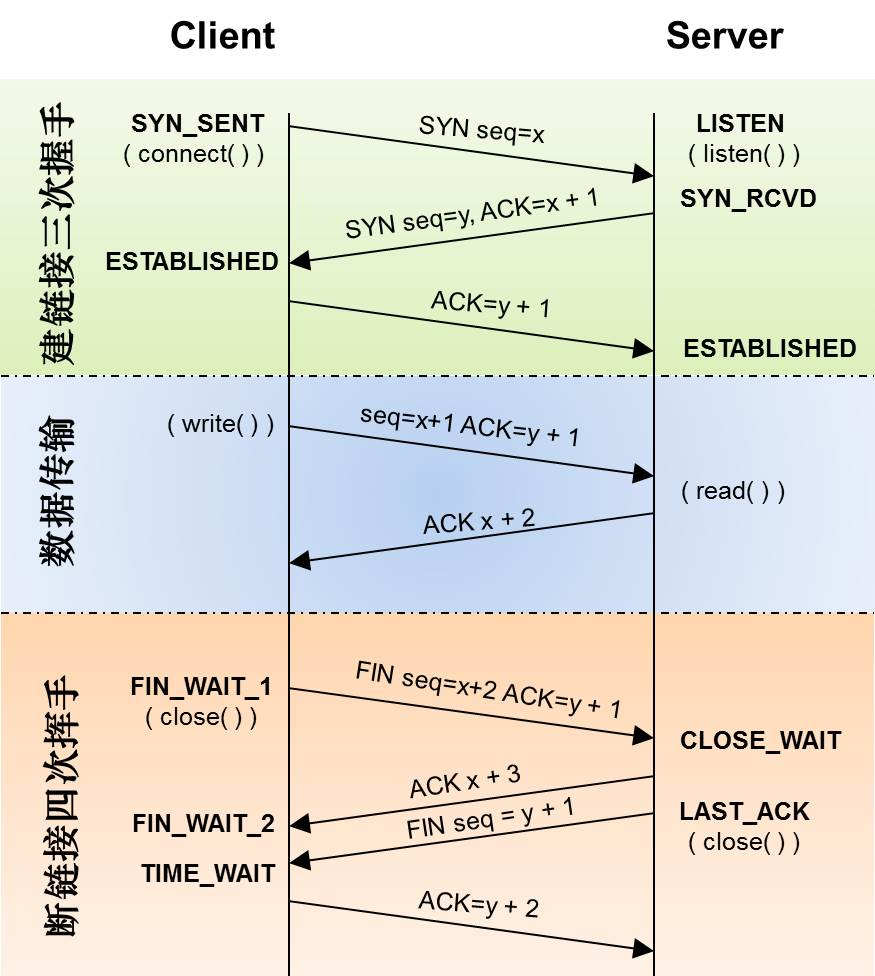
时序图
核心参数
Spring Boot 基础就不介绍了,推荐看这个实战项目:
https://github.com/javastacks/spring-boot-best-practice
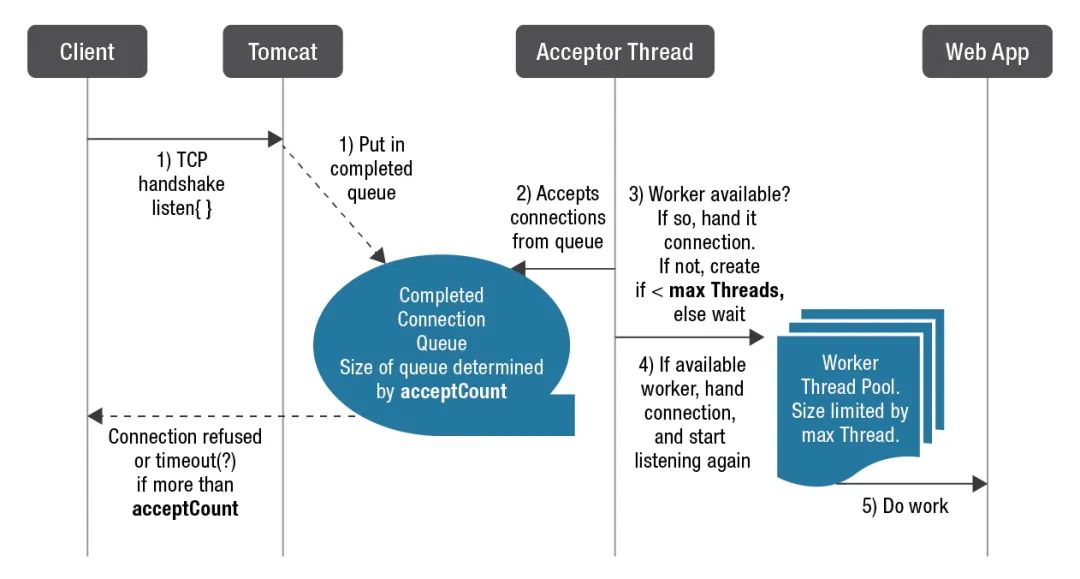
AcceptCount
全连接队列容量,等同于backlog参数,与Linux中的系统参数somaxconn取较小值,Windows中没有系统参数。
NioEndpoint.java- serverSock = ServerSocketChannel.open();
- socketProperties.setProperties(serverSock.socket());
- InetSocketAddress addr = new InetSocketAddress(getAddress(), getPortWithOffset());
- // 这里
- serverSock.socket().bind(addr,getAcceptCount());
Acccptor.java- // 线程的run方法。
- public void run() {
- while (!stopCalled) {
- // 如果我们已达到最大连接数,等待
- connectionLimitLatch.countUpOrAwait();
- // 接受来自服务器套接字的下一个传入连接
- socket = endpoint.serverSocketAccept()
- // socket.close 释放的时候 调用 connectionLimitLatch.countDown();
AbstractEndpoint.java- // tomcat 启动时
- public void createExecutor() {
- internalExecutor = true;
- // 容量为Integer.MAX_VALUE
- TaskQueue taskqueue = new TaskQueue();
- TaskThreadFactory tf = new TaskThreadFactory(getName() + "-exec-", daemon, getThreadPriority());
- // Tomcat扩展的线程池
- executor = new ThreadPoolExecutor(getMinSpareThreads(), getMaxThreads(), 60, TimeUnit.SECONDS,taskqueue, tf);
- taskqueue.setParent( (ThreadPoolExecutor) executor);
- }
Tomcat扩展了线程池增强了功能。
- JDK线程池流程:minThreads --> queue --> maxThreads --> Exception
- Tomcat增强后: minThreads --> maxThreads --> queue --> Exception
MaxKeepAliveRequests
长连接,在发送了maxKeepAliveRequests个请求后就会被服务器端主动断开连接。
在连接关闭之前可以进行流水线处理的最大HTTP请求数量。当设置为0或1时,禁用keep-alive和流水线处理。当设置为-1时,允许无限数量的流水线处理或keep-alive请求。
较大的 MaxKeepAliveRequests 值可能会导致服务器上的连接资源被长时间占用。根据您的具体需求,您可以根据服务器的负载和资源配置来调整 MaxKeepAliveRequests 的值,以平衡并发连接和服务器资源的利用率。- NioEndpoint.setSocketOptions
- socketWrapper.setKeepAliveLeft(NioEndpoint.this.getMaxKeepAliveRequests());
- Http11Processor.service(SocketWrapperBase<?> socketWrapper)
- keepAlive = true;
- while(!getErrorState().isError() && keepAlive && !isAsync() && upgradeToken == null &&
- sendfileState == SendfileState.DONE && !protocol.isPaused()) {
- // 默认100
- int maxKeepAliveRequests = protocol.getMaxKeepAliveRequests();
- if (maxKeepAliveRequests == 1) {
- keepAlive = false;
- } else if (maxKeepAliveRequests > 0 &&
- //
- socketWrapper.decrementKeepAlive() <= 0) {
- keepAlive = false;
- }
等待另一个 HTTP 请求的时间,然后关闭连接。当未设置时,将使用 connectionTimeout。当设置为 -1 时,将没有超时。
Http11InputBuffer.parseRequestLine- // Check for read timeout
- if ((socketWrapper.interestOps() & SelectionKey.OP_READ) == SelectionKey.OP_READ) {
- long delta = now - socketWrapper.getLastRead();
- long timeout = socketWrapper.getReadTimeout();
- if (timeout > 0 && delta > timeout) {
- readTimeout = true;
- }
- }
- // Check for write timeout
- if (!readTimeout && (socketWrapper.interestOps() & SelectionKey.OP_WRITE) == SelectionKey.OP_WRITE) {
- long delta = now - socketWrapper.getLastWrite();
- long timeout = socketWrapper.getWriteTimeout();
- if (timeout > 0 && delta > timeout) {
- writeTimeout = true;
- }
- }
Acceptor
Acceptor: 接收器,作用是接受scoket网络请求,并调用setSocketOptions()封装成为NioSocketWrapper,并注册到Poller的events中。注意查看run方法org.apache.tomcat.util.net.Acceptor#run- // Read new bytes if needed
- if (byteBuffer.position() >= byteBuffer.limit()) {
- if (keptAlive) {
- // 还没有读取任何请求数据,所以使用保持活动超时
- wrapper.setReadTimeout(keepAliveTimeout);
- }
- if (!fill(false)) {
- // A read is pending, so no longer in initial state
- parsingRequestLinePhase = 1;
- return false;
- }
- // 至少已收到请求的一个字节 切换到套接字超时。
- wrapper.setReadTimeout(connectionTimeout);
- }
Poller:轮询器,轮询是否有事件达到,有请求事件到达后,以NIO的处理方式,查询Selector取出所有请求,遍历每个请求的需求,分配给Executor线程池执行。查看org.apache.tomcat.util.net.NioEndpoint.Poller#run()- public void run() {
- while (!stopCalled) {
- // 等待下一个请求进来
- socket = endpoint.serverSocketAccept();
- // 注册socket到Poller,生成PollerEvent事件
- endpoint.setSocketOptions(socket);
- // 向轮询器注册新创建的套接字
- - poller.register(socketWrapper);
- - (SynchronizedQueue(128))events.add(new PollerEvent(socketWrapper))
真正执行连接读写操作的线程池,在JDK线程池的基础上进行了扩展优化。
AbstractEndpoint.java- public void run() {
- while (true) {
- //查询selector取出所有请求事件
- Iterator<SelectionKey> iterator =
- keyCount > 0 ? selector.selectedKeys().iterator() : null;
- // 遍历就绪键的集合并调度任何活动事件。
- while (iterator != null && iterator.hasNext()) {
- SelectionKey sk = iterator.next();
- iterator.remove();
- NioSocketWrapper socketWrapper = (NioSocketWrapper) sk.attachment();
- // 分配给Executor线程池执行处理请求key
- if (socketWrapper != null) {
- processKey(sk, socketWrapper);
- - processSocket(socketWrapper, SocketEvent.OPEN_READ/SocketEvent.OPEN_WRITE)
- - executor.execute((Runnable)new SocketProcessor(socketWrapper,SocketEvent))
- }
- }
[code]// 与 java.util.concurrent.ThreadPoolExecutor 相同,但实现了更高效的getSubmittedCount()方法,用于正确处理工作队列。// 如果未指定 RejectedExecutionHandler,将配置一个默认的,并且该处理程序将始终抛出 RejectedExecutionExceptionpublic class ThreadPoolExecutor extends java.util.concurrent.ThreadPoolExecutor { // 已提交但尚未完成的任务数。这包括队列中的任务和已交给工作线程但后者尚未开始执行任务的任务。 // 这个数字总是大于或等于getActiveCount() 。 private final AtomicInteger submittedCount = new AtomicInteger(0); @Override protected void afterExecute(Runnable r, Throwable t) { if (!(t instanceof StopPooledThreadException)) { submittedCount.decrementAndGet(); } @Override public void execute(Runnable command){ // 提交任务的数量+1 submittedCount.incrementAndGet(); try { // 线程池内部方法,真正执行的方法。就是JDK线程池原生的方法。 super.execute(command); } catch (RejectedExecutionException rx) { // 再次把被拒绝的任务放入到队列中。 if (super.getQueue() instanceof TaskQueue) { final TaskQueue queue = (TaskQueue)super.getQueue(); try { //强制的将任务放入到阻塞队列中 if (!queue.force(command, timeout, unit)) { //放入失败,则继续抛出异常 submittedCount.decrementAndGet(); throw new RejectedExecutionException(sm.getString("threadPoolExecutor.queueFull")); } } catch (InterruptedException x) { //被中断也抛出异常 submittedCount.decrementAndGet(); throw new RejectedExecutionException(x); } } else { //不是这种队列,那么当任务满了之后,直接抛出去。 submittedCount.decrementAndGet(); throw rx; } } }/** * 实现Tomcat特有逻辑的自定义队列 */public class TaskQueue extends LinkedBlockingQueue { private static final long serialVersionUID = 1L; private transient volatile ThreadPoolExecutor parent = null; private static final int DEFAULT_FORCED_REMAINING_CAPACITY = -1; /** * 强制遗留的容量 */ private int forcedRemainingCapacity = -1; /** * 队列的构建方法 */ public TaskQueue() { } public TaskQueue(int capacity) { super(capacity); } public TaskQueue(Collection |


 发表于 2023-10-23 03:39:59