马上注册,结交更多好友,享用更多功能,让你轻松玩转社区。
您需要 登录 才可以下载或查看,没有账号?立即注册
×
在早些年学习Android的时候,对Service有过总结,但是主要是如何去使用,注意事项,startService和bindService的区别。
Android Service_public int onstartcommand(intent intent, int flags-CSDN博客
但是今天从源码来总结下framework层的启动流程大抵是什么样的。
一、startService()
平常,在我们的activity里,我们通过startService去启动一个service服务。
1.context.startService
使用例子:
- //testActivity
- @Override
- public void onClick(View v) {
- Intent it=new Intent(this, SimpleService.class);
- switch (v.getId()){
- case R.id.startService:
- startService(it);
- break;
- case R.id.stopService:
- stopService(it);
- break;
- }
- @Override
- public ComponentName startService(Intent service) {
- warnIfCallingFromSystemProcess();
- return startServiceCommon(service, false, mUser);
- }
- private ComponentName startServiceCommon(Intent service, boolean requireForeground,
- UserHandle user) {
- try {
- validateServiceIntent(service);
- service.prepareToLeaveProcess(this);
- ComponentName cn = ActivityManager.getService().startService(
- mMainThread.getApplicationThread(), service, service.resolveTypeIfNeeded(
- getContentResolver()), requireForeground,
- getOpPackageName(), user.getIdentifier());
- ...
- return cn;
- } catch (RemoteException e) {
- throw e.rethrowFromSystemServer();
- }
- }
可以看到:焦点代码为ActivityManager.getService().startService()
在 Activity 中使用的 startService 方法是定义在 Context 的抽象类中,它的真正实现类是 ContextImpl,以是先进入 ContextImpl 类。先从startService开始,然后进入本类的startServiceCommon方法,并最终调用ActivityManagerNative.getDefault()对象的 startService 方法。ActivityManager.getService()获取到IActivityManager对象,而且是通过单利模式创建的。
- public static IActivityManager getService() {
- return IActivityManagerSingleton.get();
- }
- private static final Singleton<IActivityManager> IActivityManagerSingleton =
- new Singleton<IActivityManager>() {
- @Override
- protected IActivityManager create() {
- final IBinder b = ServiceManager.getService(Context.ACTIVITY_SERVICE);
- final IActivityManager am = IActivityManager.Stub.asInterface(b);
- return am;
- }
- };
看下ActivityManagerService中startService()代码
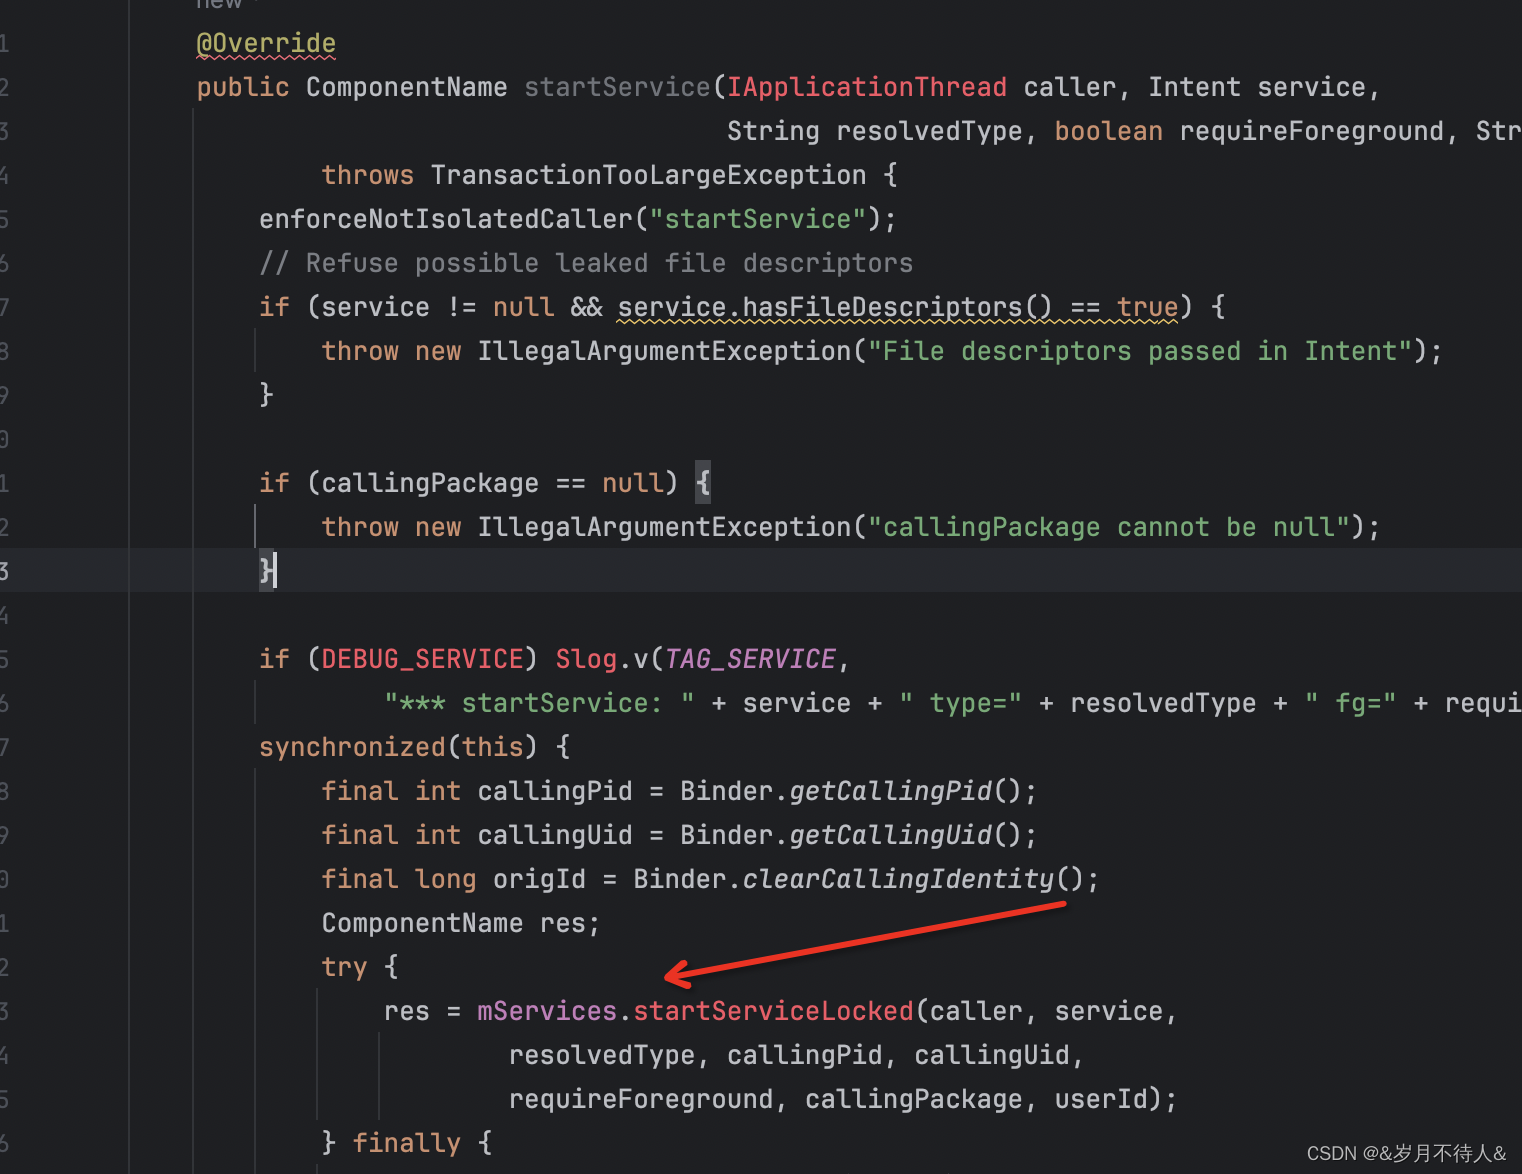
这里面走到了startServiceLocked()方法,此中mServices是ActiveServices。
ActiveServices这里面进行了以下步骤:
1.通过 retrieveServiceLocked 方法来解析 service 这个 Intent,就是解析前面我们在 AndroidManifest.xml 定义的 Service 标签的 intent-filter 相干内容,然后将解析效果放在 res.record 中。
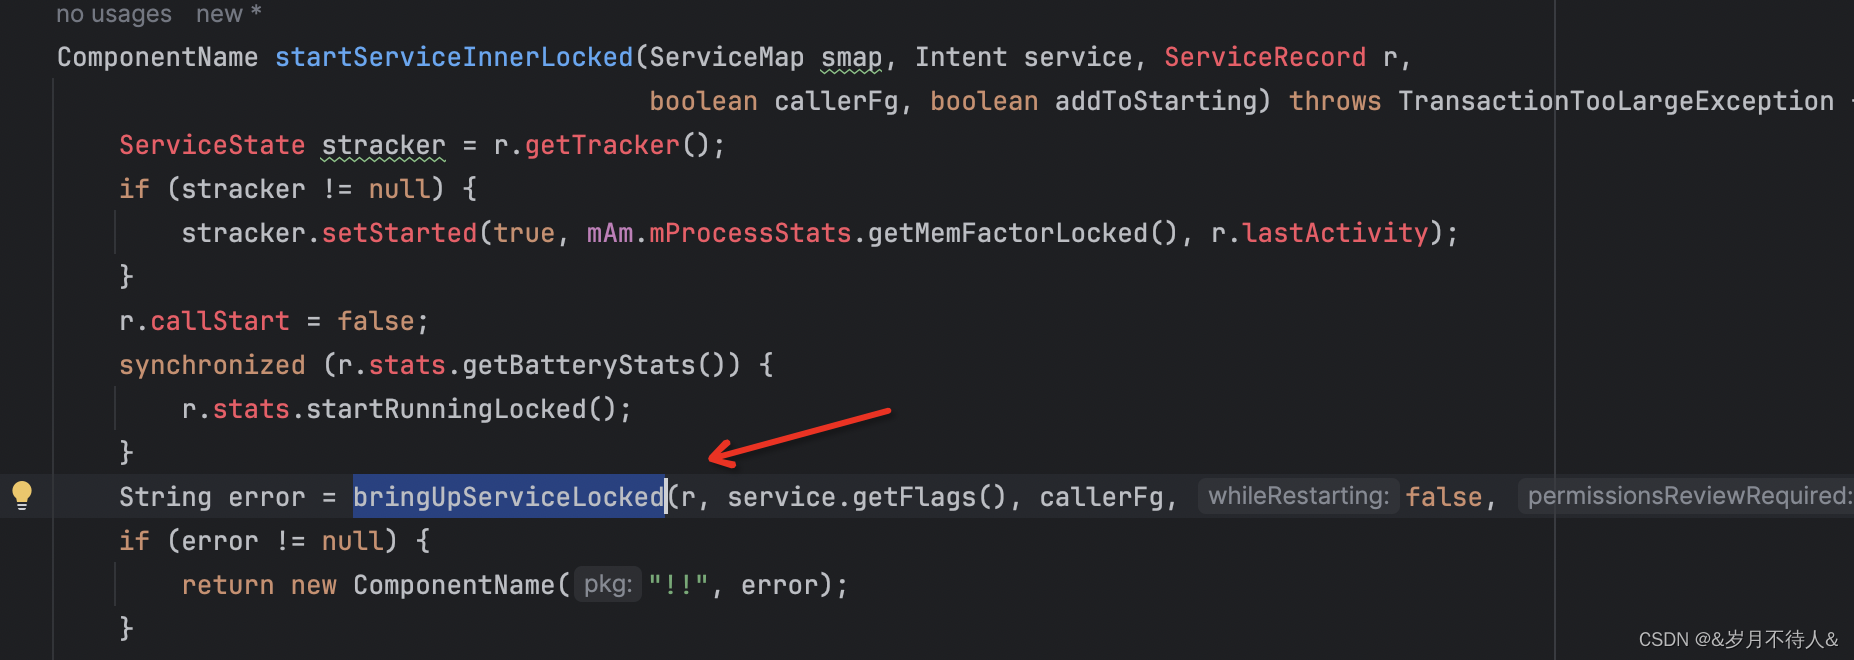
2.调用 startServiceInnerLocked 方法。

在startServiceInnerLocked 方法中会调用 bringUpServiceLocked 方法。
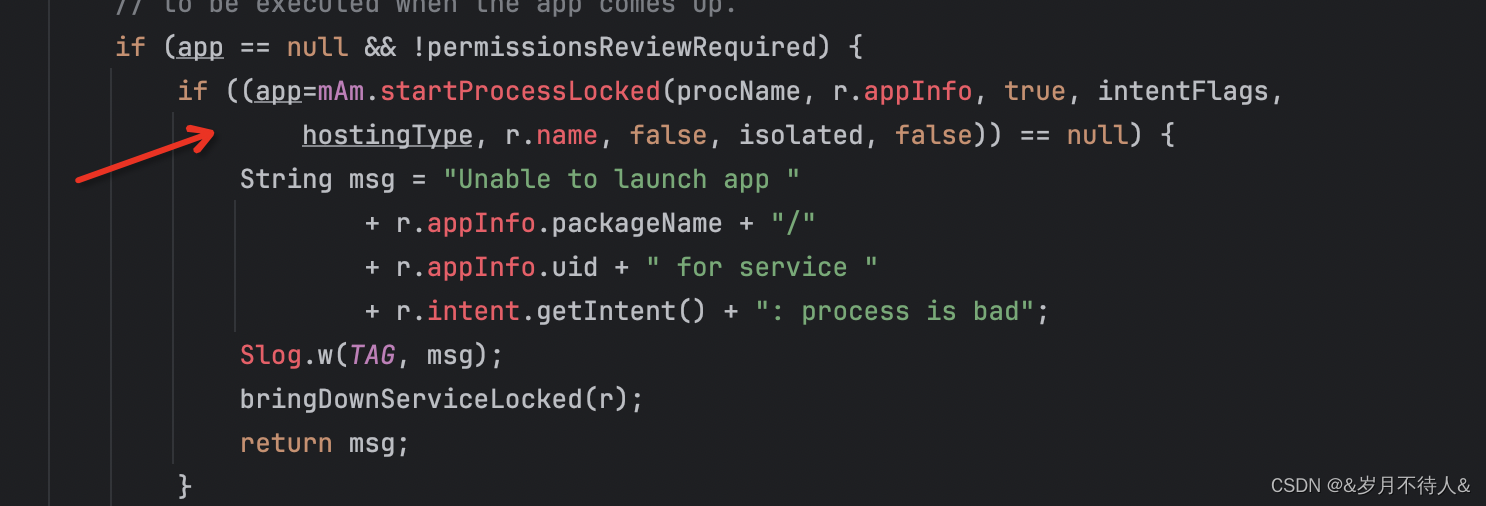
3.bringUpServiceLocked方法中,当 Service 所在的进程存在时,将调用realStartServiceLocked 方法来启动 Service,否则的话调用 startProcessLocked 方法来启动新进程。
情况一:realStartServiceLocked()

这里面会调用 app.thread.scheduleCreateService(r, r.serviceInfo, mAm.compatibilityInfoForPackageLocked(r.serviceInfo.applicationInfo), app.repProcState);
这里会走到ApplicationThread去sendMessage,最后去创建service,执行onCreate方法,后面有详细说明。因为它运行的进程已存在,就直接去创建了,如果不存在,接着往下走
情况二:startProcessLocked()
- //在ActivityManagerService类中
- private final void startProcessLocked(ProcessRecord app, String hostingType,
- String hostingNameStr, String abiOverride, String entryPoint, String[] entryPointArgs) {
- boolean isActivityProcess = (entryPoint == null);
- if (entryPoint == null)
- entryPoint = "android.app.ActivityThread";
- checkTime(startTime, "startProcess: asking zygote to start proc");
- //通过 processName,uid 等启动新进程
- Process.start(entryPoint,
- app.processName, uid, uid, gids, debugFlags, mountExternal,
- app.info.targetSdkVersion, app.info.seinfo, requiredAbi,
- instructionSet, app.info.dataDir, entryPointArgs);
- }
- //在Process类中
- public static final ProcessStartResult start(final String processClass,
- final String niceName,
- int uid, int gid, int[] gids,
- int debugFlags, int mountExternal,
- int targetSdkVersion,
- String seInfo,
- String abi,
- String instructionSet,
- String appDataDir,
- String invokeWith,
- String[] zygoteArgs) {
- return zygoteProcess.start(processClass, niceName, uid, gid, gids,
- debugFlags, mountExternal, targetSdkVersion, seInfo,
- abi, instructionSet, appDataDir, invokeWith, zygoteArgs);
- }
3.启动新进程去ActivityThread
熟悉的源码
- public static void main(String[] args) {
- Trace.traceBegin(Trace.TRACE_TAG_ACTIVITY_MANAGER, "ActivityThreadMain");
- CloseGuard.setEnabled(false);
- // 初始化应用中需要使用的系统路径
- Environment.initForCurrentUser();
- Looper.prepareMainLooper();
- //创建ActivityThread 对象
- ActivityThread thread = new ActivityThread();
- thread.attach(false);
- Looper.loop();
- throw new RuntimeException("Main thread loop unexpectedly exited");
- }
- 1.绑定应用进程到ActivityManagerService
- 在 Android 应用程序中,每一个进程对应一个 ActivityThread 实例,然后这里创建了 ActivityThread 对象并调用了其 attach 方法
- 2.主线程Handler消息处理
- 启动looper轮询器,以是在activity大概service创建handler对象时,不需要手动调用looper。缘故原由就是在这里
- 首先Looper.prepareMainLooper();是为主线程创建了Looper,然后thread.getHandler();是生存了主线程的Handler,最后Looper.loop();进入消息循环。
其余的不用看了,主要看thread.attach(false)
- main()方法通过thread.attach(false)绑定应用进程。ActivityManagerNative通过getDefault()方法返回ActivityManagerService实例,ActivityManagerService通过attachApplication将ApplicationThread对象绑定到ActivityManagerService,而ApplicationThread作为Binder实现ActivityManagerService对应用进程的通信和控制。
- 在ActivityManagerService内部,attachApplication现实是通过调用attachApplicationLocked实现的,这里采用了synchronized关键字保证同步。
- //ActivityThread.java
- private void attach(boolean system) {
- final IActivityManager mgr = ActivityManagerNative.getDefault();
- try {
- //这里调用了 ActivityManagerProxy.attachApplication 方法。
- mgr.attachApplication(mAppThread);
- } catch (RemoteException ex) {
- // Ignore
- }
- }
- //ActivityManagerService.java 然后看看attachApplication方法
- @Override
- public final void attachApplication(IApplicationThread thread) {
- synchronized (this) {
- int callingPid = Binder.getCallingPid();
- final long origId = Binder.clearCallingIdentity();
- attachApplicationLocked(thread, callingPid);
- Binder.restoreCallingIdentity(origId);
- }
- }
1.关于application,他会走到 thread.bindApplication去绑定application,执行后续操作(创建application,执行onCreate生命周期)
2.关于activity,他会走到mStackSupervisor.attachApplicationLocked(app)执行有关activity的操作(走到scheduleLaunchActivity)
上面两个步骤,具体可看我之前的博客 Android App启动流程和源码详解-CSDN博客
3.关于service,他会走到 didSomething |= mServices.attachApplicationLocked(app, processName);执行service的后续操作。
关键代码:
- private final boolean attachApplicationLocked(IApplicationThread thread,int pid) {
- if (app.instr != null) {//app的
- thread.bindApplication(processName, appInfo, providers,
- app.instr.mClass,
- profilerInfo, app.instr.mArguments,
- app.instr.mWatcher,
- app.instr.mUiAutomationConnection, testMode,
- mBinderTransactionTrackingEnabled, enableTrackAllocation,
- isRestrictedBackupMode || !normalMode, app.persistent,
- new Configuration(getGlobalConfiguration()), app.compat,
- getCommonServicesLocked(app.isolated),
- mCoreSettingsObserver.getCoreSettingsLocked(),
- buildSerial);
- } else {
- thread.bindApplication(processName, appInfo, providers, null, profilerInfo,
- null, null, null, testMode,
- mBinderTransactionTrackingEnabled, enableTrackAllocation,
- isRestrictedBackupMode || !normalMode, app.persistent,
- new Configuration(getGlobalConfiguration()), app.compat,
- getCommonServicesLocked(app.isolated),
- mCoreSettingsObserver.getCoreSettingsLocked(),
- buildSerial);
- }
-
- // See if the top visible activity is waiting to run in this process...
- if (normalMode) {
- try {//activity的
- if (mStackSupervisor.attachApplicationLocked(app)) {
- didSomething = true;
- }
- } catch (Exception e) {
- Slog.wtf(TAG, "Exception thrown launching activities in " + app, e);
- badApp = true;
- }
- }
- // Find any services that should be running in this process...
- if (!badApp) {
- try {//sevice的
- didSomething |= mServices.attachApplicationLocked(app, processName);
- checkTime(startTime, "attachApplicationLocked: after mServices.attachApplicationLocked");
- } catch (Exception e) {
- Slog.wtf(TAG, "Exception thrown starting services in " + app, e);
- badApp = true;
- }
- }
-
- }
- public final void scheduleCreateService(IBinder token, ServiceInfo info,
- CompatibilityInfo compatInfo, int processState) {
- updateProcessState(processState, false);
- CreateServiceData s = new CreateServiceData();
- s.token = token;
- s.info = info;
- s.compatInfo = compatInfo;
- sendMessage(H.CREATE_SERVICE, s);
- }
来嘛,看下handler的handleMessage()方法
- ...
- case CREATE_SERVICE:
- Trace.traceBegin(Trace.TRACE_TAG_ACTIVITY_MANAGER, ("serviceCreate: " + String.valueOf(msg.obj)));
- handleCreateService((CreateServiceData)msg.obj);
- Trace.traceEnd(Trace.TRACE_TAG_ACTIVITY_MANAGER);
- break;
- ...
1.通过类加载器 ClassLoader 来加载 Service 对象
2.创建一个 ContextImpl 对象,每个 Activity 和 Service 都有一个 Context 对象。
- private void handleCreateService(CreateServiceData data) {
- Service service = null;
- try {
- //(1)通过类加载器来加载 Service 对象
- java.lang.ClassLoader cl = packageInfo.getClassLoader();
- service = (Service) cl.loadClass(data.info.name).newInstance();
- } catch (Exception e) {
- //......
- }
- //(2)这里创建 ContextImpl 对象
- ContextImpl context = ContextImpl.createAppContext(this, packageInfo);
- context.setOuterContext(service);
- Application app = packageInfo.makeApplication(false, mInstrumentation);
- service.attach(context, this, data.info.name, data.token, app,ActivityManagerNative.getDefault());
- //(3)这里调用 Service 的 onCreate 方法
- service.onCreate();
- mServices.put(data.token, service);
- }
二、bindService()
1.ContextImpl类中bindService()
具体使用:
- TestActivity.java
- private void test(){
- Intent intent = new Intent(this, XXXService.class);
- // bindService 的具体实现在 ContextImpl
- // BIND_AUTO_CREATE 参数具体使用的代码 ActivityServices
- bindService(intent, conn, BIND_AUTO_CREATE);
- }
- private ServiceConnection conn = new ServiceConnection() {
- @Override
- public void onServiceConnected(ComponentName name, IBinder service) {
- // 绑定成功
- }
- @Override
- public void onServiceDisconnected(ComponentName name) {
- // 绑定结束
- }
- }
- @Override
- public boolean bindService(Intent service, ServiceConnection conn,
- int flags) {
- // mMainThread.getHandler(),传入的 handle 是主线程的 Handle
- return bindServiceCommon(service, conn, flags, mMainThread.getHandler(),
- Process.myUserHandle());
- }
- private boolean bindServiceCommon(Intent service, ServiceConnection conn,
- int flags, Handler handler, UserHandle user) {
- IServiceConnection sd;
- if (mPackageInfo != null) {
- // 1,将传入的 ServiceConnection 转化为 IServiceConnection 返回
- // mPackgeInfo 是 LoadedApk
- sd = mPackageInfo.getServiceDispatcher(conn, getOuterContext(), handler, flags);
- }
- validateServiceIntent(service);
- try {
- IBinder token = getActivityToken();
- ...
- // 2,Binder 调用 AMS 的 bindService 方法,下面具体分析
- int res = ActivityManagerNative.getDefault().bindService(
- mMainThread.getApplicationThread(), getActivityToken(), service,
- service.resolveTypeIfNeeded(getContentResolver()),
- sd, flags, getOpPackageName(), user.getIdentifier());
- return res != 0;
- }
- //...
- }
- public final IServiceConnection getServiceDispatcher(ServiceConnection c,
- Context context, Handler handler, int flags) {
- synchronized (mServices) {
- LoadedApk.ServiceDispatcher sd = null;
- // private final ArrayMap<Context,
- // ArrayMap<ServiceConnection, LoadedApk.ServiceDispatcher>> mServices
- // 根据当前的 Context 获取 ArrayMap<ServiceConnection, LoadedApk.ServiceDispatcher>
- ArrayMap<ServiceConnection, LoadedApk.ServiceDispatcher> map = mServices.get(context);
- if (map != null) {
- // 如果存在,尝试根据当前的 ServiceConnection 获取 ServiceDispatcher
- sd = map.get(c);
- }
- if (sd == null) {
- // 如果与 ServiceConnection 对应的 ServiceDispatcher 不存在,创建一个保存了当前
- // ServiceConnection 的 ServiceDispatcher 对象,
- // 并将之前传入的主线的 Handle 保存,同时创建一个 InnerConnection 对象保存
- sd = new ServiceDispatcher(c, context, handler, flags);
- if (map == null) {
- map = new ArrayMap<ServiceConnection, LoadedApk.ServiceDispatcher>();
- mServices.put(context, map);
- }
- // 将该 ServiceConnection 与 ServiceDispatcher 关系保存
- map.put(c, sd);
- } else {
- // 如果最开始就获取到 ServiceDispatcher,比如多次 bindService,
- // 就会调用 ServiceDispatcher 的 validate 判断此次 bindService 是否合法
- // validate 的判断逻辑比较简单:
- // 1.判断当前的 context 是否和之前 bindService 的一样
- // 2.判断当前 handler 是否是主线程的 handle
- // 以上两个条件都满足的情况下正常执行,反之抛出相应的异常
- sd.validate(context, handler);
- }
- return sd.getIServiceConnection();
- }
- }
2.ActivityManagerService.bindService()
- public int bindService(IApplicationThread caller, IBinder token, Intent service,
- String resolvedType, IServiceConnection connection,
- int flags, String callingPackage, int userId) throws TransactionTooLargeException {
- //...
- synchronized(this) {
- // 调用 ActiveServices 的 bindServiceLocked 方法
- return mServices.bindServiceLocked(caller, token, service,
- resolvedType, connection, flags, callingPackage, userId);
- }
- }
看realStartServiceLocked方法,刚才在我们startService的时候也调用了这个方法,但是因为它是bind的,以是有些许不同
- private final void realStartServiceLocked(ServiceRecord r, ProcessRecord app,
- boolean execInFg) throws RemoteException {
- //...
- try {
- // 第一步,调用 ApplicationThread 的 scheduleCreateService 方法,
- // 之后会实例化 Service 并调用 Service 的 onCreate 方法,这里的过程跟上面 startService 中一样。
- // 不会调用 onStartCommand
- app.thread.scheduleCreateService(r, r.serviceInfo,
- mAm.compatibilityInfoForPackageLocked(r.serviceInfo.applicationInfo),
- app.repProcState);
- }
- //...
- // 第二步,调用 requestServiceBindingLocked
- requestServiceBindingLocked(r, execInFg);
- updateServiceClientActivitiesLocked(app, null, true);
- // 第三步
- // If the service is in the started state, and there are no
- // pending arguments, then fake up one so its onStartCommand() will
- // be called.
- if (r.startRequested && r.callStart && r.pendingStarts.size() == 0) {
- r.pendingStarts.add(new ServiceRecord.StartItem(r, false,
- r.makeNextStartId(), null, null));
- }
- // StartItem 的 taskRemoved 如果是 false 的话,
- // 调用下面方法会调用 Service 的 onStartCommand
- sendServiceArgsLocked(r, execInFg, true);
- }
- private final boolean requestServiceBindingLocked(ServiceRecord r,
- IntentBindRecord i, boolean execInFg, boolean rebind)
- throws TransactionTooLargeException {
- if ((!i.requested || rebind) && i.apps.size() > 0) {
- try {
- // 调用 ApplicationThread 的 scheduleBindService 方法
- r.app.thread.scheduleBindService(r, i.intent.getIntent(), rebind,
- r.app.repProcState);
- }
- }
- return true;
- }
来来来,看下ApplicationThread.scheduleBindService()方法
- 调用 ApplicationThread 的 scheduleBindService,scheduleBindService 通过 mH 发送一个 H.BIND_SERVICE 消息,mH 收到该消息调用 handleBindService(BindServiceData data)。

- private void handleBindService(BindServiceData data) {
- Service s = mServices.get(data.token);
- if (DEBUG_SERVICE)
- Slog.v(TAG, "handleBindService s=" + s + " rebind=" + data.rebind);
- if (s != null) {
- try {
- data.intent.setExtrasClassLoader(s.getClassLoader());
- data.intent.prepareToEnterProcess();
- try {
- if (!data.rebind) {
- // 调用 Service 的 onBind,返回给客户端调用的 Binder
- IBinder binder = s.onBind(data.intent);
- // 调用 AMS 的 publishService,进而通知客户端连接成功
- ActivityManager.getService().publishService(
- data.token, data.intent, binder);
- } else {
- s.onRebind(data.intent);
- ActivityManager.getService().serviceDoneExecuting(
- data.token, SERVICE_DONE_EXECUTING_ANON, 0, 0);
- }
- ensureJitEnabled();
- } catch (RemoteException ex) {
- throw ex.rethrowFromSystemServer();
- }
- } catch (Exception e) {
- if (!mInstrumentation.onException(s, e)) {
- throw new RuntimeException(
- "Unable to bind to service " + s
- + " with " + data.intent + ": " + e.toString(), e);
- }
- }
- }
- }
免责声明:如果侵犯了您的权益,请联系站长,我们会及时删除侵权内容,谢谢合作!更多信息从访问主页:qidao123.com:ToB企服之家,中国第一个企服评测及商务社交产业平台。 |


 发表于 2024-9-30 17:55:11