1.default表现对所有的盘算机进行控制
restrict default nomodify notrap nopeer noquery
局域网可放行可以指定网段或列出单独IP
restrict xxx.xxx.xxx.x mask 255.255.255.0 nomodify
restrict xxx.xxx.xxx.x nomodify
1.end
restrict 127.0.0.1
restrict ::1
2.注释掉公网NTP服务器
server 0.centos.pool.ntp.org iburst
server 1.centos.pool.ntp.org iburst
server 2.centos.pool.ntp.org iburst
server 3.centos.pool.ntp.org iburst
2.end
3.开启自身同步
server 127.127.1.0
Fudge 127.127.1.0 stratum 8
3.end
includefile /etc/ntp/crypto/pw
keys /etc/ntp/keys
disable monitor
重启服务
systemctl restart ntpd
测试
[root@aliyun ~]# ntpstat
synchronised to local net (127.127.1.0) at stratum 6
time correct to within 949 ms
polling server every 64 s
- ## 3.Linux客户端配置
- ### 3.1 安装
- 安装过程跟服务器端一致,这里不再赘述。
- ### 3.2 客户端配置
- `ntp.conf`修改前不再赘述,修改后:
restrict default nomodify notrap nopeer noquery
restrict 127.0.0.1
restrict ::1
1.注释掉公网NTP服务器
server 0.centos.pool.ntp.org iburst
server 1.centos.pool.ntp.org iburst
server 2.centos.pool.ntp.org iburst
server 3.centos.pool.ntp.org iburst
1.end
2.开启服务器同步
server aliyun
Fudge aliyun stratum 8
2.end
includefile /etc/ntp/crypto/pw
keys /etc/ntp/keys
disable monitor
查看NTP服务是否开启
[root@tcloud ~]# timedatectl
Local time: Fri 2022-03-25 15:29:25 CST
Universal time: Fri 2022-03-25 07:29:25 UTC
RTC time: Fri 2022-03-25 07:29:24
Time zone: Asia/Shanghai (CST, +0800)
NTP enabled: no
NTP synchronized: no
RTC in local TZ: no
DST active: n/a
开启NTP服务
[root@tcloud ~]# timedatectl set-ntp yes
[root@tcloud ~]# timedatectl
Local time: Fri 2022-03-25 15:52:30 CST
Universal time: Fri 2022-03-25 07:52:30 UTC
RTC time: Fri 2022-03-25 07:52:29
Time zone: Asia/Shanghai (CST, +0800)
NTP enabled: yes
NTP synchronized: yes
RTC in local TZ: no
DST active: n/a
- [/code] [size=5]重启服务[/size]
- systemctl restart ntpd
- [size=5]测试[/size]
- [root@tcloud ~]# ntpstat
- unsynchronised
- time server re-starting
- polling server every 8 s
- [size=5]配置后一般要等候几分钟才能与/etc/ntp.conf中的服务器端完成同步[/size]
- [root@tcloud ~]# ntpstat
- synchronised to NTP server (101.201.69.99) at stratum 7
- time correct to within 968 ms
- polling server every 64 s
- [code]
- ### 3.4 另一种方式
- 使用`ntpdate`命令结合定时任务实现时间同步。此时要停止`ntpd`服务器,测试`ntpdate aliyun`报错,查看报错信息:
28 Mar 15:33:22 ntpdate[17145]: ntpdate 4.2.6p5@1.2349-o Tue Jun 23 15:38:19 UTC 2020 (1)
Looking for host aliyun and service ntp
host found : aliyun
transmit(101.201.69.99)
101.201.69.99: Server dropped: no data
server 101.201.69.99, port 123
28 Mar 15:33:30 ntpdate[17145]: no server suitable for synchronization found
- 解决:关闭防火墙,配置`aliyun`服务器的安全组放开端口`123`。
[root@tcloud ~]# ntpdate aliyun
28 Mar 16:06:57 ntpdate[2330]: adjust time server 101.201.69.99 offset 0.000112 sec
- [/code] [size=5]添加定时任务[/size]
- vim /etc/crontab
- SHELL=/bin/bash
- PATH=/sbin:/bin:/usr/sbin:/usr/bin
- MAILTO=root
- [size=5]/etc/crontab 内容如下[/size]
- [size=5]For details see man 4 crontabs[/size]
- [size=5]Example of job definition:[/size]
- [size=5].---------------- minute (0 - 59)[/size]
- [size=5]| .------------- hour (0 - 23)[/size]
- [size=5]| | .---------- day of month (1 - 31)[/size]
- [size=5]| | | .------- month (1 - 12) OR jan,feb,mar,apr …[/size]
- [size=5]| | | | .---- day of week (0 - 6) (Sunday=0 or 7) OR sun,mon,tue,wed,thu,fri,sat[/size]
- [size=5]| | | | |[/size]
- [size=5]* * * * * user-name command to be executed[/size]
- [size=5]每分钟同步一次[/size]
- */1 * * * * root ntpdate aliyun
- [code]
- ## 4.Windows客户端配置
- ### 4.1 配置并启用客户端
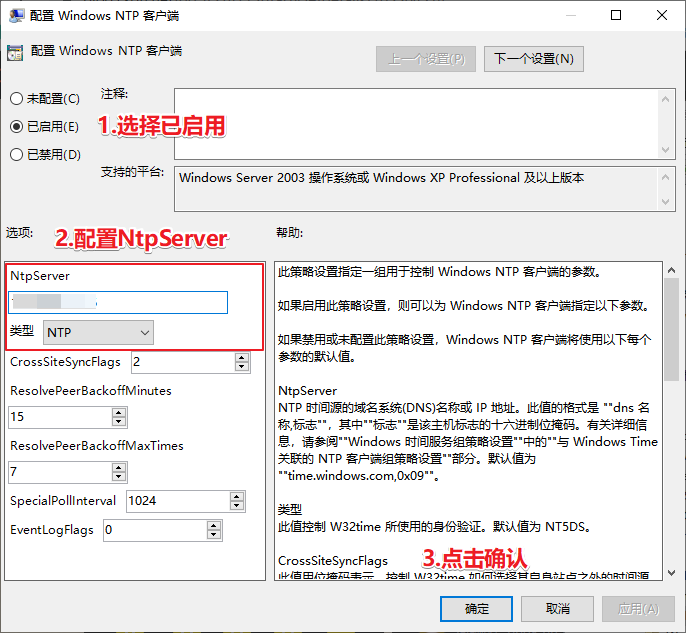
- `Win键+r`输入`gpedit.msc`打开本地组策略编辑器,找到`配置 Windows NTP 客户端`(计算间配置-管理模板-系统-Windows 时间服务-时间提供程序)进行客户端配置:
- 
- 配置页面:
- 
- 启用客户端配置:
- 
- ### 4.2 使用客户端配置
- 
- ## 5.ntp服务其他参数配置
- ### 5.1 查看ntp服务器有无和上层ntp连通
synchronised to NTP server (139.199.214.202) at stratum 3
time correct to within 1010 ms
polling server every 64 s
- ### 5.2 查看ntp服务器与上层ntp的状态
remote refid st t when poll reach delay offset jitter
+skitty.itu.ch 84.16.67.12 2 u 49 64 17 174.891 20.582 5.712
+139.199.214.202 100.122.36.196 2 u 47 64 37 46.355 43.764 9.636
-time.cloudflare 10.28.12.207 3 u 49 64 37 216.628 31.101 12.642
*tick.ntp.infoma .GPS. 1 u 49 64 37 156.665 12.054 11.269
或者利用以下下令查看实时状态
[root@aliyun ~]# watch “ntpq -p”
- * remote:列出源的 IP 地址或主机名。第一列中的字符指示源的质量。星号 ( \* ) 表示该源是当前引用。
- * refid:参考上一层ntp主机地址。
- * st:stratum阶层。
- * when:多少秒前曾经同步过时间。指出从轮询源开始已过去的时间(秒)。
- * poll:下次更新在多少秒后。指出轮询间隔时间。该值会根据本地时钟的精度相应增加。
- * reach:已经向上层ntp服务器要求更新的次数。是一个八进制数字,指出源的可存取性。值 377 表示源已应答了前八个连续轮询。
- * delay:网络延迟。
- * offset:时间补偿。是源时钟与本地时钟的时间差(毫秒)。
- * jitter:系统时间与bios时间差。
- ### 5.3 从其他博客收集的信息
- #### 5.3.1 /etc/ntp.conf 配置内容
1. 权限设置 包括放行上层服务器以及开放局域网用户来源
restrict default nomodify notrap nopeer noquery
restrict 127.0.0.1
restrict ::1
放行局域网用户来源 或者列出单独IP
restrict xxx.xxx.xxx.x mask 255.255.255.0 nomodify
2. 设定主机来源 请先将原本的 [0|1|2|3].centos.pool.ntp.org 注掉
#server 0.centos.pool.ntp.org iburst
#server 1.centos.pool.ntp.org iburst
#server 2.centos.pool.ntp.org iburst
#server 3.centos.pool.ntp.org iburst
以这部主机为最优先的server
server xxx.xxx.xxx.xx prefer
3. 默认的一个内部时钟数据 用在没有外部NTP服务器时 利用它为局域网用户提供服务
server 127.127.1.0
Fudge 127.127.1.0 stratum 8
includefile /etc/ntp/crypto/pw
keys /etc/ntp/keys
disable monitor
- #### 5.3.2 restrict选项格式
- restrict [ 客户端IP ] mask [ IP掩码 ] [参数]
- `客户端IP`和`IP掩码`指定了对网络中哪些范围的计算机进行控制,如果使用default关键字,则表示对所有的计算机进行控制,参数指定了具体的限制内容,常见的参数如下:
- * ignore:拒绝连接到NTP服务器。
- * nomodiy: 客户端不能更改服务端的时间参数,但是客户端可以通过服务端进行网络校时。
- * noquery: 不提供客户端的时间查询。
- * notrap: 不提供trap远程登录功能,trap服务是一种远程时间日志服务。
- * notrust: 客户端除非通过认证,否则该客户端来源将被视为不信任子网 。
- * nopeer: 提供时间服务,但不作为对等体。
- * kod: 向不安全的访问者发送Kiss-Of-Death报文。
- #### 5.3.3 server选项格式
- server host [ key n ] [ version n ] [ prefer ] [ mode n ] [ minpoll n ] [ maxpoll n ] [ iburst ]
- 其中host是上层NTP服务器的IP地址或域名,随后所跟的参数解释如下所示:
- * key: 表示所有发往服务器的报文包含有秘钥加密的认证信息,n是32位的整数,表示秘钥号。
- * version: 表示发往上层服务器的报文使用的版本号,n默认是3,可以是1或者2。
- * prefer: 如果有多个server选项,具有该参数的服务器有限使用。
- * mode: 指定数据报文mode字段的值。
- * minpoll: 指定与查询该服务器的最小时间间隔为2的n次方秒,n默认为6,范围为4-14。
- * maxpoll: 指定与查询该服务器的最大时间间隔为2的n次方秒,n默认为10,范围为4-14。
- * iburst: 当初始同步请求时,采用突发方式接连发送8个报文,时间间隔为2秒。
- #### 5.3.4 层次(stratum)
- stratum根据上层server的层次而设定(+1)。对于提供network time service provider的主机来说,stratum的设定要尽可能准确。而作为局域网的time service provider,通常将stratum设置为10。
- 0层的服务器采用的是原子钟、GPS钟等物理设备,stratum 1与stratum 0 是直接相连的,往后的stratum与上一层stratum通过网络相连,同一层的server也可以交互。ntpd对下层client来说是service server,对于上层server来说它是client。ntpd根据配置文件的参数决定是要为其他服务器提供时钟服务或者是从其他服务器同步时钟。所有的配置都在/etc/ntp.conf文件中。
- **先自我介绍一下,小编浙江大学毕业,去过华为、字节跳动等大厂,目前在阿里**
- **深知大多数程序员,想要提升技能,往往是自己摸索成长,但自己不成体系的自学效果低效又漫长,而且极易碰到天花板技术停滞不前!**
- **因此收集整理了一份《2024年最新Linux运维全套学习资料》,初衷也很简单,就是希望能够帮助到想自学提升又不知道该从何学起的朋友。**
- 
- 
- 
- 
- 
- **既有适合小白学习的零基础资料,也有适合3年以上经验的小伙伴深入学习提升的进阶课程,涵盖了95%以上运维知识点,真正体系化!**
- **由于文件比较多,这里只是将部分目录截图出来,全套包含大厂面经、学习笔记、源码讲义、实战项目、大纲路线、讲解视频,并且后续会持续更新**
- **[需要这份系统化的资料的朋友,可以点击这里获取!](https://bbs.csdn.net/topics/618542503)**
- 795684)]
- [外链图片转存中...(img-766MGa6P-1714273795684)]
- [外链图片转存中...(img-mMMB97bf-1714273795684)]
- [外链图片转存中...(img-Px8HjsfD-1714273795685)]
- **既有适合小白学习的零基础资料,也有适合3年以上经验的小伙伴深入学习提升的进阶课程,涵盖了95%以上运维知识点,真正体系化!**
- **由于文件比较多,这里只是将部分目录截图出来,全套包含大厂面经、学习笔记、源码讲义、实战项目、大纲路线、讲解视频,并且后续会持续更新**
- **[需要这份系统化的资料的朋友,可以点击这里获取!](https://bbs.csdn.net/topics/618542503)**
|