用Python实现BP神经网络(附代码)
大家好 我是毕加锁(锁!)
今天教大家用Python实现BP神经网络(附代码)
用Python实现出来的机器学习算法都是什么样子呢? 前两期线性回归及逻辑回归项目已发布(见文末链接),今天来讲讲BP神经网络。
BP神经网络
神经网络model
先介绍个三层的神经网络,如下图所示
输入层(input layer)有三个units(

为补上的bias,通常设为1)

表示第j层的第i个激励,也称为为单元unit

为第j层到第j+1层映射的权重矩阵,就是每条边的权重
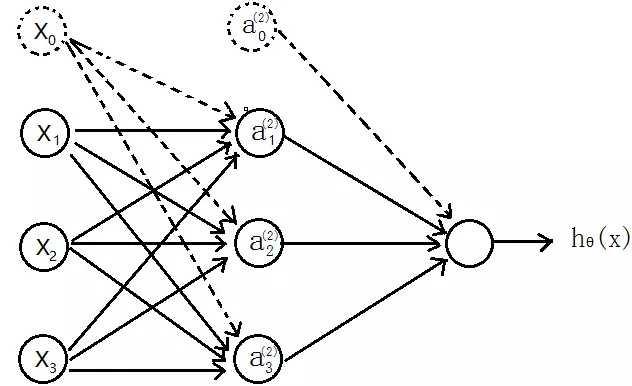
所以可以得到:
隐含层:


输出层

,
其中,S型函数

,也成为激励函数
可以看出

为3x4的矩阵,

为1x4的矩阵

==》j+1的单元数x(j层的单元数+1)
代价函数
假设最后输出的

,即代表输出层有K个单元

,
其中,

代表第i个单元输出与逻辑回归的代价函数

差不多,就是累加上每个输出(共有K个输出)
正则化
L-->所有层的个数

-->第l层unit的个数
正则化后的代价函数为


共有L-1层,然后是累加对应每一层的theta矩阵,注意不包含加上偏置项对应的theta(0)
正则化后的代价函数实现代码:
1
2
3
4
5
6
7
8
9
10
11
12
13
14
15
16
17
18
19
20
21
22
23
24
25
26
27
28
29
30
31
32
33
34
35
36
37
38
39
40
41
42
43
44
45
46
47
48
49
50
51
52
53
54
55
56
57
| # 代价函数
def nnCostFunction(nn_params,input_layer_size,hidden_layer_size,num_labels,X,y,Lambda):
length = nn_params.shape[0] # theta的中长度
# 还原theta1和theta2
Theta1 = nn_params[0:hidden_layer_size*(input_layer_size+1)].reshape(hidden_layer_size,input_layer_size+1)
Theta2 = nn_params[hidden_layer_size*(input_layer_size+1):length].reshape(num_labels,hidden_layer_size+1)
# np.savetxt("Theta1.csv",Theta1,delimiter=',')
m = X.shape[0]
class_y = np.zeros((m,num_labels)) # 数据的y对应0-9,需要映射为0/1的关系
# 映射y
for i in range(num_labels):
class_y[:,i] = np.int32(y==i).reshape(1,-1) # 注意reshape(1,-1)才可以赋值
'''去掉theta1和theta2的第一列,因为正则化时从1开始'''
Theta1_colCount = Theta1.shape[1]
Theta1_x = Theta1[:,1:Theta1_colCount]
Theta2_colCount = Theta2.shape[1]
Theta2_x = Theta2[:,1:Theta2_colCount]
# 正则化向theta^2
term = np.dot(np.transpose(np.vstack((Theta1_x.reshape(-1,1),Theta2_x.reshape(-1,1)))),np.vstack((Theta1_x.reshape(-1,1),Theta2_x.reshape(-1,1))))
'''正向传播,每次需要补上一列1的偏置bias'''
a1 = np.hstack((np.ones((m,1)),X))
z2 = np.dot(a1,np.transpose(Theta1))
a2 = sigmoid(z2)
a2 = np.hstack((np.ones((m,1)),a2))
z3 = np.dot(a2,np.transpose(Theta2))
h = sigmoid(z3)
'''代价'''
J = -(np.dot(np.transpose(class_y.reshape(-1,1)),np.log(h.reshape(-1,1)))+np.dot(np.transpose(1-class_y.reshape(-1,1)),np.log(1-h.reshape(-1,1)))-Lambda*term/2)/m
return np.ravel(J)
|
反向传播BP
上面正向传播可以计算得到J(θ),使用梯度下降法还需要求它的梯度
BP反向传播的目的就是求代价函数的梯度
假设4层的神经网络,

记为-->l层第j个单元的误差

《===》

(向量化)


没有

,因为对于输入没有误差
因为S型函数

的倒数为:

,
所以上面的

和

可以在前向传播中计算出来
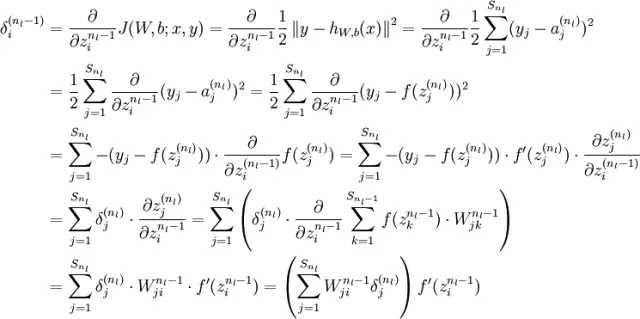
反向传播计算梯度的过程为:

(

是大写的

)
for i=1-m:-

-正向传播计算

(l=2,3,4...L)
-反向计算

、

...

;
-
-


最后

,即得到代价函数的梯度
实现代码:
1
2
3
4
5
6
7
8
9
10
11
12
13
14
15
16
17
18
19
20
21
22
23
24
25
26
27
28
29
30
31
32
33
34
35
36
37
38
39
40
41
42
43
44
45
46
47
48
49
50
51
52
53
54
55
56
57
58
59
60
61
62
63
64
65
66
67
68
69
70
71
72
73
| # 梯度
def nnGradient(nn_params,input_layer_size,hidden_layer_size,num_labels,X,y,Lambda):
length = nn_params.shape[0]
Theta1 = nn_params[0:hidden_layer_size*(input_layer_size+1)].reshape(hidden_layer_size,input_layer_size+1)
Theta2 = nn_params[hidden_layer_size*(input_layer_size+1):length].reshape(num_labels,hidden_layer_size+1)
m = X.shape[0]
class_y = np.zeros((m,num_labels)) # 数据的y对应0-9,需要映射为0/1的关系
# 映射y
for i in range(num_labels):
class_y[:,i] = np.int32(y==i).reshape(1,-1) # 注意reshape(1,-1)才可以赋值
'''去掉theta1和theta2的第一列,因为正则化时从1开始'''
Theta1_colCount = Theta1.shape[1]
Theta1_x = Theta1[:,1:Theta1_colCount]
Theta2_colCount = Theta2.shape[1]
Theta2_x = Theta2[:,1:Theta2_colCount]
Theta1_grad = np.zeros((Theta1.shape)) #第一层到第二层的权重
Theta2_grad = np.zeros((Theta2.shape)) #第二层到第三层的权重
Theta1[:,0] = 0;
Theta2[:,0] = 0;
'''正向传播,每次需要补上一列1的偏置bias'''
a1 = np.hstack((np.ones((m,1)),X))
z2 = np.dot(a1,np.transpose(Theta1))
a2 = sigmoid(z2)
a2 = np.hstack((np.ones((m,1)),a2))
z3 = np.dot(a2,np.transpose(Theta2))
h = sigmoid(z3)
'''反向传播,delta为误差,'''
delta3 = np.zeros((m,num_labels))
delta2 = np.zeros((m,hidden_layer_size))
for i in range(m):
delta3[i,:] = h[i,:]-class_y[i,:]
Theta2_grad = Theta2_grad+np.dot(np.transpose(delta3[i,:].reshape(1,-1)),a2[i,:].reshape(1,-1))
delta2[i,:] = np.dot(delta3[i,:].reshape(1,-1),Theta2_x)*sigmoidGradient(z2[i,:])
Theta1_grad = Theta1_grad+np.dot(np.transpose(delta2[i,:].reshape(1,-1)),a1[i,:].reshape(1,-1))
'''梯度'''
grad = (np.vstack((Theta1_grad.reshape(-1,1),Theta2_grad.reshape(-1,1)))+Lambda*np.vstack((Theta1.reshape(-1,1),Theta2.reshape(-1,1))))/m
return np.ravel(grad)
|
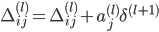
BP可以求梯度的原因
实际是利用了链式求导法则
因为下一层的单元利用上一层的单元作为输入进行计算
大体的推导过程如下,最终我们是想预测函数与已知的y非常接近,求均方差的梯度沿着此梯度方向可使代价函数最小化。可对照上面求梯度的过程。
字比较草 勿喷
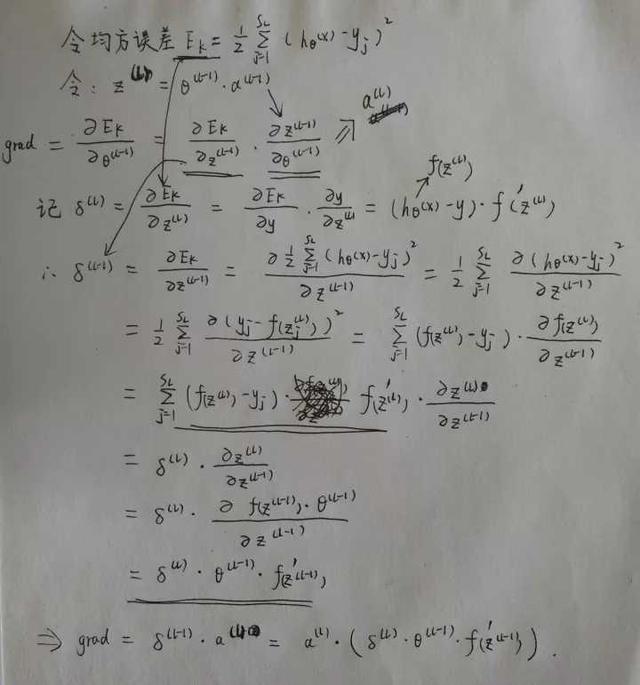
求误差更详细的推导过程:
梯度检查
检查利用BP求的梯度是否正确
利用导数的定义验证:
求出来的数值梯度应该与BP求出的梯度非常接近
验证BP正确后就不需要再执行验证梯度的算法了
实现代码:
1
2
3
4
5
6
7
8
9
10
11
12
13
14
15
16
17
18
19
20
21
22
23
24
25
26
27
28
29
30
31
32
33
34
35
36
37
38
39
40
41
42
43
44
45
46
47
48
49
50
51
52
53
54
55
56
57
58
59
60
61
62
63
64
65
66
67
| # 检验梯度是否计算正确
# 检验梯度是否计算正确
def checkGradient(Lambda = 0):
'''构造一个小型的神经网络验证,因为数值法计算梯度很浪费时间,而且验证正确后之后就不再需要验证了'''
input_layer_size = 3
hidden_layer_size = 5
num_labels = 3
m = 5
initial_Theta1 = debugInitializeWeights(input_layer_size,hidden_layer_size);
initial_Theta2 = debugInitializeWeights(hidden_layer_size,num_labels)
X = debugInitializeWeights(input_layer_size-1,m)
y = 1+np.transpose(np.mod(np.arange(1,m+1), num_labels))# 初始化y
y = y.reshape(-1,1)
nn_params = np.vstack((initial_Theta1.reshape(-1,1),initial_Theta2.reshape(-1,1))) #展开theta
'''BP求出梯度'''
grad = nnGradient(nn_params, input_layer_size, hidden_layer_size,
num_labels, X, y, Lambda)
'''使用数值法计算梯度'''
num_grad = np.zeros((nn_params.shape[0]))
step = np.zeros((nn_params.shape[0]))
e = 1e-4
for i in range(nn_params.shape[0]):
step = e
loss1 = nnCostFunction(nn_params-step.reshape(-1,1), input_layer_size, hidden_layer_size,
num_labels, X, y,
Lambda)
loss2 = nnCostFunction(nn_params+step.reshape(-1,1), input_layer_size, hidden_layer_size,
num_labels, X, y,
Lambda)
num_grad = (loss2-loss1)/(2*e)
step=0
# 显示两列比较
res = np.hstack((num_grad.reshape(-1,1),grad.reshape(-1,1)))
print res
|
权重的随机初始化
神经网络不能像逻辑回归那样初始化theta为0,因为若是每条边的权重都为0,每个神经元都是相同的输出,在反向传播中也会得到同样的梯度,最终只会预测一种结果。
所以应该初始化为接近0的数
实现代码
1
2
3
4
5
6
7
8
9
10
11
| # 随机初始化权重theta
def randInitializeWeights(L_in,L_out):
W = np.zeros((L_out,1+L_in)) # 对应theta的权重
epsilon_init = (6.0/(L_out+L_in))**0.5
W = np.random.rand(L_out,1+L_in)*2*epsilon_init-epsilon_init # np.random.rand(L_out,1+L_in)产生L_out*(1+L_in)大小的随机矩阵
return W
|
预测
正向传播预测结果
实现代码
1
2
3
4
5
6
7
8
9
10
11
12
13
14
15
16
17
18
19
20
21
22
23
24
25
26
27
28
29
30
31
32
33
34
35
36
37
38
39
40
41
| # 预测
def predict(Theta1,Theta2,X):
m = X.shape[0]
num_labels = Theta2.shape[0]
#p = np.zeros((m,1))
'''正向传播,预测结果'''
X = np.hstack((np.ones((m,1)),X))
h1 = sigmoid(np.dot(X,np.transpose(Theta1)))
h1 = np.hstack((np.ones((m,1)),h1))
h2 = sigmoid(np.dot(h1,np.transpose(Theta2)))
'''
返回h中每一行最大值所在的列号
- np.max(h, axis=1)返回h中每一行的最大值(是某个数字的最大概率)
- 最后where找到的最大概率所在的列号(列号即是对应的数字)
'''
#np.savetxt("h2.csv",h2,delimiter=',')
p = np.array(np.where(h2[0,:] == np.max(h2, axis=1)[0]))
for i in np.arange(1, m):
t = np.array(np.where(h2[i,:] == np.max(h2, axis=1)))
p = np.vstack((p,t))
return p
|
输出结果
梯度检查:
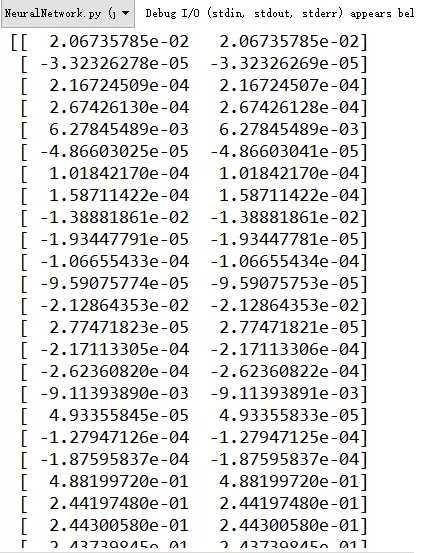
随机显示100个手写数字
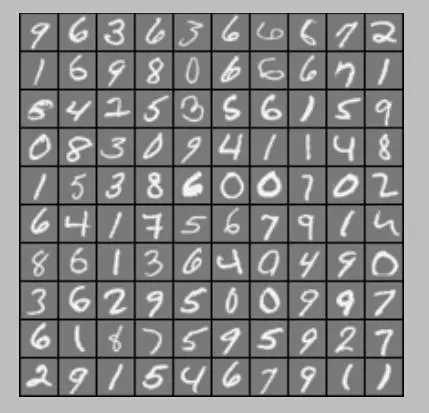
显示theta1权重
训练集预测准确度
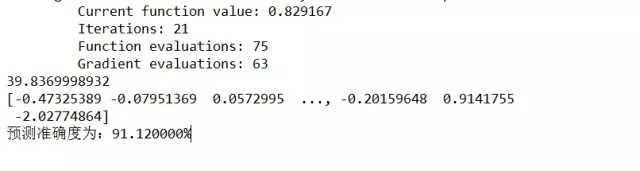
归一化后训练集预测准确度

我是毕加锁 期待你的关注
免责声明:如果侵犯了您的权益,请联系站长,我们会及时删除侵权内容,谢谢合作! |


 发表于 2022-6-25 12:09:49