AOP (Aspect Orient Programming):直译过来就是 面向切面编程。AOP 是一种编程思想
用途:Transactions (事务调用方法前开启事务, 调用方法后提交关闭事务 )、日志、性能(监控方法运行时间)、权限控制等
也就是对业务方法做了增强
1.1 Spring AOP环境介绍
目标:认识AOP基础环境,后面讲使用这个基础环境进行源码讲解
tips:
沿用ioC的工厂
1)引入起步依赖
- compile(project(':spring-aop'))
- compile(project(':spring-context'))
- compile 'org.aspectj:aspectjweaver:1.9.2'
- public interface Slaver {
- void work();
- }
- import org.springframework.stereotype.Service;
- @Service
- public class SlaverImpl implements Slaver {
- public void work() {
- System.out.println("进入实现类 work.....");
- try {
- Thread.sleep(1000);
- } catch (InterruptedException e) {
- e.printStackTrace();
- }
- }
- }
- package com.spring.test.aop.aop;
- import org.aspectj.lang.JoinPoint;
- import org.aspectj.lang.ProceedingJoinPoint;
- import org.aspectj.lang.annotation.*;
- import org.springframework.stereotype.Component;
- import java.util.Arrays;
- //将这个类声明为一个切面,需要将其放入IOC容器中
- @Aspect//声明这是一个切面
- @Component//声明这是一个组件
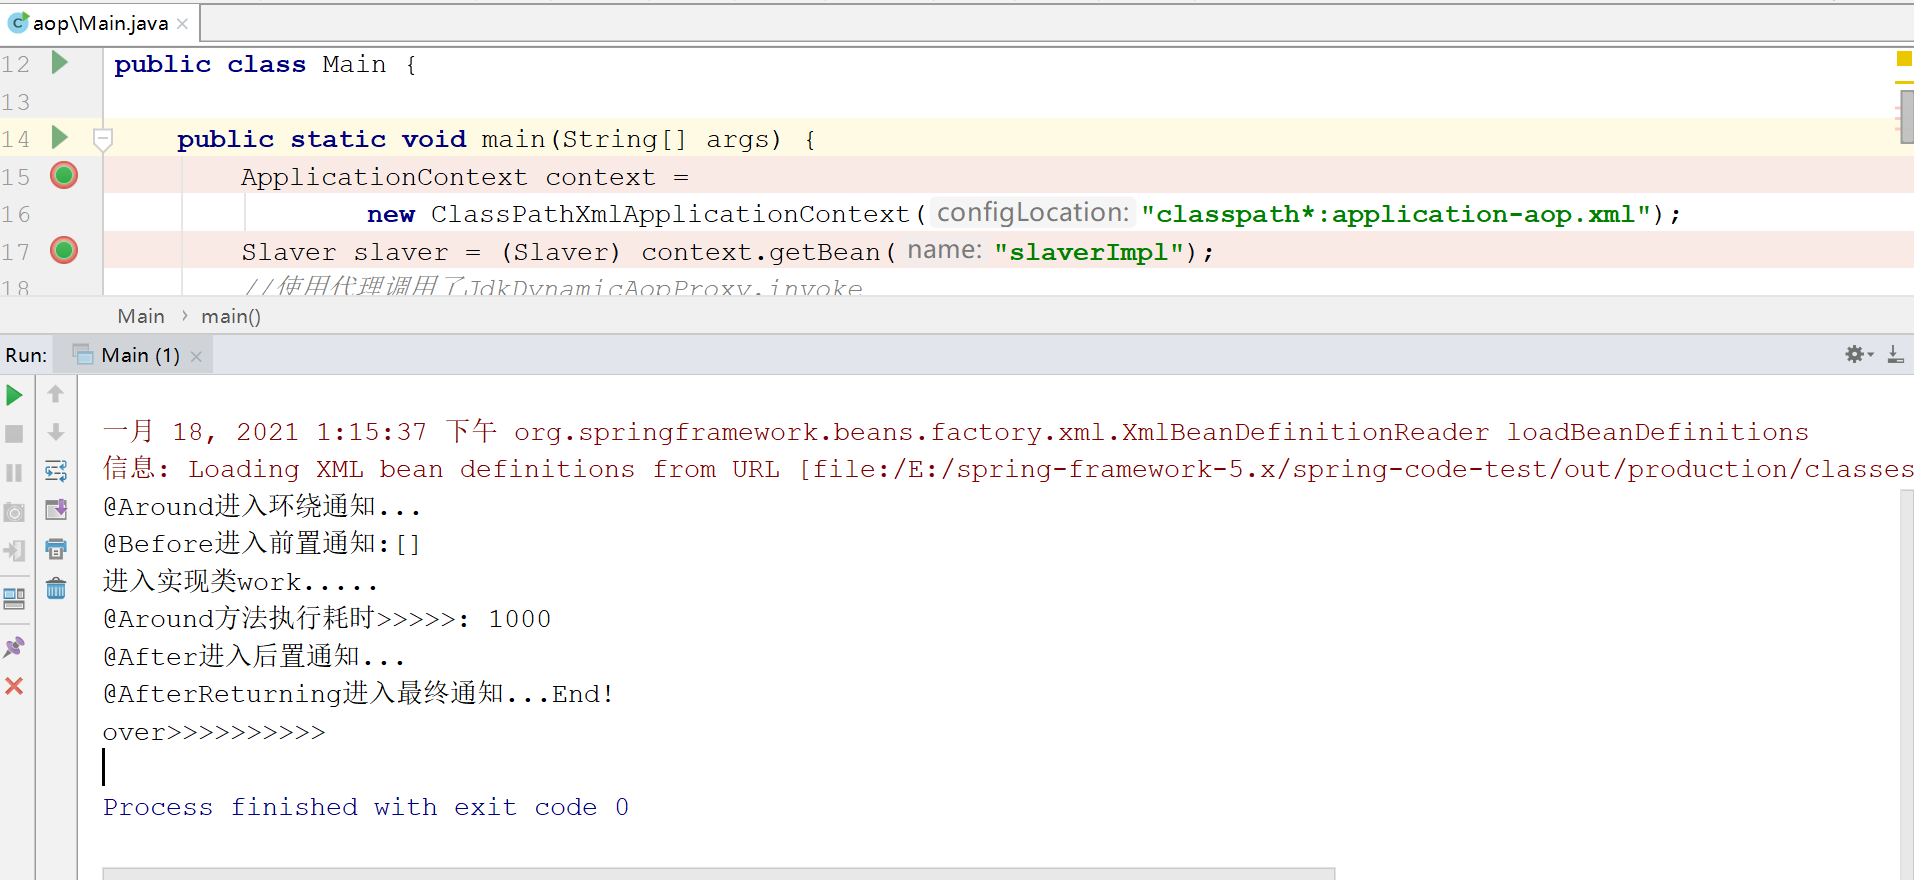
- /**
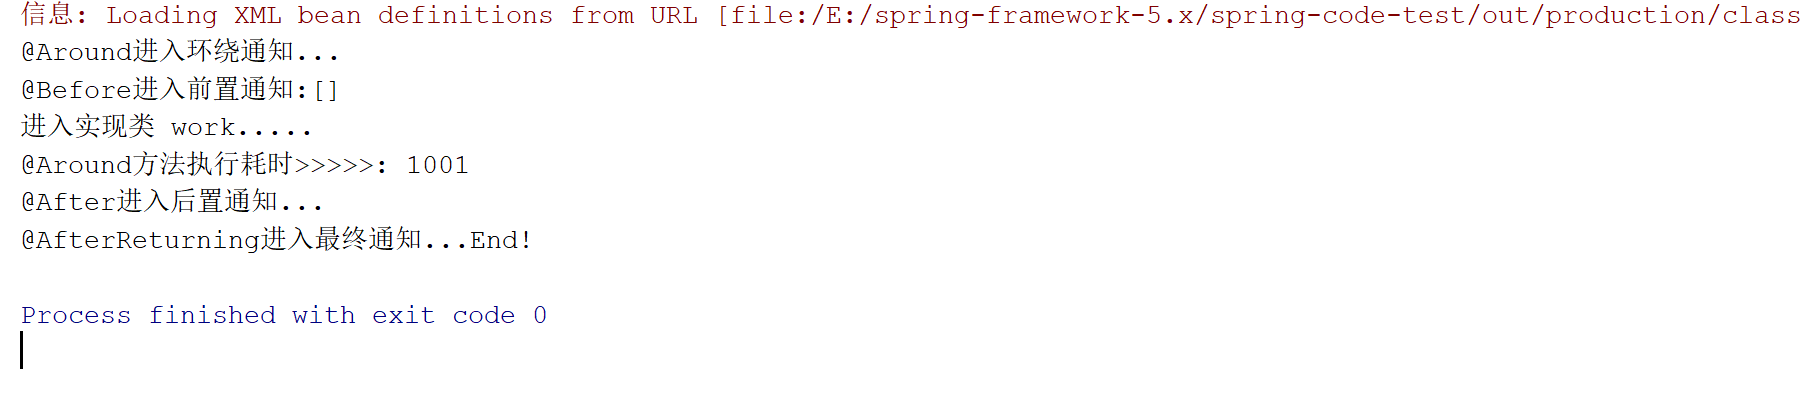
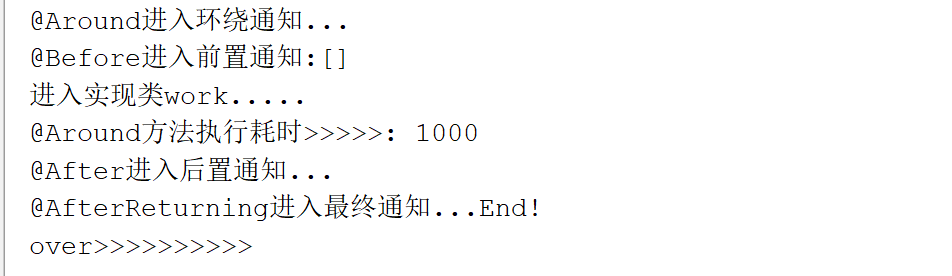
- * 执行顺序
- * @Around进入环绕通知...
- * @Before进入前置通知:[]
- * 进入实现类 work.....
- * @Around方法执行耗时>>>>>: 1001
- * @After进入后置通知...
- * @AfterReturning进入最终通知...End!
- */
- public class SlaverAspect {
- //环绕通知(连接到切入点开始执行,下一步进入前置通知,在下一步才是执行操作方法)
- @Around(value = "pointCut()")
- public void around(ProceedingJoinPoint joinPoint) throws Throwable {
- System.out.println("@Around进入环绕通知...");
- long startTime = System.currentTimeMillis();
- joinPoint.proceed();
- long endTime = System.currentTimeMillis();
- System.out.println(String.format("@Around方法执行耗时>>>>>: %s", endTime - startTime));
- }
- //前置通知(进入环绕后执行,下一步执行方法)
- @Before(value = "pointCut()")
- public void before(JoinPoint joinPoint) {
- System.out.println("@Before进入前置通知:" + Arrays.toString(joinPoint.getArgs()));
- }
- //异常通知(出错时执行)
- @AfterThrowing(value = "pointCut()", throwing = "ex")
- public void afterThrowing(JoinPoint joinPoint, Throwable ex) {
- System.out.println("@AfterThrowing进入异常通知" + Arrays.toString(joinPoint.getArgs()));
- System.out.println("@AfterThrowing异常信息:" + ex);
- }
- //后置通知(返回之前执行)
- @After(value = "pointCut()")
- public void after() {
- System.out.println("@After进入后置通知...");
- }
- //最终通知(正常返回通知,最后执行)
- @AfterReturning(value = "pointCut()")
- public void afterReturning() {
- System.out.println("@AfterReturning进入最终通知...End!");
- }
- //定义一个切入点 后面的通知直接引入切入点方法pointCut即可
- // @Pointcut("execution(public * com.spring.test.aop.impl.SlaverImpl.work())")
- @Pointcut(value = "execution(* com.spring.test.aop.impl.SlaverImpl.*(..))")
- public void pointCut() {
- }
- }
@Before: 前置通知, 在方法执行之前执行
@After: 后置通知, 在方法执行之后执行
@AfterRunning: 返回通知, 在方法返回结果之后执行
@AfterThrowing: 异常通知, 在方法抛出异常之后
@Around: 环绕通知, 围绕着方法执行
execution:用于匹配方法执行的连接点;
4)新建配置文件
resources/application-aop.xml- <?xml version="1.0" encoding="UTF-8"?>
- <beans xmlns="http://www.springframework.org/schema/beans"
- xmlns:aop="http://www.springframework.org/schema/aop"
- xmlns:xsi="http://www.w3.org/2001/XMLSchema-instance"
- xmlns:context="http://www.springframework.org/schema/context"
- xsi:schemaLocation="http://www.springframework.org/schema/beans
- http://www.springframework.org/schema/beans/spring-beans.xsd
- http://www.springframework.org/schema/aop
- http://www.springframework.org/schema/aop/spring-aop.xsd http://www.springframework.org/schema/context http://www.springframework.org/schema/context/spring-context.xsd"
- >
-
- <aop:aspectj-autoproxy/>
-
- <context:component-scan base-package="com.spring.test.aop"/>
- </beans>
配置文件缺乏xsd的引用

5)新建入口类
- public class Main { public static void main(String[] args) { ApplicationContext context =<?xml version="1.0" encoding="UTF-8"?>
- <beans xmlns="http://www.springframework.org/schema/beans"
- xmlns:aop="http://www.springframework.org/schema/aop"
- xmlns:xsi="http://www.w3.org/2001/XMLSchema-instance"
- xmlns:context="http://www.springframework.org/schema/context"
- xsi:schemaLocation="http://www.springframework.org/schema/beans
- http://www.springframework.org/schema/beans/spring-beans.xsd
- http://www.springframework.org/schema/aop
- http://www.springframework.org/schema/aop/spring-aop.xsd http://www.springframework.org/schema/context http://www.springframework.org/schema/context/spring-context.xsd"
- >
-
- <aop:aspectj-autoproxy/>
-
- <context:component-scan base-package="com.spring.test.aop"/>
- </beans>new ClassPathXmlApplicationContext("classpath*:application-aop.xml"); Slaver slaver=(Slaver)context.getBean("slaverImpl"); slaver.work(); }}
1.2 SpringAOP和AspectJ联系
tips:
十个人有九 个人弄不懂的关系
Spring AOP:
Spring AOP旨在通过Spring IoC提供一个简单的AOP实现,以解决编码人员面临的最常出现的问题。这并不是完整的AOP解决方案,它只能用于Spring容器管理的beans。
AspectJ:
AspectJ是最原始的AOP实现技术,提供了完整的AOP解决方案。AspectJ更为健壮,相对于Spring AOP也显得更为复杂
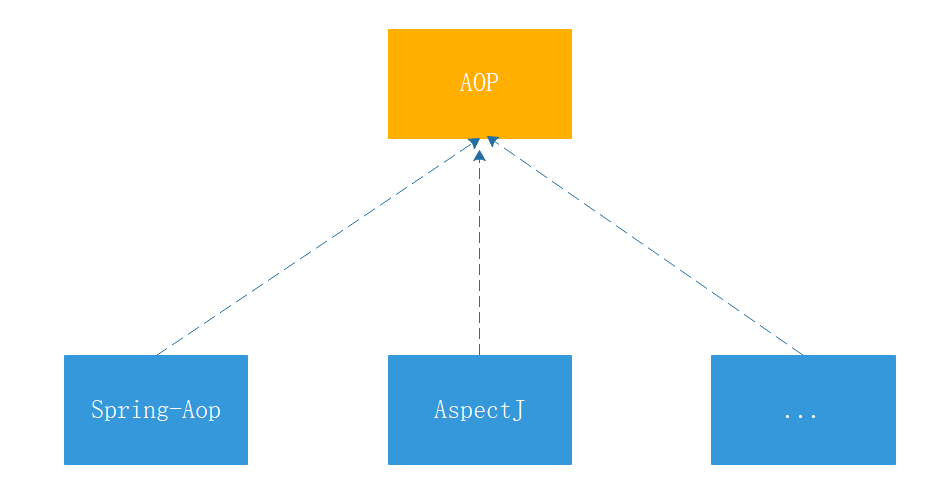
总结- AOP是面向切面的一个思想
- 他有两种实现
- 1、Spring AOP
- 2、Aspectj
- Spring AOP的实现没有AspectJ强大
- 所以,Spring把Aspectj给集成(如果用,还需要单独引jar)进来了
- 但是;spring aop已能满足我们的需求
- 在进行开发时候,这两个框架是完全兼容的
- 说白了,就是两个框架能一起使用,就看你项目需求用到的哪种程度了
- 简单的;spirng aop够用了,但是spring aop借助了aspectj的注解功能,
- 在高级点,比如切面很多,上万个,这是就要用到aspectj的高级功能了
依赖:如果使用@Aspect注解,在xml里加上。但是这需要额外的jar包( aspectjweaver.jar)
因为spring直接使用AspectJ的注解功能,注意只是使用了它 的注解功能而已。并不是核心功能 !
运行效果如下:

1.3 找到处理AOP的源头
1、Spring处理AOP源头在哪里(织入)
AspectJ编译期和类加载时进行织入、Spring AOP利用的是运行时织入
- 猜想:
- 1. 在容器启动时创建?
- 2.在getBean时创建?
容器启动
2、代理对象到底长什么样?
将断点打在getBean的返回对象上,发现这并不是一个我们定义的对象本身,而是一个Proxy
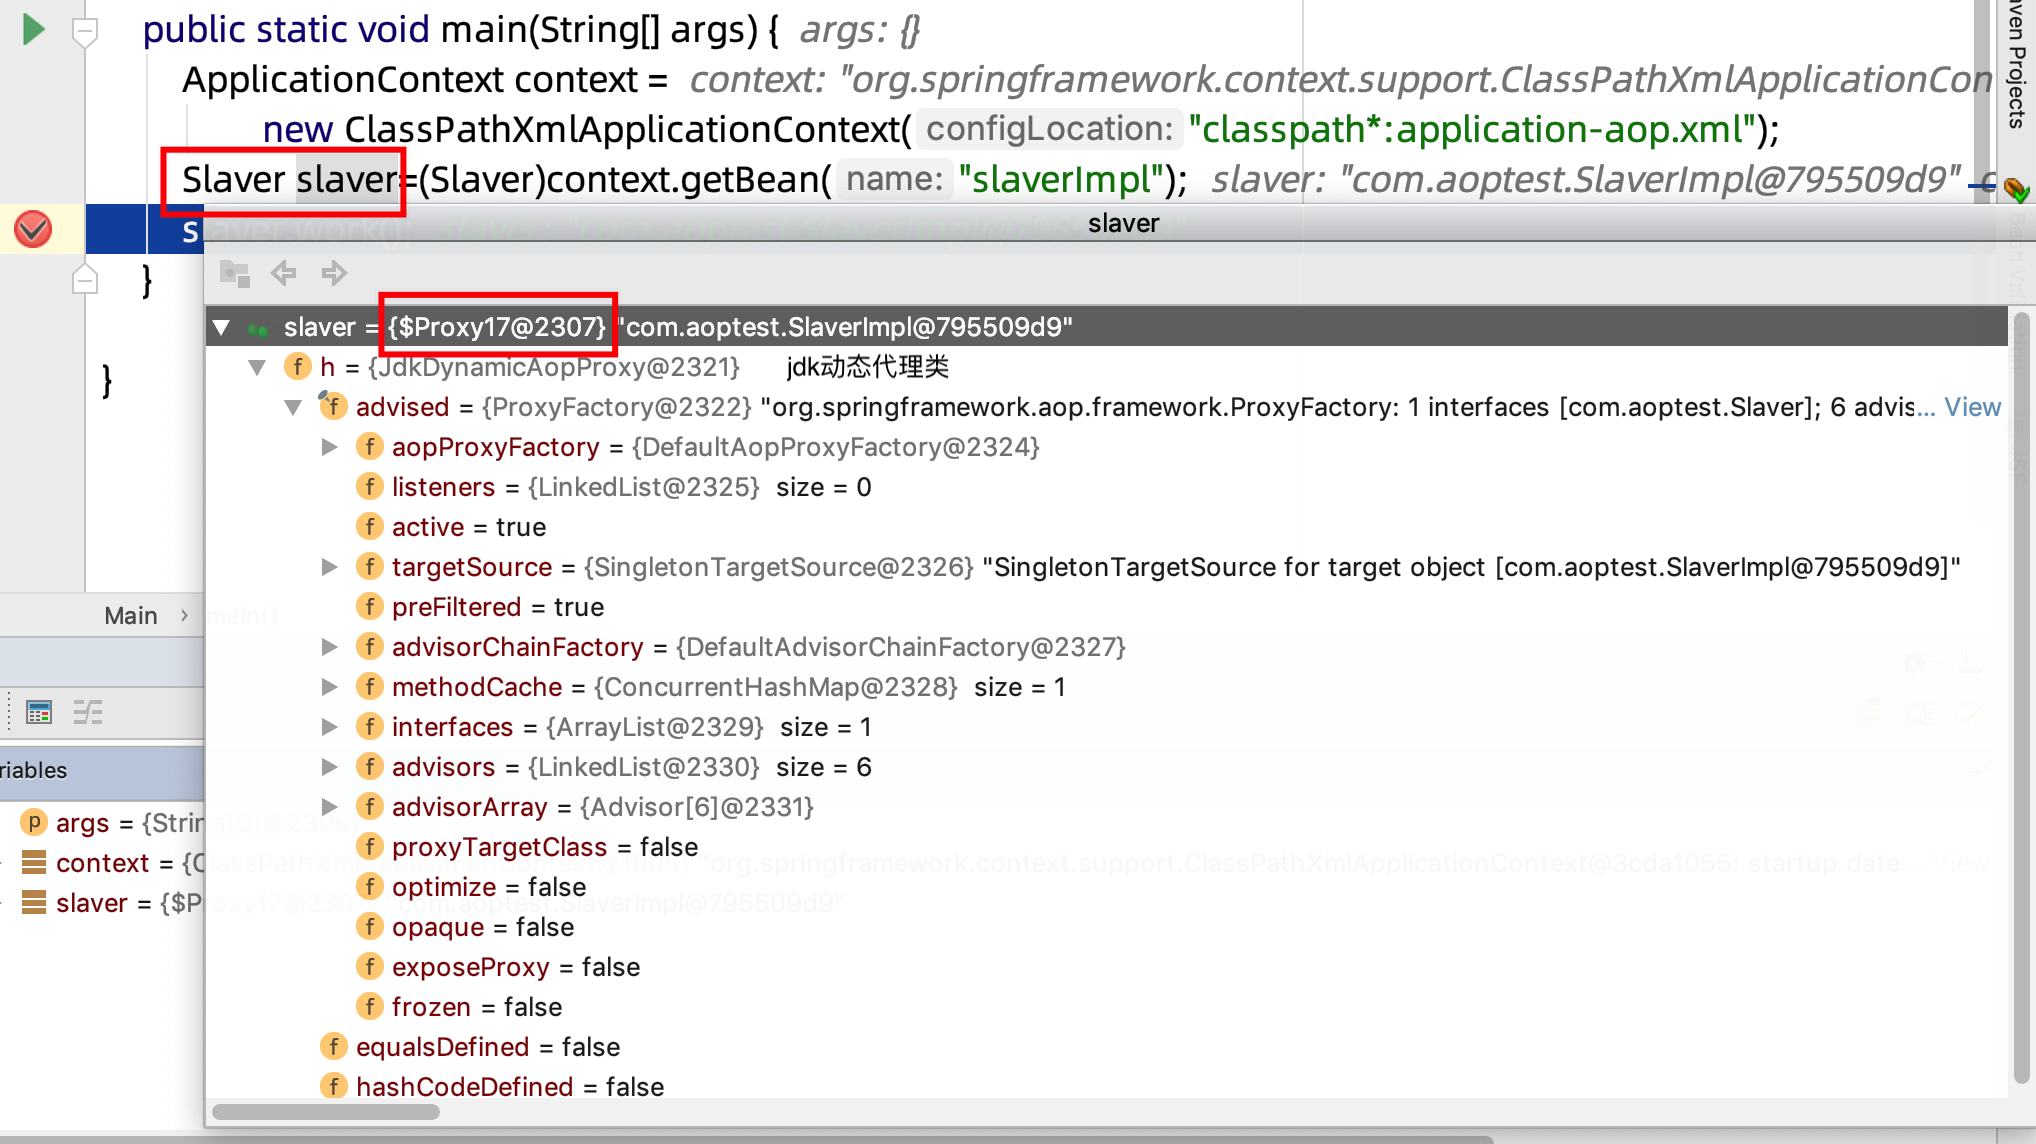
接下来,我们会找到$Proxy生成的始末
3、我的接口是怎么被A0P管理上的 ?
com.spring.test.aop.aop.SlaverAspect#pointCut- //定义一个切入点 后面的通知直接引入切入点方法pointCut即可
- //参数:
- //第一个”*“符号;表示返回值的类型任意
- //.*(..)表示任何方法名,括号表示参数,两个点表示任何参数类型
- @Pointcut(value = "execution(* com.spring.test.aop.impl.SlaverImpl.*(..))")
- public void pointCut() {
- System.out.println("@进入切点...");
- }
tips:
当然是execution声明,改成 SlaverImpl.aaaa*(..) , 再来看getBean的对象,不再是proxy
断点一下……
1.4 代理对象是怎么生成的
1、AOP其实就是用的动态代理模式,创建代理
2、AOP织入源头在哪里
目标:通过源头找代理对象是如何生成的
找到生成代理的地方Proxy.newProxyInstance
0)回顾助学
简单回顾一下,注意,这里不仅仅是学习代理模式,还必须搞懂它的实现方式,尤其是动态代理。
开始之前,我们先必须搞懂一件事情:
那就是:代理模式
设计模式【静态代理】 【动态代理】 回顾 (见第2小节)
1)从源头找代理对象生成
记住目标:
spring aop使用的就是代理模式,那我们的目标就明确了:找到生成代理的地方Proxy.newProxyInstance
先来张流程图:
下面我们沿着图中的调用链,找到aop 代理诞生的地方

tips:从后置处理器开始
为什么要从后置处理器入手?
很容易理解,没初始化好没法用,等你初始化好了功能齐备了,我再下手,代替你
找到后置处理器
重点关注postProcessAfterInitialization
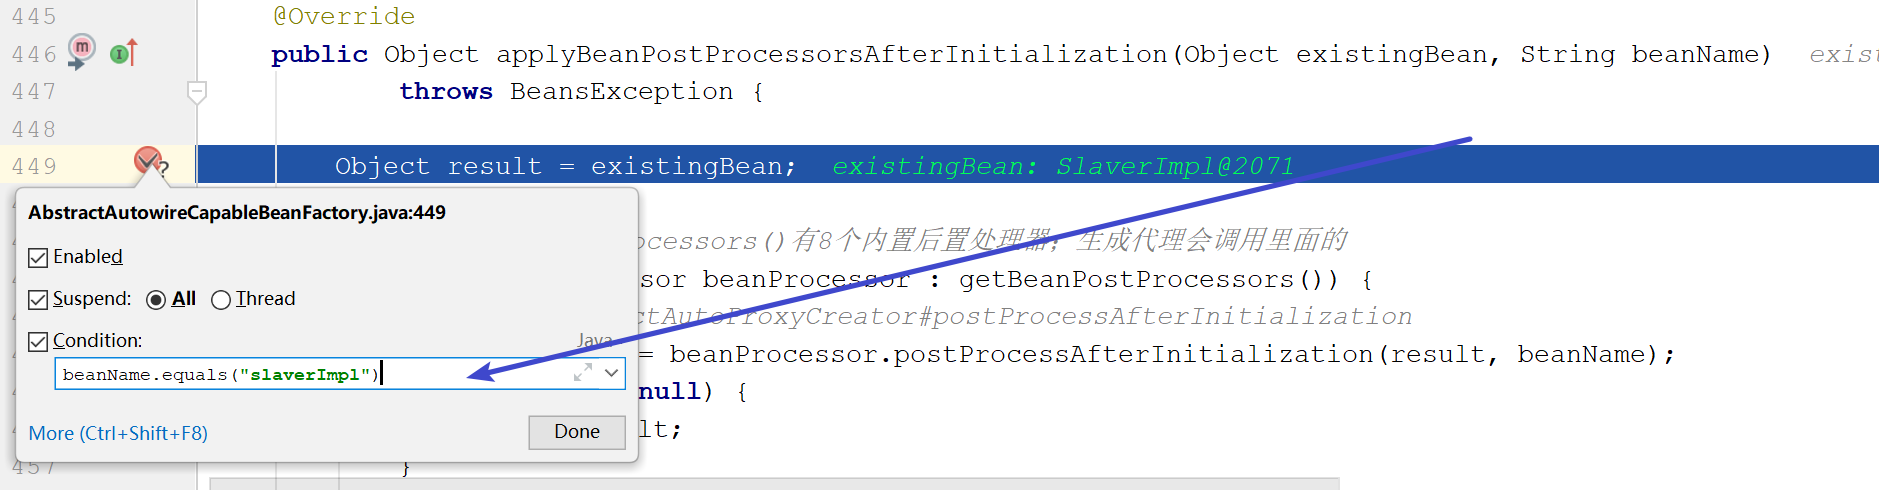
此处最好使用断点表达式,否则要循环很多次
因为在refresh方法中的invokeBeanFactoryPostProcessors方法也会调用到这个地方
断点表达式:
关注点:
tips:
在BeanPostProcessor循环中,观察AnnotationAwareAspectJAutoProxyCreator
这货就是切面的后置处理器
AbstractAutowireCapableBeanFactory#applyBeanPostProcessorsAfterInitialization- //目标:循环所有的后置处理器进行调用 //注意: //AOP调试,此处最好使用断点表达式,否则要循环很多次 //因为在refresh方法中的invokeBeanFactoryPostProcessors方法也会调用到这个地方 @Override public Object applyBeanPostProcessorsAfterInitialization(Object existingBean, String beanName) throws BeansException { Object result = existingBean; //aop //此处getBeanPostProcessors()有8个内置后置处理器;生成代理会调用里面的 AnnotationAwareAspectJAutoProxyCreator for (BeanPostProcessor beanProcessor : getBeanPostProcessors()) { //Aop调用AbstractAutoProxyCreator#postProcessAfterInitialization, Object current = beanProcessor.postProcessAfterInitialization(result, beanName); if (current == null) {<?xml version="1.0" encoding="UTF-8"?>
- <beans xmlns="http://www.springframework.org/schema/beans"
- xmlns:aop="http://www.springframework.org/schema/aop"
- xmlns:xsi="http://www.w3.org/2001/XMLSchema-instance"
- xmlns:context="http://www.springframework.org/schema/context"
- xsi:schemaLocation="http://www.springframework.org/schema/beans
- http://www.springframework.org/schema/beans/spring-beans.xsd
- http://www.springframework.org/schema/aop
- http://www.springframework.org/schema/aop/spring-aop.xsd http://www.springframework.org/schema/context http://www.springframework.org/schema/context/spring-context.xsd"
- >
-
- <aop:aspectj-autoproxy/>
-
- <context:component-scan base-package="com.spring.test.aop"/>
- </beans>return result; } result = current; } return result; }
如上所见
也就是说AOP模块是通过实现BeanPostProcessor集成进来的
2)进入后置处理器
tips:
aop这是spring内置的一个后置处理器,生效在postProcessAfterInitialization方法
AbstractAutoProxyCreator#postProcessAfterInitialization
重点关注wrapIfNecessary- //如果当前的bean适合被代理,则需要包装指定的bean @Override public Object postProcessAfterInitialization(@Nullable Object bean, String beanName) throws BeansException { if (bean != null) { // 根据给定的bean的class和name构建一个key Object cacheKey = getCacheKey(bean.getClass(), beanName); if (!this.earlyProxyReferences.contains(cacheKey)) {<?xml version="1.0" encoding="UTF-8"?>
- <beans xmlns="http://www.springframework.org/schema/beans"
- xmlns:aop="http://www.springframework.org/schema/aop"
- xmlns:xsi="http://www.w3.org/2001/XMLSchema-instance"
- xmlns:context="http://www.springframework.org/schema/context"
- xsi:schemaLocation="http://www.springframework.org/schema/beans
- http://www.springframework.org/schema/beans/spring-beans.xsd
- http://www.springframework.org/schema/aop
- http://www.springframework.org/schema/aop/spring-aop.xsd http://www.springframework.org/schema/context http://www.springframework.org/schema/context/spring-context.xsd"
- >
-
- <aop:aspectj-autoproxy/>
-
- <context:component-scan base-package="com.spring.test.aop"/>
- </beans>// 如果当前的bean适合被代理,则需要包装指定的bean<?xml version="1.0" encoding="UTF-8"?>
- <beans xmlns="http://www.springframework.org/schema/beans"
- xmlns:aop="http://www.springframework.org/schema/aop"
- xmlns:xsi="http://www.w3.org/2001/XMLSchema-instance"
- xmlns:context="http://www.springframework.org/schema/context"
- xsi:schemaLocation="http://www.springframework.org/schema/beans
- http://www.springframework.org/schema/beans/spring-beans.xsd
- http://www.springframework.org/schema/aop
- http://www.springframework.org/schema/aop/spring-aop.xsd http://www.springframework.org/schema/context http://www.springframework.org/schema/context/spring-context.xsd"
- >
-
- <aop:aspectj-autoproxy/>
-
- <context:component-scan base-package="com.spring.test.aop"/>
- </beans>return wrapIfNecessary(bean, beanName, cacheKey); } } return bean; }
1是:getAdvicesAndAdvisorsForBean,找到哪些切面会作用在当前bean上,满足条件的抓出来!
2是:createProxy,生成代理,替代slaverImpl去做事- //目标 //1、判断当前bean是否已经生成过代理对象,或者是否是应该被略过的对象,是则直接返回,否则进行下一步 //2、拿到切面类中的所有增强方法(拦截器:环绕、前置、后置等) //3、生成代理对象 protected Object wrapIfNecessary(Object bean, String beanName, Object cacheKey) { // 判断是否为空 // 判断当前bean是否在TargetSource缓存中存在,如果存在,则直接返回当前bean if (StringUtils.hasLength(beanName) && this.targetSourcedBeans.contains(beanName)) { return bean; } // 这里advisedBeans缓存了不需要代理的bean(为false的),如果缓存中存在,则可以直接返回 if (Boolean.FALSE.equals(this.advisedBeans.get(cacheKey))) { return bean; } //Infrastructure基础设施 // 用于判断当前bean是否为Spring系统自带的bean,自带的bean是 // 不用进行代理的;shouldSkip()则用于判断当前bean是否应该被略过 if (isInfrastructureClass(bean.getClass()) || shouldSkip(bean.getClass(), beanName)) { // 对当前bean进行缓存 this.advisedBeans.put(cacheKey, Boolean.FALSE); return bean; } //AOP:【关键点1】反射来过滤,看看哪些aspect的execution能匹配上当前bean // ===【【【【注意!这货要分两步调试讲解,修改切面表达式做对比】】】】==== // 将SlaverAspect的 execution改成 SlaverImpl.aaa*(..) 试试,你将得到一个空数组!!! // 匹配上的话列出前后和置换的方法(拦截器:环绕、前置、后置等) Object[] specificInterceptors = getAdvicesAndAdvisorsForBean(bean.getClass(), beanName, null); //如果拿到的增强方法不为空 if (specificInterceptors != DO_NOT_PROXY) { // 对当前bean的代理状态进行缓存 this.advisedBeans.put(cacheKey, Boolean.TRUE); // 开始创建AOP代理 // ===【关键点2】=== Object proxy = createProxy(<?xml version="1.0" encoding="UTF-8"?>
- <beans xmlns="http://www.springframework.org/schema/beans"
- xmlns:aop="http://www.springframework.org/schema/aop"
- xmlns:xsi="http://www.w3.org/2001/XMLSchema-instance"
- xmlns:context="http://www.springframework.org/schema/context"
- xsi:schemaLocation="http://www.springframework.org/schema/beans
- http://www.springframework.org/schema/beans/spring-beans.xsd
- http://www.springframework.org/schema/aop
- http://www.springframework.org/schema/aop/spring-aop.xsd http://www.springframework.org/schema/context http://www.springframework.org/schema/context/spring-context.xsd"
- >
-
- <aop:aspectj-autoproxy/>
-
- <context:component-scan base-package="com.spring.test.aop"/>
- </beans> bean.getClass(), beanName, specificInterceptors, new SingletonTargetSource(bean)); // 缓存生成的代理bean的类型,并且返回生成的代理bean this.proxyTypes.put(cacheKey, proxy.getClass()); //此处返回的代理和在Main函数中返回的是一样的 //说明此处代理成功创建 return proxy; } //如果拿到的增强方法为空,缓存起来(使用false标记不需要代理) this.advisedBeans.put(cacheKey, Boolean.FALSE); return bean; }
重点关注最下面的关键点:proxyFactory.getProxy(getProxyClassLoader())- //beanClass:目标对象class //beanaName //specificInterceptors:拦截器里面的拦截方法 //targetSource:目标资源 //目标:开始为bean创建代理 protected Object createProxy(Class beanClass, @Nullable String beanName,<?xml version="1.0" encoding="UTF-8"?>
- <beans xmlns="http://www.springframework.org/schema/beans"
- xmlns:aop="http://www.springframework.org/schema/aop"
- xmlns:xsi="http://www.w3.org/2001/XMLSchema-instance"
- xmlns:context="http://www.springframework.org/schema/context"
- xsi:schemaLocation="http://www.springframework.org/schema/beans
- http://www.springframework.org/schema/beans/spring-beans.xsd
- http://www.springframework.org/schema/aop
- http://www.springframework.org/schema/aop/spring-aop.xsd http://www.springframework.org/schema/context http://www.springframework.org/schema/context/spring-context.xsd"
- >
-
- <aop:aspectj-autoproxy/>
-
- <context:component-scan base-package="com.spring.test.aop"/>
- </beans><?xml version="1.0" encoding="UTF-8"?>
- <beans xmlns="http://www.springframework.org/schema/beans"
- xmlns:aop="http://www.springframework.org/schema/aop"
- xmlns:xsi="http://www.w3.org/2001/XMLSchema-instance"
- xmlns:context="http://www.springframework.org/schema/context"
- xsi:schemaLocation="http://www.springframework.org/schema/beans
- http://www.springframework.org/schema/beans/spring-beans.xsd
- http://www.springframework.org/schema/aop
- http://www.springframework.org/schema/aop/spring-aop.xsd http://www.springframework.org/schema/context http://www.springframework.org/schema/context/spring-context.xsd"
- >
-
- <aop:aspectj-autoproxy/>
-
- <context:component-scan base-package="com.spring.test.aop"/>
- </beans> @Nullable Object[] specificInterceptors, TargetSource targetSource) { //为true,DefaultListableBeanFactory if (this.beanFactory instanceof ConfigurableListableBeanFactory) { //给当前的bd设置属性setAttribute("originalTargetClass",bean的class),进入 AutoProxyUtils.exposeTargetClass((ConfigurableListableBeanFactory) this.beanFactory, beanName, beanClass); } //创建一个默认的代理工厂DefaultAopProxyFactory,父类无参构造器 ProxyFactory proxyFactory = new ProxyFactory(); //proxyFactory通过复制配置进行初始化 //this为AbstractAutoProxyCreator对象,说明AbstractAutoProxyCreator继承参数实际类型 proxyFactory.copyFrom(this); /** * isProxyTargetClass(),默认false * true *目标对象没有接口(只有实现类) – 使用CGLIB代理机制 * false * 目标对象实现了接口 – 使用JDK代理机制(代理所有实现了的接口) */ if (!proxyFactory.isProxyTargetClass()) { //来判断@EnableAspectJAutoProxy注解或者XML的proxyTargetClass参数(true或者false) //看看用户有没有指定什么方式生成代理 // 如果没配置就为空,此处返回false if (shouldProxyTargetClass(beanClass, beanName)) {<?xml version="1.0" encoding="UTF-8"?>
- <beans xmlns="http://www.springframework.org/schema/beans"
- xmlns:aop="http://www.springframework.org/schema/aop"
- xmlns:xsi="http://www.w3.org/2001/XMLSchema-instance"
- xmlns:context="http://www.springframework.org/schema/context"
- xsi:schemaLocation="http://www.springframework.org/schema/beans
- http://www.springframework.org/schema/beans/spring-beans.xsd
- http://www.springframework.org/schema/aop
- http://www.springframework.org/schema/aop/spring-aop.xsd http://www.springframework.org/schema/context http://www.springframework.org/schema/context/spring-context.xsd"
- >
-
- <aop:aspectj-autoproxy/>
-
- <context:component-scan base-package="com.spring.test.aop"/>
- </beans>proxyFactory.setProxyTargetClass(true); } else {<?xml version="1.0" encoding="UTF-8"?>
- <beans xmlns="http://www.springframework.org/schema/beans"
- xmlns:aop="http://www.springframework.org/schema/aop"
- xmlns:xsi="http://www.w3.org/2001/XMLSchema-instance"
- xmlns:context="http://www.springframework.org/schema/context"
- xsi:schemaLocation="http://www.springframework.org/schema/beans
- http://www.springframework.org/schema/beans/spring-beans.xsd
- http://www.springframework.org/schema/aop
- http://www.springframework.org/schema/aop/spring-aop.xsd http://www.springframework.org/schema/context http://www.springframework.org/schema/context/spring-context.xsd"
- >
-
- <aop:aspectj-autoproxy/>
-
- <context:component-scan base-package="com.spring.test.aop"/>
- </beans>//评估接口的合理性,一些内部回调接口,比如InitializingBean等,不会被实现jdk代理<?xml version="1.0" encoding="UTF-8"?>
- <beans xmlns="http://www.springframework.org/schema/beans"
- xmlns:aop="http://www.springframework.org/schema/aop"
- xmlns:xsi="http://www.w3.org/2001/XMLSchema-instance"
- xmlns:context="http://www.springframework.org/schema/context"
- xsi:schemaLocation="http://www.springframework.org/schema/beans
- http://www.springframework.org/schema/beans/spring-beans.xsd
- http://www.springframework.org/schema/aop
- http://www.springframework.org/schema/aop/spring-aop.xsd http://www.springframework.org/schema/context http://www.springframework.org/schema/context/spring-context.xsd"
- >
-
- <aop:aspectj-autoproxy/>
-
- <context:component-scan base-package="com.spring.test.aop"/>
- </beans>evaluateProxyInterfaces(beanClass, proxyFactory); } } // 把advice(增强)类型的增强包装成advisor类型(强制类型转换) Advisor[] advisors = buildAdvisors(beanName, specificInterceptors); //加入到代理工厂 proxyFactory.addAdvisors(advisors); //设置要代理的类(目标类) proxyFactory.setTargetSource(targetSource); //子类实现, 定制代理 customizeProxyFactory(proxyFactory); //用来控制代理工厂被设置后是否还允许修改通知,缺省值为false proxyFactory.setFrozen(this.freezeProxy); //明明是false?? 此处注意,他是在子类AbstractAdvisorAutoProxyCreator重写了advisorsPreFiltered方法 if (advisorsPreFiltered()) { //设置预过滤 proxyFactory.setPreFiltered(true); } //【关键点】通过类加载期获取代理;getProxyClassLoader为默认的类加载器 return proxyFactory.getProxy(getProxyClassLoader()); }
- //通过类加载期获取代理
- public Object getProxy(@Nullable ClassLoader classLoader) {
- //分别进入createAopProxy 和getProxy
- return createAopProxy().getProxy(classLoader);
- }
查看返回jdk代理还是cglib代理- public AopProxy createAopProxy(AdvisedSupport config) throws AopConfigException { // isOptimize:是否对代理进行优化 // isProxyTargetClass:值为true,使用CGLIB代理,默认false // hasNoUserSuppliedProxyInterfaces: //1、如果长度为0;也就是接口为空,返回false //or(或的关系) //2、如果接口类型不是SpringProxy类型的;返回flase //如果条件不满足;直接走JDK动态代理(return) if (config.isOptimize() || config.isProxyTargetClass() || hasNoUserSuppliedProxyInterfaces(config)) { Class targetClass = config.getTargetClass(); if (targetClass == null) {<?xml version="1.0" encoding="UTF-8"?>
- <beans xmlns="http://www.springframework.org/schema/beans"
- xmlns:aop="http://www.springframework.org/schema/aop"
- xmlns:xsi="http://www.w3.org/2001/XMLSchema-instance"
- xmlns:context="http://www.springframework.org/schema/context"
- xsi:schemaLocation="http://www.springframework.org/schema/beans
- http://www.springframework.org/schema/beans/spring-beans.xsd
- http://www.springframework.org/schema/aop
- http://www.springframework.org/schema/aop/spring-aop.xsd http://www.springframework.org/schema/context http://www.springframework.org/schema/context/spring-context.xsd"
- >
-
- <aop:aspectj-autoproxy/>
-
- <context:component-scan base-package="com.spring.test.aop"/>
- </beans>throw new AopConfigException("TargetSource cannot determine target class: " +<?xml version="1.0" encoding="UTF-8"?>
- <beans xmlns="http://www.springframework.org/schema/beans"
- xmlns:aop="http://www.springframework.org/schema/aop"
- xmlns:xsi="http://www.w3.org/2001/XMLSchema-instance"
- xmlns:context="http://www.springframework.org/schema/context"
- xsi:schemaLocation="http://www.springframework.org/schema/beans
- http://www.springframework.org/schema/beans/spring-beans.xsd
- http://www.springframework.org/schema/aop
- http://www.springframework.org/schema/aop/spring-aop.xsd http://www.springframework.org/schema/context http://www.springframework.org/schema/context/spring-context.xsd"
- >
-
- <aop:aspectj-autoproxy/>
-
- <context:component-scan base-package="com.spring.test.aop"/>
- </beans> "Either an interface or a target is required for proxy creation."); } // 如果targetClass是接口类,使用JDK来生成Proxy //Tips //如果目标对象实现了接口,默认情况下会采用JDK动态代理, // 但也可以通过配置(proxy-target-class=true)强制使用CGLIB。 if (targetClass.isInterface() || Proxy.isProxyClass(targetClass)) {<?xml version="1.0" encoding="UTF-8"?>
- <beans xmlns="http://www.springframework.org/schema/beans"
- xmlns:aop="http://www.springframework.org/schema/aop"
- xmlns:xsi="http://www.w3.org/2001/XMLSchema-instance"
- xmlns:context="http://www.springframework.org/schema/context"
- xsi:schemaLocation="http://www.springframework.org/schema/beans
- http://www.springframework.org/schema/beans/spring-beans.xsd
- http://www.springframework.org/schema/aop
- http://www.springframework.org/schema/aop/spring-aop.xsd http://www.springframework.org/schema/context http://www.springframework.org/schema/context/spring-context.xsd"
- >
-
- <aop:aspectj-autoproxy/>
-
- <context:component-scan base-package="com.spring.test.aop"/>
- </beans>//jdk<?xml version="1.0" encoding="UTF-8"?>
- <beans xmlns="http://www.springframework.org/schema/beans"
- xmlns:aop="http://www.springframework.org/schema/aop"
- xmlns:xsi="http://www.w3.org/2001/XMLSchema-instance"
- xmlns:context="http://www.springframework.org/schema/context"
- xsi:schemaLocation="http://www.springframework.org/schema/beans
- http://www.springframework.org/schema/beans/spring-beans.xsd
- http://www.springframework.org/schema/aop
- http://www.springframework.org/schema/aop/spring-aop.xsd http://www.springframework.org/schema/context http://www.springframework.org/schema/context/spring-context.xsd"
- >
-
- <aop:aspectj-autoproxy/>
-
- <context:component-scan base-package="com.spring.test.aop"/>
- </beans>return new JdkDynamicAopProxy(config); } //cglib return new ObjenesisCglibAopProxy(config); } else { //jdk return new JdkDynamicAopProxy(config); } }
- //获取最终的代理对象(由JDK生成;运行时织入)
- @Override
- public Object getProxy(@Nullable ClassLoader classLoader) {
- if (logger.isDebugEnabled()) {
- logger.debug("Creating JDK dynamic proxy: target source is " + this.advised.getTargetSource());
- }
- //获取代理对象需要实现的接口(业务接口和内置接口)
- Class<?>[] proxiedInterfaces = AopProxyUtils.completeProxiedInterfaces(this.advised, true);
- //判断接口中是否重写了equals和hashCode方法
- findDefinedEqualsAndHashCodeMethods(proxiedInterfaces);
- /**
- * 第一个参数是类加载器(目标类)
- * 第二个参数是代理类需要实现的接口,即目标类实现的接口(含系统接口)(数组)
- * 第三个是InvocationHandler,本类实现了此接口
- */
- return Proxy.newProxyInstance(classLoader, proxiedInterfaces, this);
- }
4)代理对象验证
tips:
前面创建完成了代理对象,下面我们看下它调用的时候,是不是走了代理
这是我们一开始的结果,下面我们来再debug到work方法时,点击debug into试试,发现调到哪里去了???
结论:
没错!代理对象精准的调用了JdkDynamicAopProxy里面的invoke方法
这说明jdk动态代理生效,但是它生成的proxy字节码在jvm里,我们是看不到的,怎么破?
arthas上!
2)Arthas代理类验证
arthas,阿里神器,主页:https://arthas.aliyun.com/zh-cn/
获取之前,我们需要做点小事情,打出我们的 slaver的类路径,让arthas能找到它!
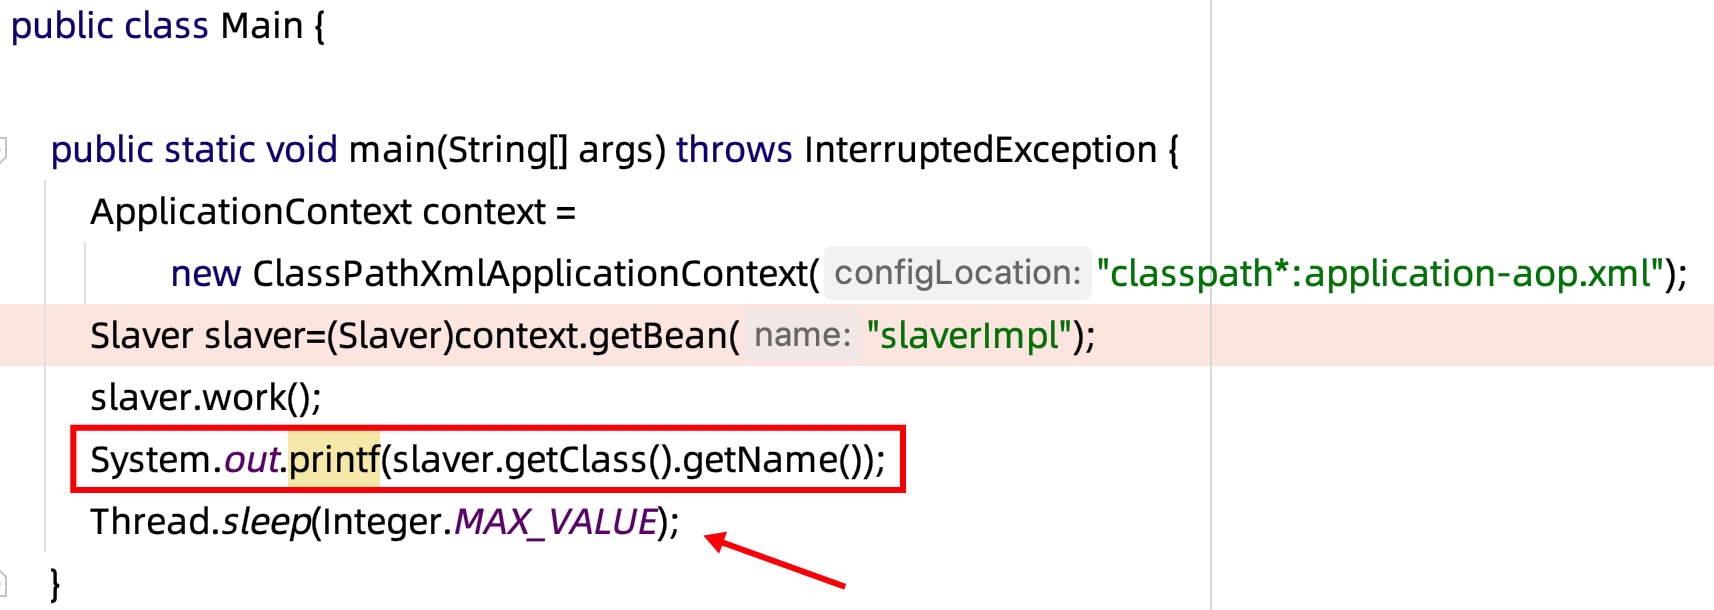
源码:- package com.aoptest;import org.springframework.context.ApplicationContext;import org.springframework.context.support.ClassPathXmlApplicationContext;public class Main { public static void main(String[] args) throws InterruptedException { ApplicationContext context =<?xml version="1.0" encoding="UTF-8"?>
- <beans xmlns="http://www.springframework.org/schema/beans"
- xmlns:aop="http://www.springframework.org/schema/aop"
- xmlns:xsi="http://www.w3.org/2001/XMLSchema-instance"
- xmlns:context="http://www.springframework.org/schema/context"
- xsi:schemaLocation="http://www.springframework.org/schema/beans
- http://www.springframework.org/schema/beans/spring-beans.xsd
- http://www.springframework.org/schema/aop
- http://www.springframework.org/schema/aop/spring-aop.xsd http://www.springframework.org/schema/context http://www.springframework.org/schema/context/spring-context.xsd"
- >
-
- <aop:aspectj-autoproxy/>
-
- <context:component-scan base-package="com.spring.test.aop"/>
- </beans>new ClassPathXmlApplicationContext("classpath*:application-aop.xml"); Slaver slaver=(Slaver)context.getBean("slaverImpl"); slaver.work(); System.out.printf(slaver.getClass().getName()); //打印当前对象的类名称:com.sun.proxy.$Proxy17 Thread.sleep(Integer.MAX_VALUE); // 必须停留在这里,debug是不行的,arthas会连不上 }}
- 很简单, java -jar arthas-boot.jar
- 启动后,在arthas里执行:jad com.sun.proxy.$Proxy17 反编译我们的代理类
注意,jad后面的,换成你上一步控制台打印出来的
见证奇迹的时刻……
找到里面的work方法,结果它长这样……
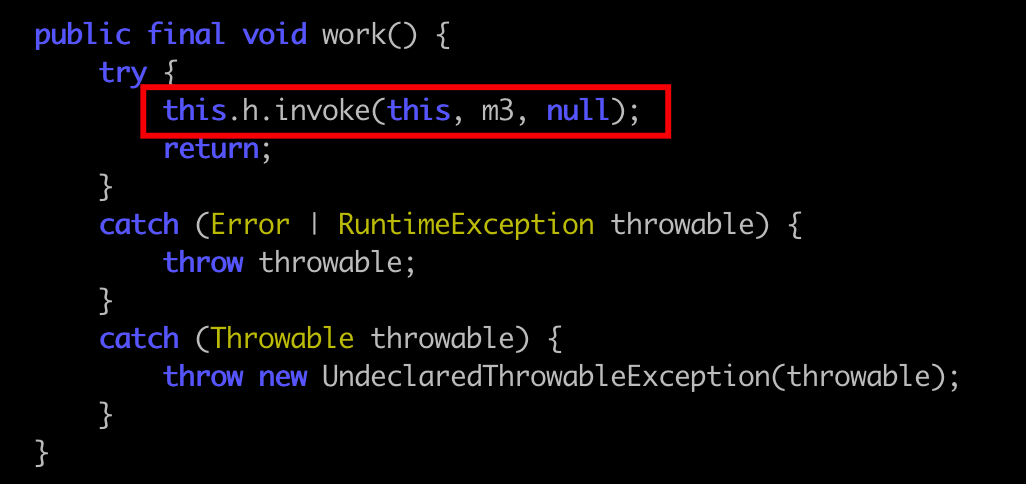
那么,this.h呢?
杀死进程,回到debug模式,看看
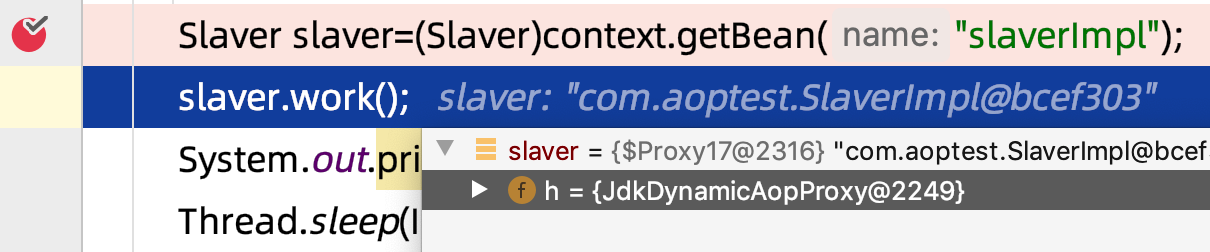
没错,就是我们的jdk动态代理类!
现在调用关系明确了,接下来,我们就来分析下这个invoke
1.5 代理对象如何调用
1)先看张图
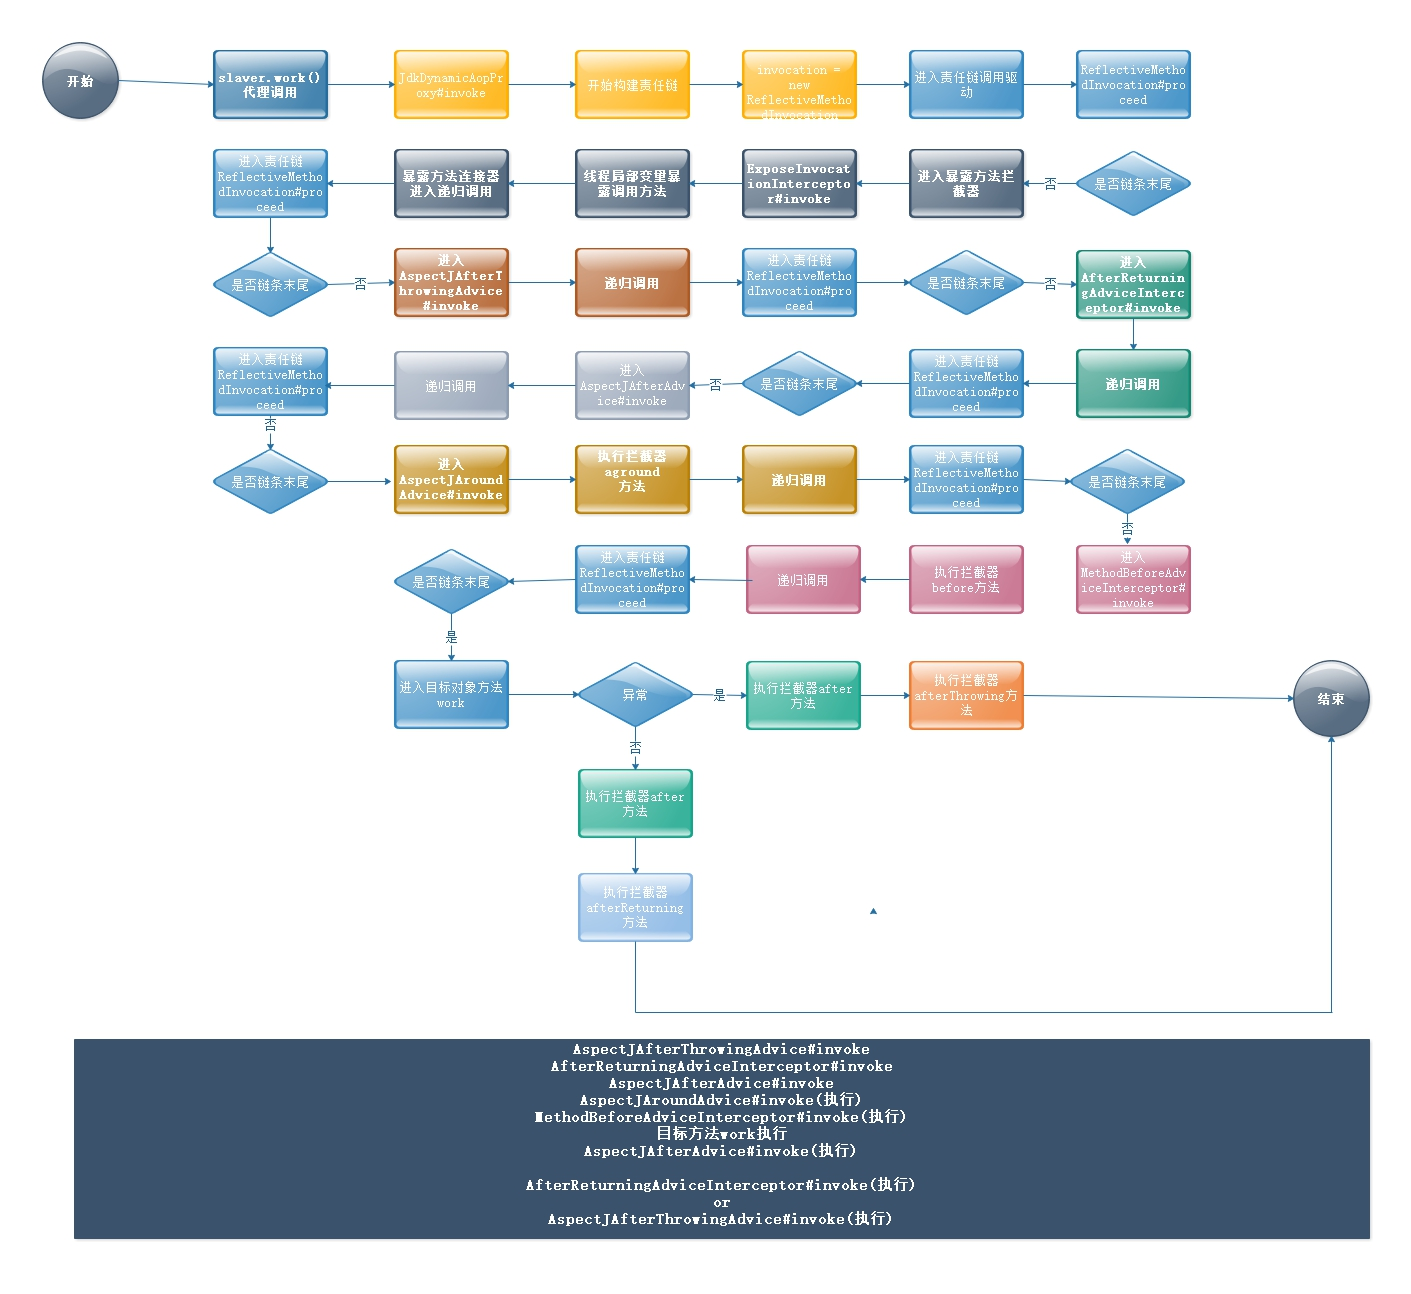
代理对象调用链如下图 (责任链,先有个印象,很长,很长……)
2)理解责任链
代码中给大家准备了一个责任链小demo,它就是我们spring aop切面调用链的缩影
spring-aop-test 项目下的 com.spring.test.aop.chain 包。
执行里面的main方法
生活中的例子,类似于:
- 全公司站成一队,从队首开始签名
如果先签完再交给下一个,你就是前置拦截。(签名 = 执行切面任务)
如果先交给下一个,等传回来的时候再签,你就实现了后置,回来的时候再补
- 一个个传到底后,到达队尾,老板盖章(真正的业务逻辑得到执行)
- 然后一个个往回传(return),前面没签的那些家伙补上(后置切面任务得到执行)
3)invoke方法源码分析
通过上小节我们知道,代理模式下执行的是以下invoke
org.springframework.aop.framework.JdkDynamicAopProxy#invoke
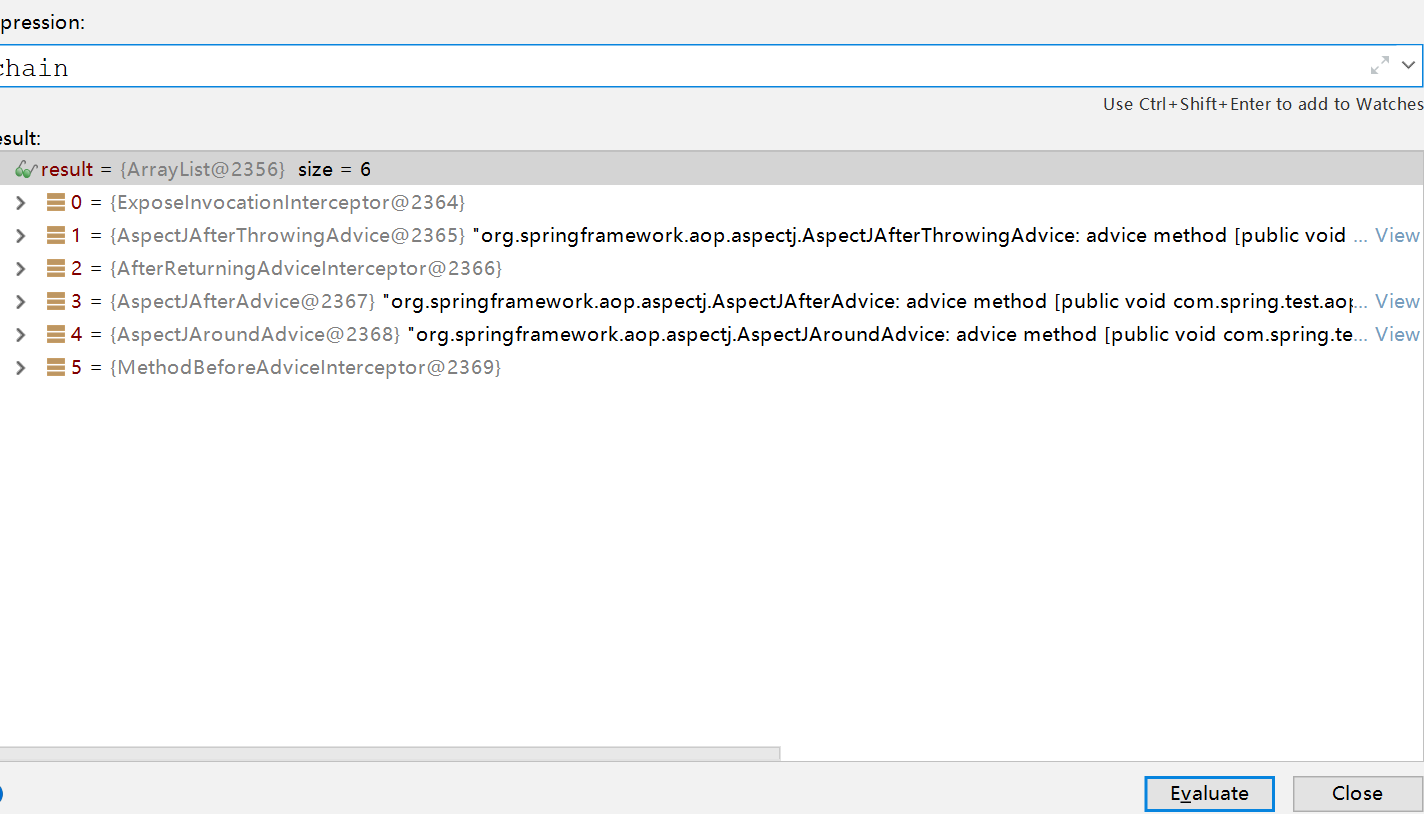
代码重点关注- // 2.从ProxyFactory(this.advised)中构建拦截器链,包含了目标方法的所有切面方法
- List<Object> chain = this.advised.getInterceptorsAndDynamicInterceptionAdvice(method, targetClass)
-
- //责任链开始调用:ReflectiveMethodInvocation.proceed();重点关注!!!
- retVal = invocation.proceed();
接下来,我们具体看看责任链具体的处理逻辑
4)AOP核心之责任链
思考:
责任链调用,调用的什么?
责任链目标:
AOP责任链调用流程简图
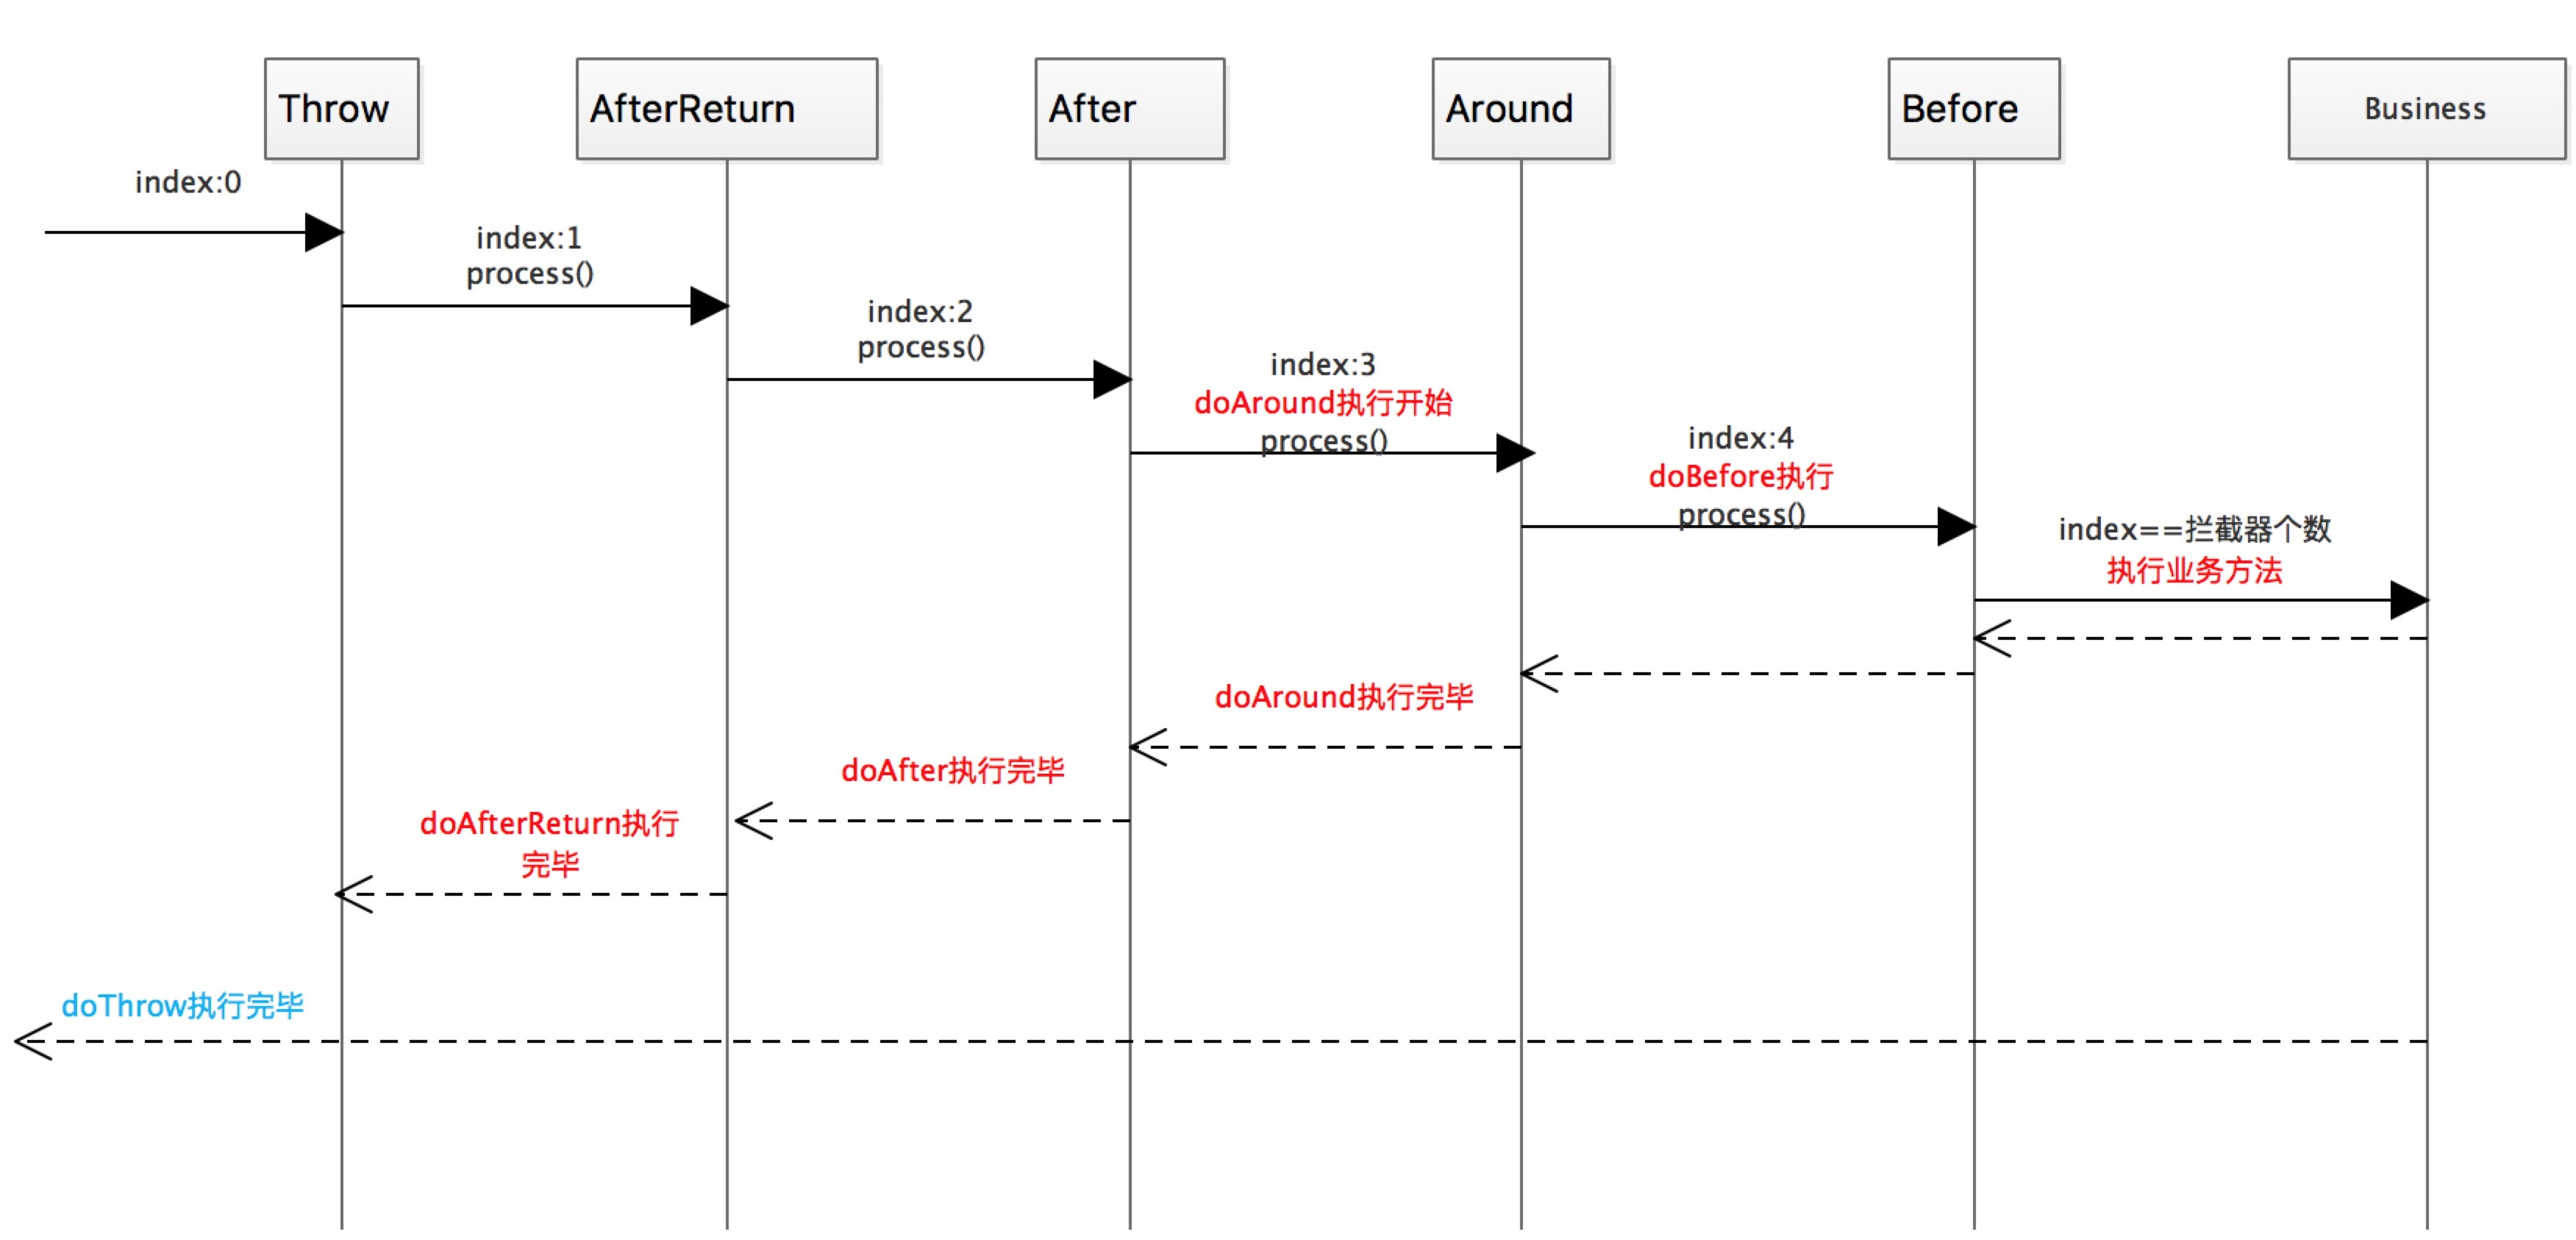
注意:上图的颜色区分
黑色:表示正向调用,invoke的时候,在前或后执行自己的切面逻辑,然后推动责任链往下走
红色:表示当前切面任务触发的点
备注:ExposeInvocationInterceptor 是spring帮我们加上做上下文传递的,本图不涉及(它在最前面)
注意,我们的链条如下:
调试技巧:
从 ReflectiveMethodInvocation.invoke() 开始,对照上面的责任链嵌套调用图
每次通过debug into 进行查看,每到一环,注意对照图上的节点,看到那个invocation了!
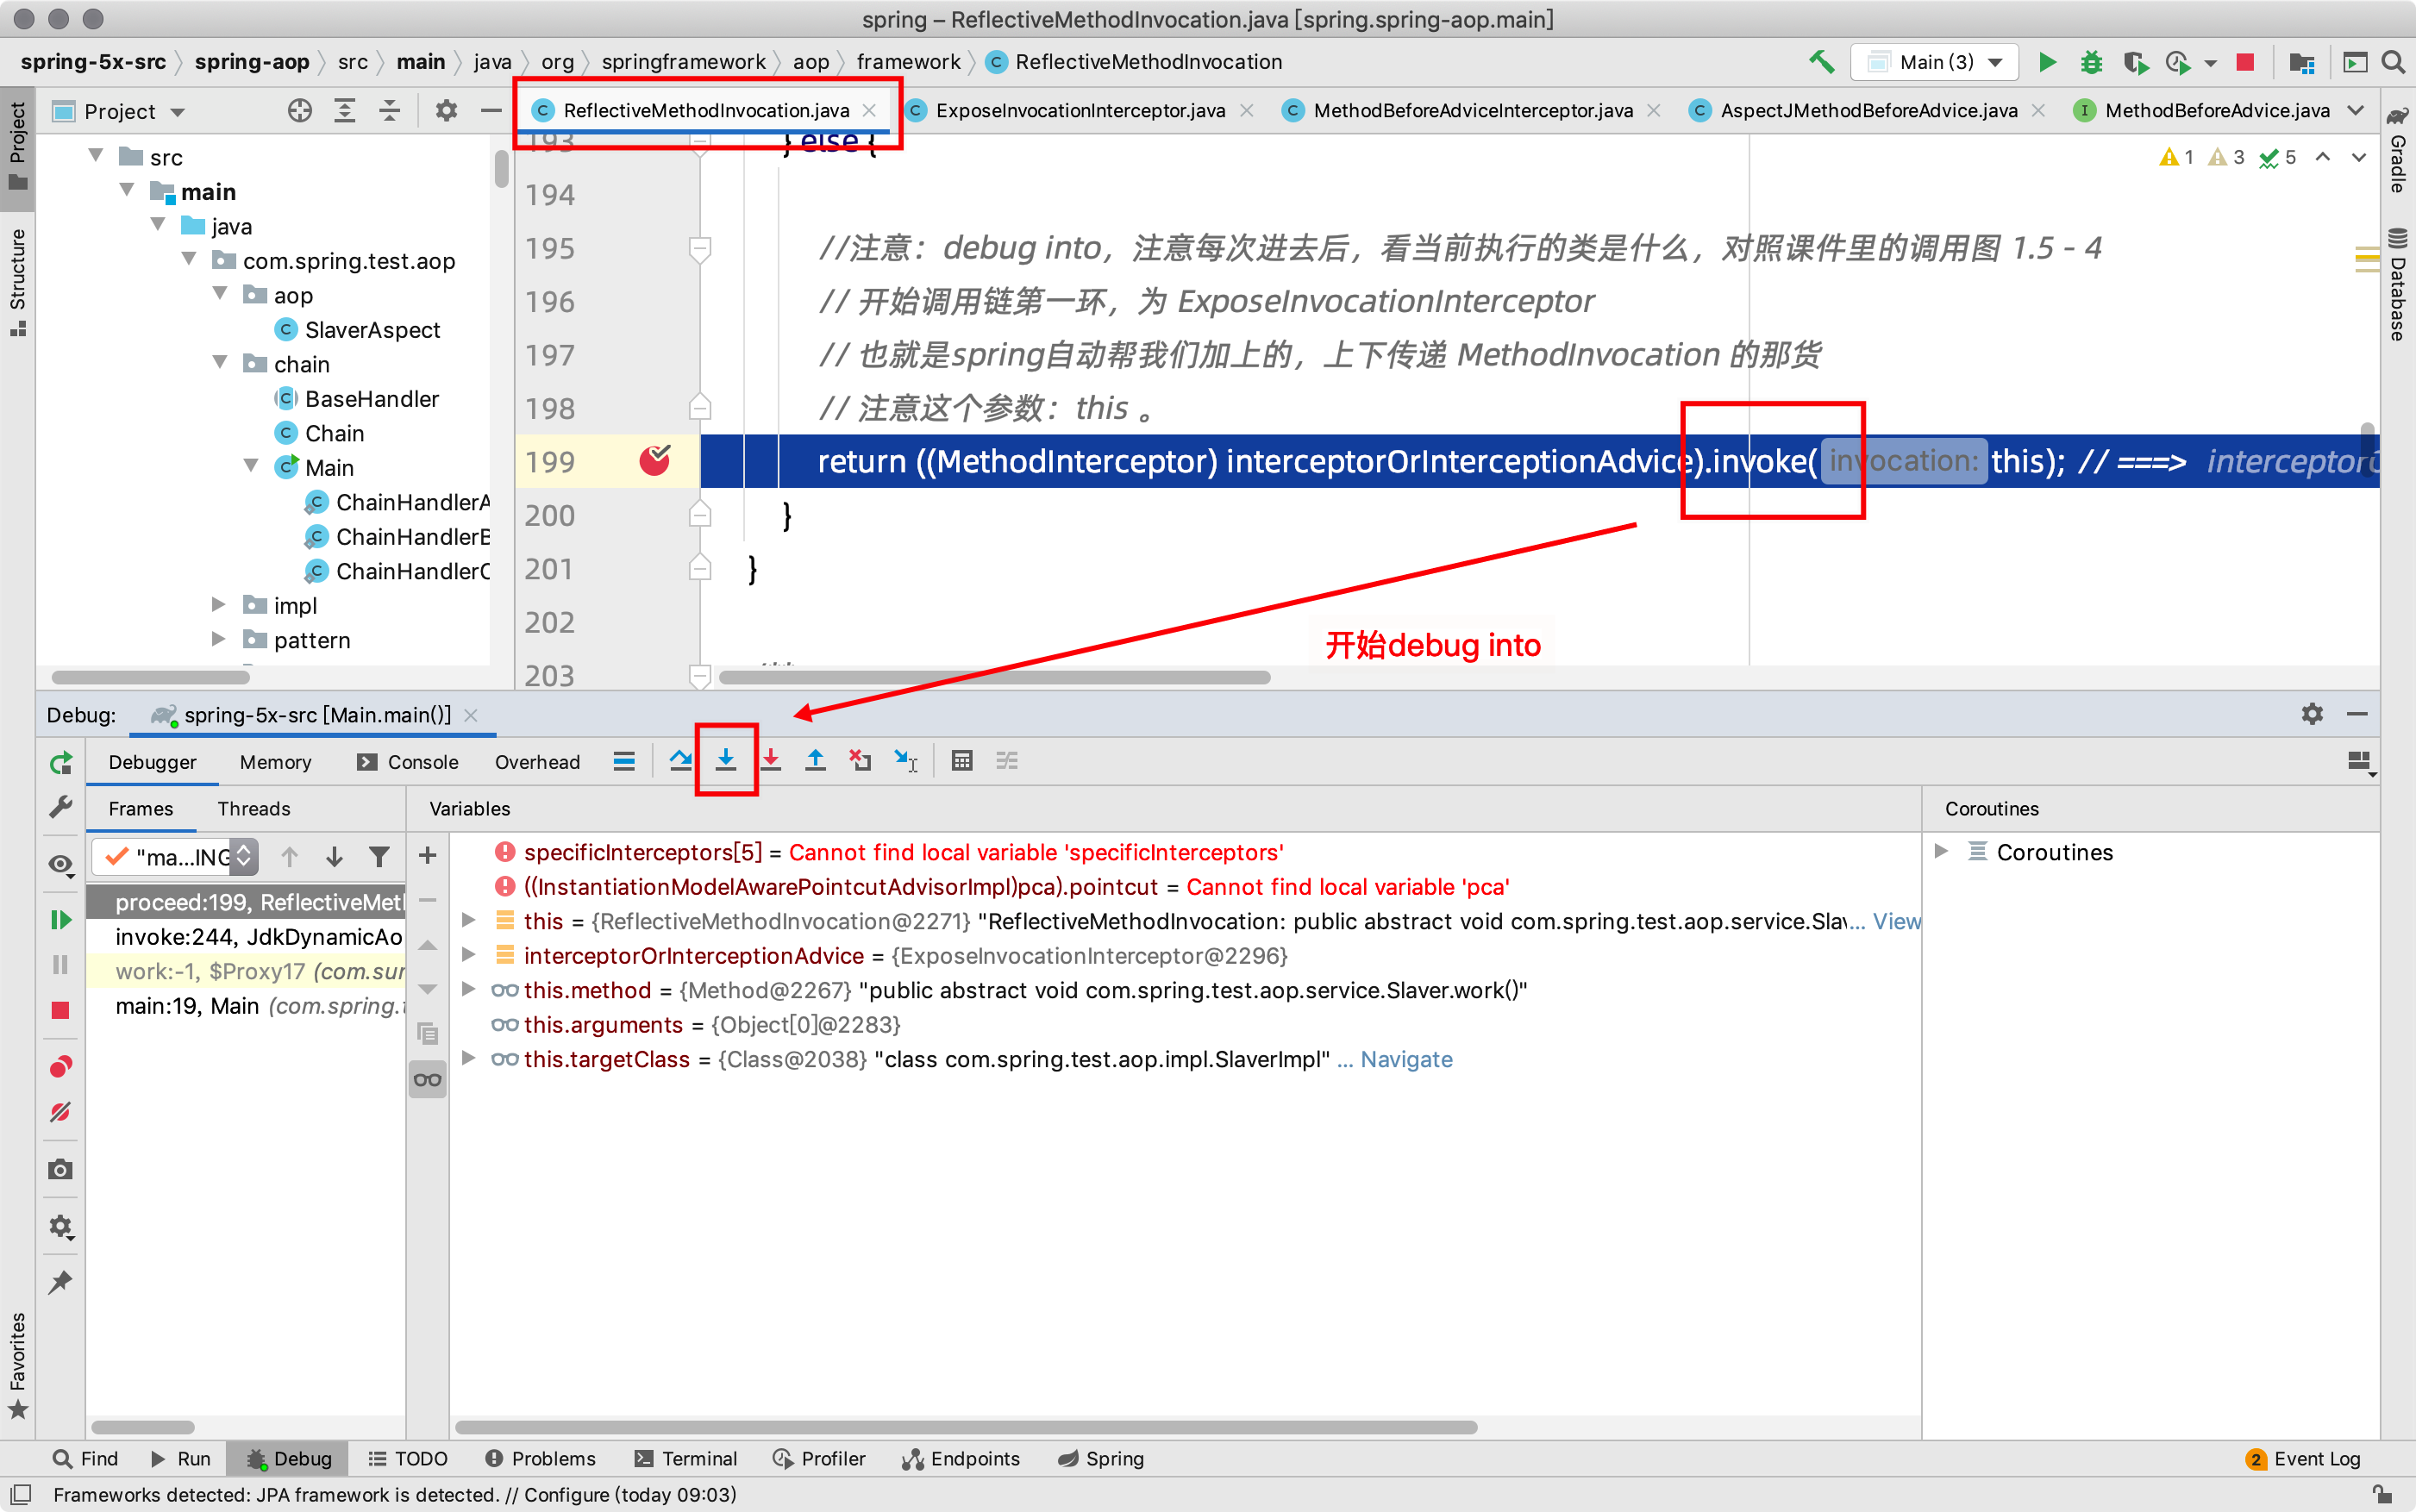
案例:第一环,遇proceed,再 debug into
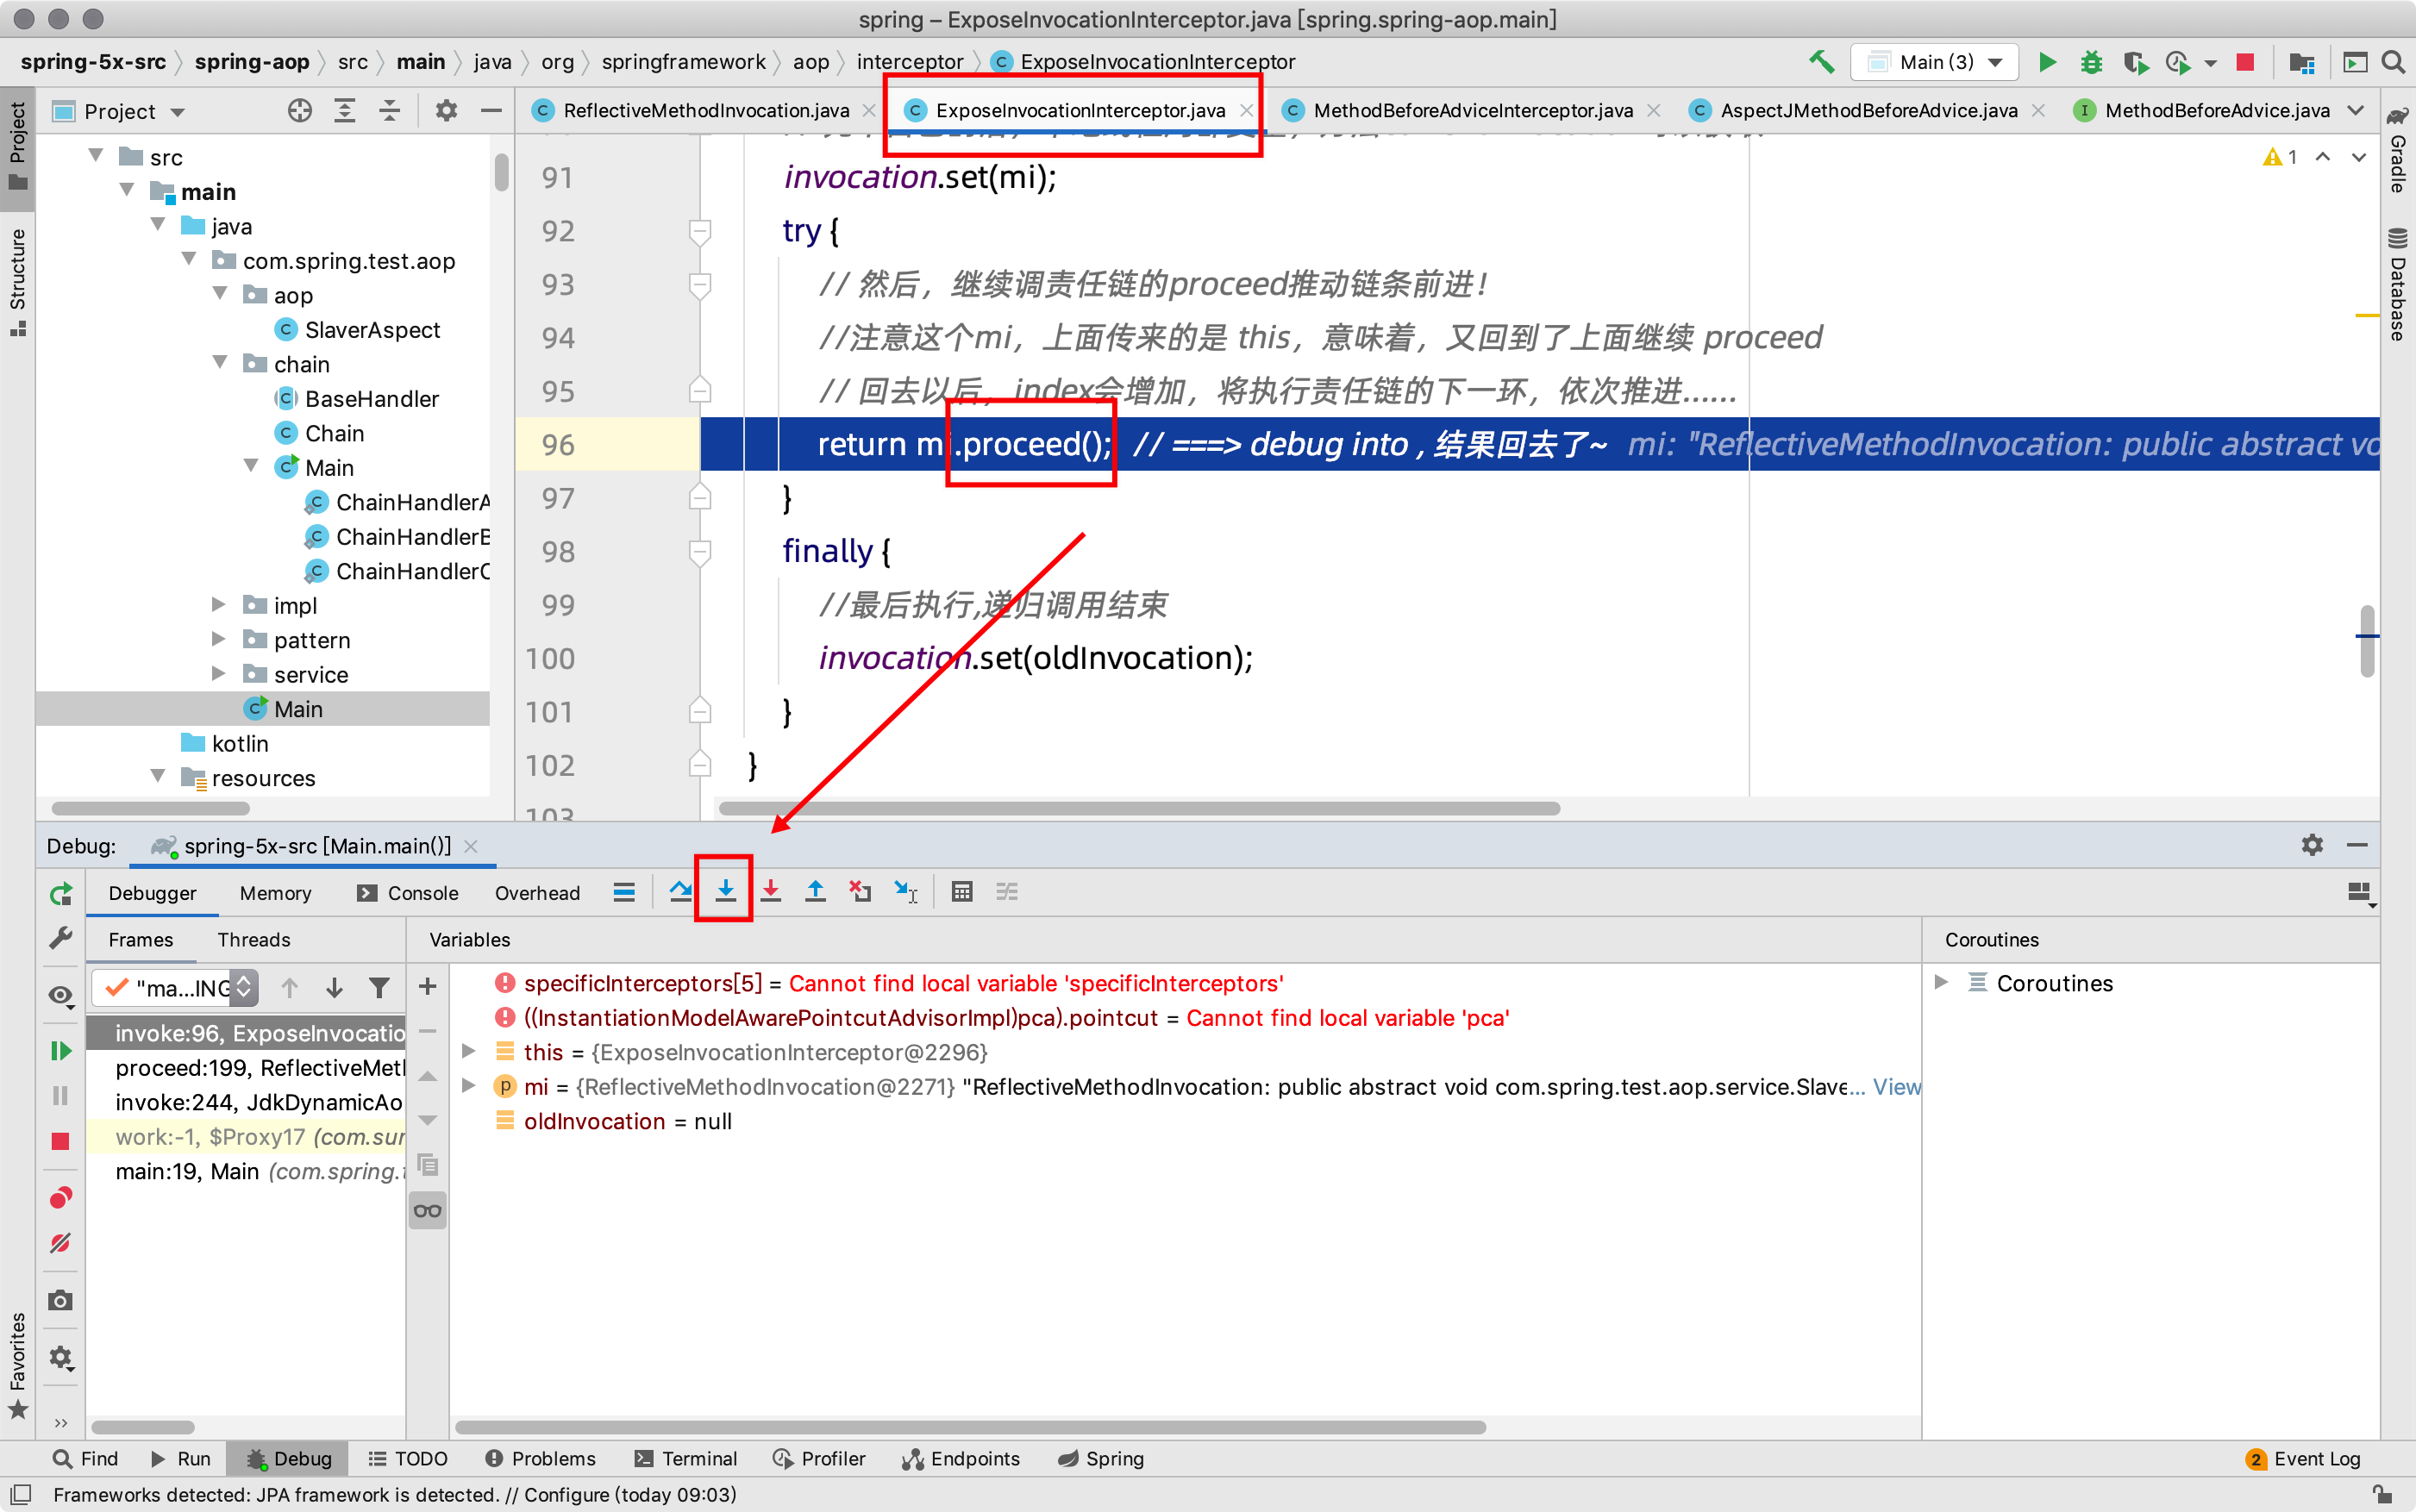
依次循环,步步跟进,其乐无穷~~~
2 AOP基础 - 代理模式(助学)
2.1 设计模式之代理
- 背景
- 举个例子
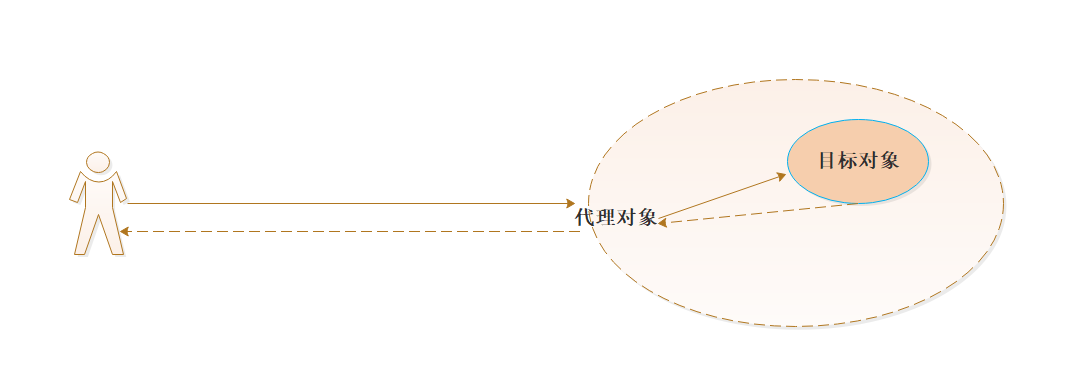
- 假设我们想邀请一位明星,不联系明星
- 而是联系明星的经纪人,来达到邀请的的目的
- 明星就是一个目标对象,他只要负责活动中的节目,而其他琐碎的事情就交给他的代理人(经纪人)来解决.
- 这就是代理思想在现实中的一个例子
代理(Proxy)是一种设计模式
提供了对目标对象另外的访问方式;即通过代理对象访问目标对象.
这样做的好处是:可以在目标对象实现的基础上,增强额外的功能操作
代理模式分类
1、静态代理
2、动态代理
2.2 静态代理模式
静态代理在使用时:
需要定义接口、目标对象与代理对象
重要特点:
静态代理是由程序员创建或工具生成代理类的源码,再编译代理类。
接口- //接口
- public interface IStartBusiness {
- //邀请明星唱歌
- void sing();
- }
- //目标对象,实现类
- public class StartBusinessImpl implements IStartBusiness {
- @Override
- public void sing() {
- System.out.println("sing>>>>>>>>>>>>>>>>>>>>>>>>>>>");
- }
- }
- package com.spring.test.aop.pattern.proxy.staticproxy;
- //代理对象,静态代理
- public class AgentProxy implements IStartBusiness {
- //代理类持有一个目标类的对象引用
- private IStartBusiness iStartBusiness;
- //构造注入目标对象
- public AgentProxy(IStartBusiness iStartBusiness) {
- this.iStartBusiness = iStartBusiness;
- }
- @Override
- public void sing() {
- //**********方法前增强****************
- //do something
- //将请求分派给目标类执行;通过注入进入来的目标对象进行访问
- this.iStartBusiness.sing();
- //do after
- //**********方法后增强****************
- }
- }
- package com.spring.test.aop.pattern.proxy.staticproxy;
- //静态代理测试
- public class Test {
- public static void main(String[] args) {
- //目标对象
- IStartBusiness target = new StartBusinessImpl();
- //代理对象,把目标对象传给代理对象,建立代理关系
- IStartBusiness proxy = new AgentProxy(target);
- //调用的时候通过调用代理对象的方法来调用目标对象
- proxy.sing();
- }
- }

优点:
可以在被代理方法的执行前或后加入别的代码,实现诸如权限及日志的操作。
缺点:
1、如果接口增加一个方法,除了所有实现类需要实现这个方法外,所有代理类也需要实现此方法
总结:(记住两点)
1、只需要知道静态代理是在运行前代理类就已经被织入进去了
2、大规模使用静态代理难以维护(增加方法)
有没有其他的方式可以减少代码的维护,那就是动态代理?
2.3 动态代理模式
什么是动态代理?
动态代理类的源码是在程序运行期间由JVM根据反射等机制动态织入的,
所以;不存在代理类的字节码文件,直接进了虚拟机。(但是有办法给抓到他)
JDK中生成代理对象的API最重要类和接口有两个,如下
Proxy
InvocationHandler
1)代理父类Proxy回顾
所在包:java.lang.reflect.Proxy
这是 Java 动态代理机制生成的所有动态代理类的父类,
提供了一组静态方法来为一组接口动态地生成代理类及其对象。
Proxy类的静态方法(了解)- // 方法 1: 该方法用于获取指定代理对象所关联的调用处理器
- static InvocationHandler getInvocationHandler(Object proxy)
-
- // 方法 2:该方法用于获取关联于指定类装载器和一组接口的动态代理类的类对象
- static Class getProxyClass(ClassLoader loader, Class[] interfaces)
-
- // 方法 3:该方法用于判断指定类对象是否是一个动态代理类
- static boolean isProxyClass(Class cl)
-
- // 方法 4:该方法用于为指定类装载器、一组接口及调用处理器生成动态代理类实例
- static Object newProxyInstance(ClassLoader loader, Class[] interfaces, InvocationHandler h)
tips:重要
重点关注newProxyInstance
这三个参数非常重要
Spring Aop也是使用这个机制
- public static Object newProxyInstance(ClassLoader loader,
- Class<?>[] interfaces,
- InvocationHandler h)
- throws IllegalArgumentException
- ClassLoader loader,:指定当前目标对象使用类加载器 ;负责将类的字节码装载到 Java 虚拟机(JVM)中并为其定义类对象
- Class[] interfaces,:目标对象实现的接口的类型,使用泛型方式确认类型
- InvocationHandler h:事件处理,执行目标对象的方法时,会触发事件处理器的方法,会把当前执行目标对象的方法作为参数传入
2)调用处理器接口回顾
java.lang.reflect.InvocationHandler
这是调用处理器接口,它自定义了一个 invoke 方法(只有一个)
用于集中处理在动态代理类对象上的方法调用,通常在该方法中实现对目标类的代理访问。
每次生成动态代理类对象时都要指定一个对应的调用处理器对象。
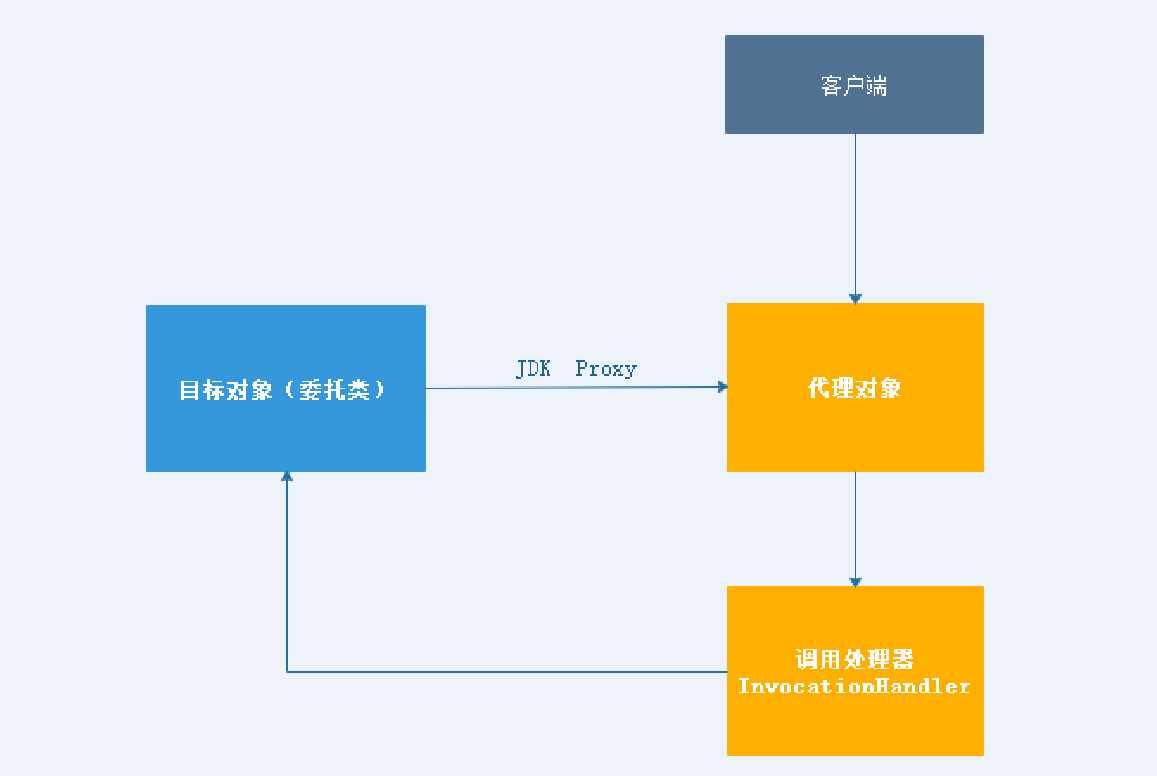
1、目标对象(委托类)通过jdk的Proxy生成了代理对象、
2、客户端访问代理对象,代理对象通过调用于处理器接口反射调用了目标对象方法
InvocationHandler的核心方法
仅仅一个方法- public interface InvocationHandler {
- //第一个参数既是代理类实例
- //第二个参数是被调用的方法对象
- // 第三个方法是调用参数
- Object invoke(Object proxy, Method method, Object[] args)
- }
沿用上面的 例子
tips
代理对象不需要实现接口(业务),但是目标对象一定要实现接口,否则不能用动态代理
接口
目标对象接口- package com.spring.test.aop.pattern.proxy.dynamic;//接口
- public interface IStartBusiness {
- //邀请明星唱歌
- void sing();
- }
- //目标对象
- public class StartBusinessImpl implements IStartBusiness {
- @Override
- public void sing() {
- System.out.println("sing>>>>>>>>>>>>>>>>>>>>>>>>>>>");
- }
- }
- package com.spring.test.aop.pattern.proxy.dynamic;
- import java.lang.reflect.InvocationHandler;
- import java.lang.reflect.Method;
- //动态代理实现
- public class DynamicProxy implements InvocationHandler {
- // 这个就是我们要代理的真实对象
- private Object obj;
- // 构造方法,给我们要代理的真实对象赋初值
- public DynamicProxy(Object object) {
- this.obj = object;
- }
- //相比静态代理,动态代理减只需要实现一个接口即可完成,而静态代理每次都要实现新加的方法以及维护被代理方法
-
- //第一个参数既是代理类实例
- //第二个参数是被调用的方法对象
- // 第三个方法是调用参数
- @Override
- public Object invoke(Object object, Method method, Object[] args)
- throws Throwable {
- //********************方法前增强***************************
- // 反射调用目标方法
- return method.invoke(obj, args);
-
- //********************方法后增强***************************
- }
- }
- package com.spring.test.aop.pattern.proxy.dynamic;import com.spring.test.aop.pattern.proxy.staticproxy.IStartBusiness;import java.lang.reflect.InvocationHandler;import java.lang.reflect.Proxy;//动态代理测试//目标://1、知道如何创建动态代理//2、如何调用了invoke方法(拦截方法会用到当前知识点)public class Test { public static void main(String[] args) { // 目标对象;要代理的真实对象 IStartBusiness target = new StartBusinessImpl(); // 我们要代理哪个真实对象,就将该对象传进去,最后是通过该真实对象来调用其方法的 InvocationHandler handler = new DynamicProxy(target); /* * 第一个参数:目标对象加载器 * 第二个参数:目标对象接口 * 第三个参数:实现InvocationHandler的代理类 */ //生成代理对象 IStartBusiness iStartBusiness = (IStartBusiness) Proxy.newProxyInstance(target.getClass().getClassLoader(), target<?xml version="1.0" encoding="UTF-8"?>
- <beans xmlns="http://www.springframework.org/schema/beans"
- xmlns:aop="http://www.springframework.org/schema/aop"
- xmlns:xsi="http://www.w3.org/2001/XMLSchema-instance"
- xmlns:context="http://www.springframework.org/schema/context"
- xsi:schemaLocation="http://www.springframework.org/schema/beans
- http://www.springframework.org/schema/beans/spring-beans.xsd
- http://www.springframework.org/schema/aop
- http://www.springframework.org/schema/aop/spring-aop.xsd http://www.springframework.org/schema/context http://www.springframework.org/schema/context/spring-context.xsd"
- >
-
- <aop:aspectj-autoproxy/>
-
- <context:component-scan base-package="com.spring.test.aop"/>
- </beans>.getClass().getInterfaces(), handler); iStartBusiness.sing(); }}

总结
1、相比静态代理,动态代理减只需要实现一个接口即可完成,而静态代理每次都要实现新加的方法以及维护被代理方法
2、动态代理是靠Proxy.newProxyInstance() 生成的
3、动态代理在调用(iStartBusiness.sing())的时候,调用到了 implements InvocationHandler 的invoke
目标明确了:spring的代理就需要我们找到 Proxy.newProxyInstance() 在哪里……
4)动态代理原理(了解)
tips:
涉及JDK字节码,不在spring的源码范围内,感兴趣的同学自己了解一下
参考资料:https://www.baiyp.ren/JAVA动态代理源码分析.html
代理对象内部生成流程调用链,如下图
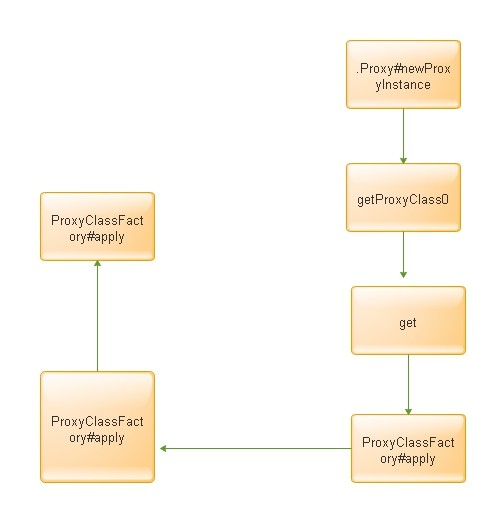
对象生成过程(核心)
Proxy.newProxyInstance(classLoader, proxiedInterfaces, this);
进入newProxyInstance方法内部
java.lang.reflect.Proxy#newProxyInstance
重点关注核心方法getProxyClass0- //使用jdk代理工厂创建新的代理实例@CallerSensitive public static Object newProxyInstance(ClassLoader loader,
- Class<?>[] interfaces,
- InvocationHandler h)
- throws IllegalArgumentException { //判断是否实现InvocationHandler接口,如果此处为空抛出异常 //当前h非常重要,因为在代理对象调用目标方法的时候,就是通过d的invoke方法反射调用的目标方法 //稍后会讲解 Objects.requireNonNull(h); //克隆参数传来的 接口 final Class[] intfs = interfaces.clone(); //系统内部的安全 final SecurityManager sm = System.getSecurityManager(); if (sm != null) { //访问权限的验证 checkProxyAccess(Reflection.getCallerClass(), loader, intfs); } /* *查找或生成指定的代理类;非常重要,重点关注 */ Class cl = getProxyClass0(loader, intfs); /* * Invoke its constructor with the designated invocation handler. */ try { if (sm != null) { //代理权限的检查(此处是新生产的代理对象c1) checkNewProxyPermission(Reflection.getCallerClass(), cl); } //从生成的代理对象(只是class对象,还不是实例化对象)中取出构造器 final Constructor cons = cl.getConstructor(constructorParams); final InvocationHandler ih = h; if (!Modifier.isPublic(cl.getModifiers())) { AccessController.doPrivileged(new PrivilegedAction() { public Void run() { cons.setAccessible(true); return null; } }); } //使用构造器实例化(实例化对象) return cons.newInstance(new Object[]{h}); } catch (IllegalAccessException|InstantiationException e) { throw new InternalError(e.toString(), e); } catch (InvocationTargetException e) { Throwable t = e.getCause(); if (t instanceof RuntimeException) { throw (RuntimeException) t; } else { throw new InternalError(t.toString(), t); } } catch (NoSuchMethodException e) { throw new InternalError(e.toString(), e); } }
java.lang.reflect.Proxy#getProxyClass0- private static Class<?> getProxyClass0(ClassLoader loader,
- Class<?>... interfaces) {
- //判断接口数组大小,别大于65535,如果大于,提示接口超出限制
- if (interfaces.length > 65535) {
- throw new IllegalArgumentException("interface limit exceeded");
- }
- //通过接口和类加载器创建代理
- //给定的接口存在,这将简单地返回缓存副本;
- //否则,它将通过ProxyClassFactory创建代理类
- return proxyClassCache.get(loader, interfaces);//也就是查询+创建的过程
- }
java.lang.reflect.WeakCache#get
其他不要看
重点关注apply方法- public V get(K key, P parameter) {
- Objects.requireNonNull(parameter);
- expungeStaleEntries();
- Object cacheKey = CacheKey.valueOf(key, refQueue);
- // lazily install the 2nd level valuesMap for the particular cacheKey
- ConcurrentMap<Object, Supplier<V>> valuesMap = map.get(cacheKey);
- if (valuesMap == null) {
- ConcurrentMap<Object, Supplier<V>> oldValuesMap
- = map.putIfAbsent(cacheKey,
- valuesMap = new ConcurrentHashMap<>());
- if (oldValuesMap != null) {
- valuesMap = oldValuesMap;
- }
- }
- // create subKey and retrieve the possible Supplier<V> stored by that
- // subKey from valuesMap
- Object subKey = Objects.requireNonNull(subKeyFactory.apply(key, parameter));
- Supplier<V> supplier = valuesMap.get(subKey);
- Factory factory = null;
- while (true) {
- if (supplier != null) {
- // supplier might be a Factory or a CacheValue<V> instance
- V value = supplier.get();
- if (value != null) {
- return value;
- }
- }
- // else no supplier in cache
- // or a supplier that returned null (could be a cleared CacheValue
- // or a Factory that wasn't successful in installing the CacheValue)
- // lazily construct a Factory
- if (factory == null) {
- factory = new Factory(key, parameter, subKey, valuesMap);
- }
- if (supplier == null) {
- supplier = valuesMap.putIfAbsent(subKey, factory);
- if (supplier == null) {
- // successfully installed Factory
- supplier = factory;
- }
- // else retry with winning supplier
- } else {
- if (valuesMap.replace(subKey, supplier, factory)) {
- // successfully replaced
- // cleared CacheEntry / unsuccessful Factory
- // with our Factory
- supplier = factory;
- } else {
- // retry with current supplier
- supplier = valuesMap.get(subKey);
- }
- }
- }
- }
java.lang.reflect.Proxy.ProxyClassFactory#apply- //目的
- //1、判断;比如当前的class是否对加载器可见;访问权限。是否public的
- //2、生成class字节码文件
- //3、调用本地方法;通过class字节码文件生成class对象
- @Override
- public Class<?> apply(ClassLoader loader, Class<?>[] interfaces) {
- Map<Class<?>, Boolean> interfaceSet = new IdentityHashMap<>(interfaces.length);
- for (Class<?> intf : interfaces) {
- /*
- * Verify that the class loader resolves the name of this
- * interface to the same Class object.
- */
- Class<?> interfaceClass = null;
- try {
- //当前的class是否对加载器可见
- interfaceClass = Class.forName(intf.getName(), false, loader);
- } catch (ClassNotFoundException e) {
- }
- if (interfaceClass != intf) {
- throw new IllegalArgumentException(
- intf + " is not visible from class loader");
- }
- /*
- * 验证类对象是否实际表示接口
- *
- */
- if (!interfaceClass.isInterface()) {
- throw new IllegalArgumentException(
- interfaceClass.getName() + " is not an interface");
- }
- /*
- * 验证此接口不是重复的。
- */
- if (interfaceSet.put(interfaceClass, Boolean.TRUE) != null) {
- throw new IllegalArgumentException(
- "repeated interface: " + interfaceClass.getName());
- }
- }
- String proxyPkg = null; // package to define proxy class in
- int accessFlags = Modifier.PUBLIC | Modifier.FINAL;
- /*
- * Record the package of a non-public proxy interface so that the
- * proxy class will be defined in the same package. Verify that
- * all non-public proxy interfaces are in the same package.
- */
- for (Class<?> intf : interfaces) {
- int flags = intf.getModifiers();
-
- if (!Modifier.isPublic(flags)) {
- accessFlags = Modifier.FINAL;
- String name = intf.getName();
- int n = name.lastIndexOf('.');
- String pkg = ((n == -1) ? "" : name.substring(0, n + 1));
- if (proxyPkg == null) {
- proxyPkg = pkg;
- } else if (!pkg.equals(proxyPkg)) {
- //是否public的
- throw new IllegalArgumentException(
- "non-public interfaces from different packages");
- }
- }
- }
- if (proxyPkg == null) {
- // 如果没有非公共代理接口,请使用com.sun.proxy
- proxyPkg = ReflectUtil.PROXY_PACKAGE + ".";
- }
- /*
- * 这里需要注意下.他对应的是代理对象proxy后的数值;比如$proxy100
- *这里的100;就是此处原子生成
- */
- long num = nextUniqueNumber.getAndIncrement();
- //$proxy100;非常熟悉了;通过断点查看代理对象看到的,就是从这里生成的
- //proxyClassNamePrefix这个前缀就是 $
- //这个proxyPkg就是com.sun.proxy
- String proxyName = proxyPkg + proxyClassNamePrefix + num;
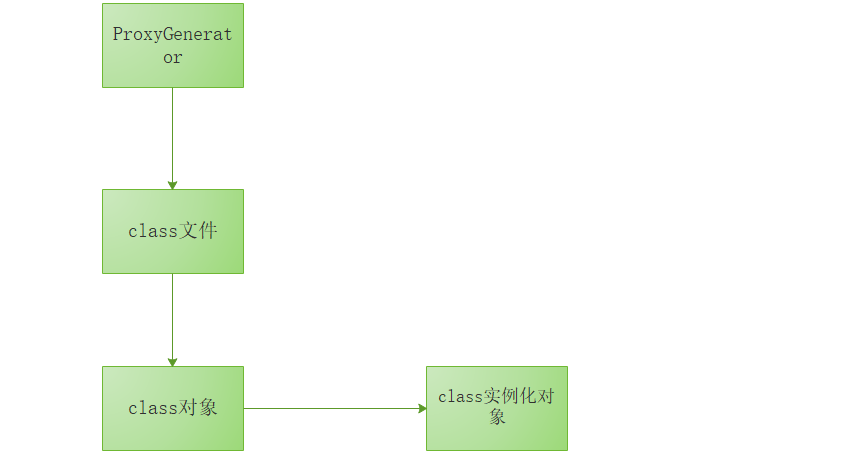
- /*
- *使用ProxyGenerator里面的工具类,帮助我们生成代理类的class内容
- 注意。此处存储到byte数组;目前还不是class对象
- */
- byte[] proxyClassFile = ProxyGenerator.generateProxyClass(
- proxyName, interfaces, accessFlags);
- try {
- //此处才是真正的class对象(注意;虽然是对象;但是还没有实例化)
- return defineClass0(loader, proxyName,
- proxyClassFile, 0, proxyClassFile.length);
- } catch (ClassFormatError e) {
- /*
- * A ClassFormatError here means that (barring bugs in the
- * proxy class generation code) there was some other
- * invalid aspect of the arguments supplied to the proxy
- * class creation (such as virtual machine limitations
- * exceeded).
- */
- throw new IllegalArgumentException(e.toString());
- }
- }
- }
核心代码参看以上注释
断点查看slaver.work()- ApplicationContext context =<?xml version="1.0" encoding="UTF-8"?>
- <beans xmlns="http://www.springframework.org/schema/beans"
- xmlns:aop="http://www.springframework.org/schema/aop"
- xmlns:xsi="http://www.w3.org/2001/XMLSchema-instance"
- xmlns:context="http://www.springframework.org/schema/context"
- xsi:schemaLocation="http://www.springframework.org/schema/beans
- http://www.springframework.org/schema/beans/spring-beans.xsd
- http://www.springframework.org/schema/aop
- http://www.springframework.org/schema/aop/spring-aop.xsd http://www.springframework.org/schema/context http://www.springframework.org/schema/context/spring-context.xsd"
- >
-
- <aop:aspectj-autoproxy/>
-
- <context:component-scan base-package="com.spring.test.aop"/>
- </beans>new ClassPathXmlApplicationContext("classpath*:application-aop.xml"); Slaver slaver = (Slaver) context.getBean("slaverImpl"); //使用代理调用了JdkDynamicAopProxy.invoke slaver.work(); System.out.println("over>>>>>>>>>>");
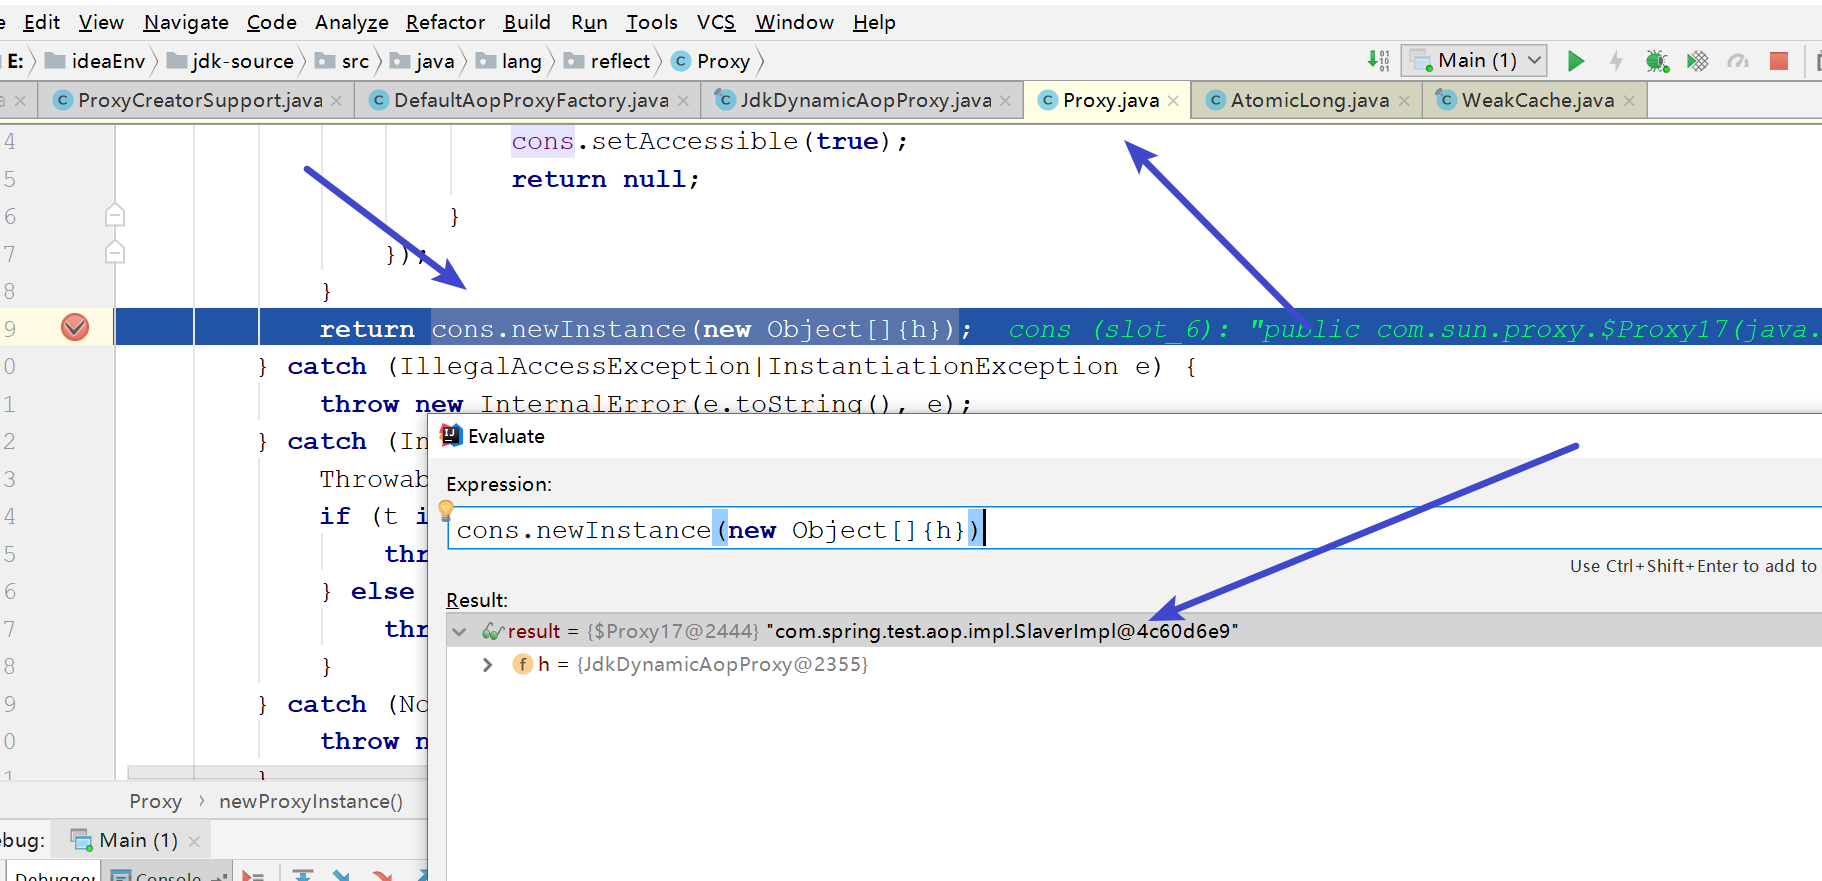
最终这个才是实例化的对象(如上)
本文由传智教育博学谷教研团队发布。
如果本文对您有帮助,欢迎关注和点赞;如果您有任何建议也可留言评论或私信,您的支持是我坚持创作的动力。
转载请注明出处!
免责声明:如果侵犯了您的权益,请联系站长,我们会及时删除侵权内容,谢谢合作! |


