SpringCloud OpenFeign-服务调用
1.OpenFeign介绍
https://github.com/spring-cloud/spring-cloud-openfeign
- OpenFeign是一个声明式WebService客户端,使用OpenFeign让编写Web Service客户端更加简单
- 它的使用方法是定义一个服务端口然后在上面添加注解
- OpenFeign也支持可插拔式的编码器和解码器
- SpringCloud对OpenFeign进行了封装使其支持SpringMVC标准注解和HttpMessageConverters消息转换器
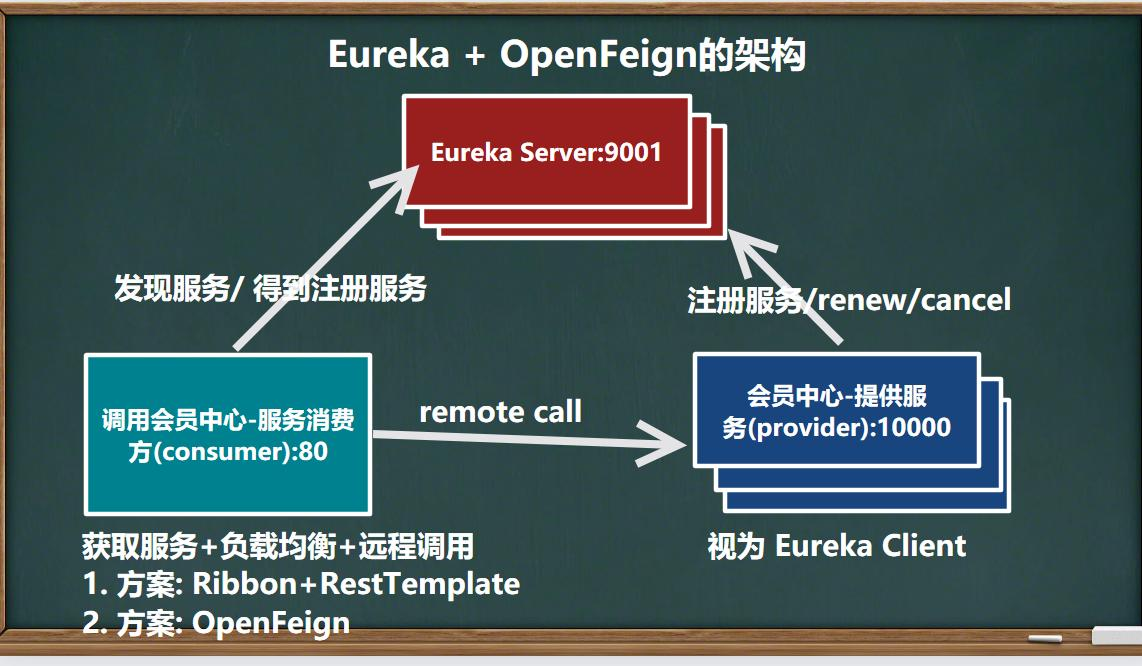
- OpenFeign可以与Eureka和Ribbon组合使用以支持负载均衡
2.OpenFeign和Feign的区别
- Feign
- Feign是SpringCloud组件中的一个轻量级RESTful的Http服务客户端
- Feign内置了Ribbon,用来做客户端负载均衡,去调用服务注册中心的服务
- Feign的使用方法是:使用Feign的注解定义接口,调用服务注册中心的服务
- Feign支持的注解和用法请参考官方文档:OpenFeign/feign: Feign makes writing java http clients easier (github.com)
- Feign本身不支持SpringMVC注解,它有一套自己的注解
- Feign集成了Ribbon、RestTemplate实现了负载均衡的执行Http调用,只不过对原有的方式(Ribbon+RestTemplate)进行了封装,开发者不必手动使用RestTemplate调服务,而是定义一个接口,在这个接口中标注一个注解即可完成服务调用,这样更加符合面向接口编程的宗旨,简化了开发。
- OpenFeign
- OpenFeign是SpringCloud在Feign的基础上支持了SpringMVC的注解,如@RequestMapping等
- OpenFeign的@FeignClient可以解析SpringMVC的@RequestMapping注解下的接口
- OpenFeign通过动态代理的方式产生实现类,实现类中做负载均衡并调用其他服务
- 一句话:OpenFeign就是在Feign的基础上做了加强
3.OpenFeign应用实例
需求分析:如下,将原来使用Ribbon+RestTemplate实现:获取服务+远程调用+负载均衡,替换为使用OpenFeign来实现
 参考 member-service-consumer-80 创建 member-service-consumer-openfeign-80(步骤参考以前)
(1)创建新模块-member-service-consumer-openfeign-80
(2)修改 pom.xml:拷贝 member-service-consumer-80 的 pom.xml 依赖,并加入 openfeign-starter- <dependency>
- <groupId>org.springframework.cloud</groupId>
- <artifactId>spring-cloud-starter-openfeign</artifactId>
- </dependency>
- server:
- port: 80
- spring:
- application:
- name: e-commerce-consumer-openfeign-80
- eureka:
- client:
- register-with-eureka: true #将自己注册到EurekaServer
- fetch-registry: true
- service-url:
- #将自己注册都哪个EurekaServer
- defaultZone: http://eureka9001.com:9001/eureka,http://eureka9002.com:9002/eureka
- package com.li.springcloud;
- import org.springframework.boot.SpringApplication;
- import org.springframework.boot.autoconfigure.SpringBootApplication;
- import org.springframework.cloud.netflix.eureka.EnableEurekaClient;
- import org.springframework.cloud.openfeign.EnableFeignClients;
- /**
- * @author 李
- * @version 1.0
- */
- @SpringBootApplication
- @EnableEurekaClient
- @EnableFeignClients//启动OpenFeignClient
- public class MemberConsumerOpenfeignApplication {
- public static void main(String[] args) {
- SpringApplication
- .run(MemberConsumerOpenfeignApplication.class,args);
- }
- }
- @FeignClient(value = "MEMBER-SERVICE-PROVIDER") 指定远程调用的地址别名
- 注意这里的 @GetMapping("/member/get/{id}") 指定要调用服务方的哪个方法,路径要和服务方的路径匹配。这是OpenFeign支持的SpringMVC的注解
- package com.li.springcloud.service;
- import com.li.springcloud.entity.Member;
- import com.li.springcloud.utils.Result;
- import org.springframework.cloud.openfeign.FeignClient;
- import org.springframework.stereotype.Component;
- import org.springframework.web.bind.annotation.GetMapping;
- import org.springframework.web.bind.annotation.PathVariable;
- /**
- * @author 李
- * @version 1.0
- */
- @Component
- //MEMBER-SERVICE-PROVIDER 是服务提供方[集群]注册到EurekaServer的别名
- //根据这个key,可以在EurekaServer提供的注册信息中找到对应value,即真正的服务方地址:http://ip+port
- @FeignClient(value = "MEMBER-SERVICE-PROVIDER")
- public interface MemberFeignService {
- //定义方法-远程调用的接口
- /**
- * 1.远程调用的方式是get
- * 2.远程调用的url http://ip+port/member/get/{id}
- * 3.MEMBER-SERVICE-PROVIDER 是服务提供方[集群]注册到EurekaServer的别名
- * 4.OpenFeign会根据负载均衡来决定要掉用服务提供方的哪个节点(默认是轮询)
- * 5.OpenFeign的好处是支持了SpringMVC注解+使用接口解耦
- * @param id
- * @return
- */
- @GetMapping("/member/get/{id}")
- public Result<Member> getMemberById(@PathVariable("id") Integer id);
- }
这里的@GetMapping("/member/consumer/openfeign/get/{id}"),是消费方给浏览器的接口。- package com.li.springcloud.controller;
- import com.li.springcloud.service.MemberFeignService;
- import com.li.springcloud.utils.Result;
- import org.springframework.web.bind.annotation.GetMapping;
- import org.springframework.web.bind.annotation.PathVariable;
- import org.springframework.web.bind.annotation.RestController;
- import javax.annotation.Resource;
- /**
- * @author 李
- * @version 1.0
- */
- @RestController
- public class MemberConsumerFeignController {
- //装配MemberFeignService,
- //使用时该接口会对应一个代理对象,通过代理对象可以该接口的方法
- @Resource
- private MemberFeignService memberFeignService;
- @GetMapping("/member/consumer/openfeign/get/{id}")
- public Result getMemberById(@PathVariable("id") Integer id) {
- return memberFeignService.getMemberById(id);
- }
- }
 注意事项和使用细节 注意事项和使用细节
- OpenFeign使用特点是 微服务调用接口+@FeignClient,使用接口进行解耦
- 接口中的@FeignClient(value = "MEMBER-SERVICE-PROVIDER"),这里的MEMBER-SERVICE-PROVIDER就是Eureka Server的服务提供方注册的别名,底层会通过这个别名(key)找到真正的地址(value)
- 接口中的方法,value是不能乱写的,要根据服务消费方的url一致,否则无法访问到服务消费方对应的方法

4.OpenFeign的日志配置
4.1基本介绍
- Feign提供了日志打印功能,可以通过配置来调整日志级别,从而对Feign接口的调用情况进行监控和输出
- 日志级别
- NONE:默认的,不显示任何日志
- BASIC:仅记录请求方法、URL、响应状态码和执行时间
- HEADERS:除了BASIC中定义的信息之外,还有请求和响应的头信息
- FULL:除了HEADERS中定义的信息之外,还有请求和响应的正文及元数据

4.2日志配置-应用实例
(1)在member-service-consumer-80创建OpenFeignConfig.java- package com.li.springcloud.config;
- import feign.Logger;
- import org.springframework.context.annotation.Bean;
- import org.springframework.context.annotation.Configuration;
- /**
- * @author 李
- * @version 1.0
- */
- @Configuration
- public class OpenFeignConfig {
- @Bean
- public Logger.Level loggerLevel() {
- return Logger.Level.FULL;
- }
- }
- logging:
- level:
- #对MemberFeignService接口调用过程打印信息-Debug
- com.li.springcloud.service.MemberFeignService: debug
常见的日志级别有 5 种,分别是 error、warn、info、debug、trace
error:错误日志,指比较严重的错误,对正常业务有影响,需要运维配置监控的;
warn:警告日志,一般的错误,对业务影响不大,但是需要开发关注;
info:信息日志,记录排查问题的关键信息,如调用时间、出参入参等等;
debug:用于开发 DEBUG 的,关键逻辑里面的运行时数据;
trace:最详细的信息,一般这些信息只记录到日志文件中。
(3)重启模块,浏览器访问消费模块,后台输出如下:
 5.OpenFeign超时时间配置 5.OpenFeign超时时间配置
OpenFeign调用服务的默认时长是1秒钟,也就是如果超过1秒没连接上或者超过1秒没响应,那么会相应的报错。
 而实际会因为业务的不同出现超出1秒的情况,这时我们需要调整超时时间: 而实际会因为业务的不同出现超出1秒的情况,这时我们需要调整超时时间:
https://cloud.tencent.com/developer/article/1444369
Feign 的负载均衡底层用的就是 Ribbon。在application.yml中添加如下配置,超过8秒没连接上报连接超时,如果超过8秒没有响应,报请求超时- #全局配置
- ribbon:
- # 设置feign客户端超时时间(OpenFeign默认支持ribbon),单位ms,默认超时时间为1s
- ReadTimeout: 8000
- #两端连接所用时间
- ConnectionTimeout: 8000
|


